The best Halloween decor for your home doesn’t have to be scary or expensive. It can be as simple or as elaborate as you like, and it can reflect your unique personality and style. Whether you prefer classic horror, whimsical, or gothic, there’s a Halloween decor theme out there for everyone.
From spooky outdoor displays to enchanting indoor decorations, this guide will help you create a Halloween haven that will be the envy of your neighborhood. We’ll explore everything from creating a cohesive theme to finding budget-friendly decor ideas, ensuring your Halloween celebration is both memorable and affordable.
Setting the Spooky Scene
Creating a cohesive theme for your Halloween decor is crucial for establishing a captivating and immersive atmosphere. A well-defined theme allows you to curate a cohesive look, guiding your choices for decorations, colors, and even your costume. This approach ensures a unified and memorable experience for both you and your guests.
Popular Halloween Themes
A cohesive theme provides a clear direction for your decorations, making the process more enjoyable and efficient. Let’s explore some popular Halloween themes and their unique characteristics:
- Classic Horror: This timeless theme evokes fear and suspense, drawing inspiration from iconic horror movies and literature. The color palette typically includes black, red, and gray, while common decor elements include cobwebs, skeletons, and spooky props. Lighting plays a crucial role, with dim, flickering lights and shadows enhancing the eerie atmosphere.
- Whimsical: This theme offers a lighthearted and playful take on Halloween, perfect for families with young children. Pastel colors like orange, purple, and green create a whimsical feel, while decorations may include friendly ghosts, pumpkins, and cute bats. Bright, cheerful lighting adds to the playful ambiance.
Creating the best Halloween decor for your home is all about getting creative and embracing the spooky spirit. One fun way to add a unique touch is by experimenting with natural dyes to color your fabrics and materials. Experimenting with natural dyes can be a fascinating process, using ingredients like turmeric, beetroot, and even coffee to achieve vibrant hues.
The resulting dyed fabrics can then be incorporated into your Halloween decorations, adding a touch of handcrafted charm to your spooky ambiance.
- Gothic: This theme embraces elegance and mystery, with a touch of darkness. Black, silver, and deep purple are dominant colors, while decorations may include lace, candles, and antique-looking props. Soft, dim lighting with candles or string lights creates a romantic and mysterious ambiance.
Creating the perfect Halloween atmosphere is all about the details. From spooky spiderwebs to flickering candlelight, every element contributes to the ambiance. But don’t forget about the feast! A hearty and delicious vegetarian lasagna like this meaty mushroom lasagna vegetarian friendly recipe will keep your guests full and satisfied, making your Halloween gathering truly memorable.
- Modern Halloween: This theme embraces contemporary trends, incorporating geometric shapes, metallic accents, and minimalist designs. Color palettes may include black, white, and silver, while decorations may include sleek pumpkins, geometric lanterns, and modern art installations. LED lights and string lights offer a modern touch.
Theme Exploration
The table below showcases different Halloween themes, their associated color palettes, common decor elements, and potential lighting options:
| Theme | Color Palette | Decor Elements | Lighting Options |
|---|---|---|---|
| Classic Horror | Black, Red, Gray | Cobwebs, Skeletons, Spooky Props | Dim, Flickering Lights, Shadows |
| Whimsical | Orange, Purple, Green | Friendly Ghosts, Pumpkins, Cute Bats | Bright, Cheerful Lighting |
| Gothic | Black, Silver, Deep Purple | Lace, Candles, Antique-Looking Props | Soft, Dim Lighting with Candles or String Lights |
| Modern Halloween | Black, White, Silver | Sleek Pumpkins, Geometric Lanterns, Modern Art Installations | LED Lights, String Lights |
Outdoor Halloween Decor Ideas
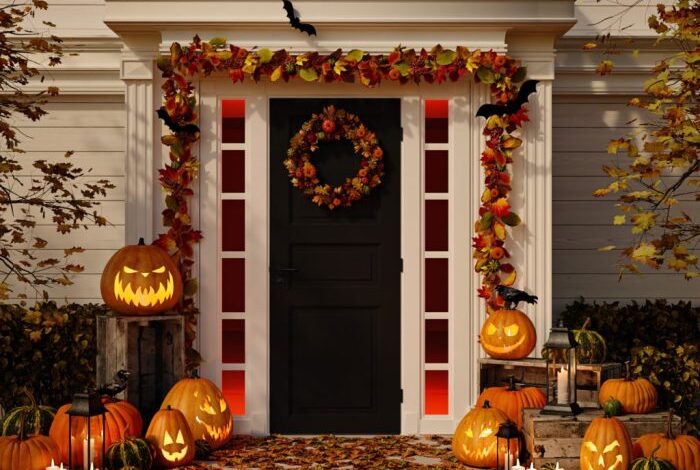
Transforming your home’s exterior into a spooky spectacle is a fun way to celebrate Halloween. A well-decorated front yard can set the stage for a memorable celebration, inviting trick-or-treaters and guests alike to immerse themselves in the Halloween spirit.
Creating a Welcoming and Spooky Entrance
A captivating entrance is essential for a memorable Halloween experience. Consider these tips to create a welcoming and spooky atmosphere:
- Porch Decorations:A well-decorated porch can be the focal point of your outdoor Halloween decor. Consider using a spooky doormat, a hanging ghost or witch, and a festive wreath.
- Lighting:Strategic lighting can dramatically enhance the ambiance of your entrance. Use string lights to create a warm glow, or opt for flickering LED candles to add a spooky touch.
- Yard Displays:Your yard offers a vast canvas for creative Halloween decorations. Consider adding inflatable ghosts, witches, and pumpkins, or create a graveyard scene with tombstones and eerie figures.
Incorporating Natural Elements
Natural elements like pumpkins, gourds, and foliage can add a rustic charm to your outdoor Halloween decor.
- Pumpkins:Carve pumpkins into spooky faces, paint them with eerie designs, or simply arrange them in a cluster for a classic Halloween display.
- Gourds:Gourds come in various shapes, sizes, and colors, adding a natural and unique touch to your decor. Arrange them in baskets or scatter them around your porch for a rustic touch.
- Foliage:Use branches, leaves, and vines to create a spooky atmosphere. You can create a simple wreath with dried branches and leaves or drape them around your porch for a touch of autumnal charm.
DIY Outdoor Decor Projects
Creating your own Halloween decorations can be a fun and rewarding experience. Here are some DIY projects that can be made with simple materials:
- Spooky Lanterns:Use mason jars, paint them with spooky designs, and add LED tea lights for a magical glow.
- Ghostly Silhouettes:Cut out ghost shapes from white fabric or paper and hang them from trees or your porch using string or wire.
- Creepy Crawly Decorations:Use cardboard, paint, and glue to create spiders, bats, and other creepy crawlies to hang from your porch or trees.
Indoor Halloween Decor Essentials
Creating a spooky ambiance inside your home is just as important as decorating the exterior. Indoor Halloween decor allows you to transform your living spaces into a hauntingly delightful experience. By incorporating key elements like table centerpieces, wall hangings, and lighting, you can set the stage for a truly memorable Halloween celebration.
From spooky spiderwebs to glowing jack-o’-lanterns, creating the perfect Halloween ambiance is all about the details. Don’t forget the finishing touch: a captivating costume! To complete your witchy look, check out these perfect cat eye eyeliner tricks for a mesmerizing, mysterious gaze.
With a few strategic touches, your home and your look will be the talk of the neighborhood this Halloween!
Table Centerpieces
Table centerpieces are an excellent way to add a touch of Halloween magic to your dining room or coffee table. They can be as simple or elaborate as you like, depending on your personal style and the overall theme of your decor.
- Classic Centerpieces: Consider using a classic black and orange color scheme, incorporating elements like pumpkins, gourds, and candles. A centerpiece featuring a carved pumpkin with a flickering candle inside is a timeless choice. You can also create a spooky centerpiece with a collection of black candles arranged in a cauldron or a vintage glass jar.
- Modern Centerpieces: For a more modern approach, incorporate metallic accents, geometric shapes, and unexpected materials. A centerpiece featuring a black metal skull surrounded by white gourds and black feathers creates a sophisticated and stylish look. You can also experiment with textures and patterns, such as using a patterned tablecloth with a centerpiece featuring a collection of black candles in glass holders.
Wall Hangings
Wall hangings are a great way to add visual interest and create a spooky atmosphere. They can be as simple as a few spiderwebs or as elaborate as a full-blown haunted scene.
- Classic Wall Hangings: Classic wall hangings include black and orange banners with Halloween greetings, spooky silhouettes, and even DIY ghost Artikels made from white fabric. These elements add a traditional touch to your Halloween decor.
- Modern Wall Hangings: Modern wall hangings can include geometric patterned banners, metallic Halloween-themed artwork, and even oversized paper bats. You can also create a unique wall hanging by using a collection of black and white photos with a spooky theme.
Lighting, The best halloween decor for your home
Lighting plays a crucial role in setting the mood for your Halloween decor. By using a combination of different light sources, you can create a truly spooky and immersive experience.
- Classic Lighting: Classic Halloween lighting often involves using candles, string lights, and lanterns. You can create a spooky atmosphere by using flickering candles in black or orange lanterns, or by hanging string lights with a spooky design.
- Modern Lighting: Modern lighting options include LED lights with a variety of colors and patterns, and even projectors that can create spooky images on your walls. You can create a modern Halloween vibe by using LED lights to illuminate your pumpkins or by using a projector to cast spooky images on your walls.
Indoor Halloween Decor Essentials
| Type of Decor | Placement | Impact on Ambiance |
|---|---|---|
| Table Centerpieces | Dining Table, Coffee Table, Entryway Table | Creates a focal point, adds a touch of Halloween magic, and sets the tone for the room. |
| Wall Hangings | Walls, Doorways, Stairwells | Adds visual interest, creates a spooky atmosphere, and transforms the space into a Halloween haven. |
| Lighting | Throughout the room, focusing on key areas | Sets the mood, creates a spooky and immersive experience, and enhances the overall effect of the decor. |
| Other Essentials | Throughout the home | Adds a touch of Halloween magic, creating a cohesive and immersive experience. |
Creative Halloween Decor Ideas
Beyond the traditional pumpkins and spooky ghosts, there’s a world of creative Halloween decor waiting to be explored. Embrace your inner artist and let your personality shine through with unique and unexpected ideas that will transform your home into a whimsical Halloween haven.
Repurposed Materials for Halloween Decor
Giving new life to old items adds a touch of charm and sustainability to your Halloween decor. Think beyond the usual store-bought decorations and explore the possibilities of repurposing materials you already have.
- Old Books:Create eerie book stacks by layering old books, adding candles, and placing them on a vintage table. You can also cut out pages to create spooky silhouettes or spell out Halloween greetings.
- Vintage Toys:Give your childhood toys a spooky makeover by dressing them up in Halloween costumes. A vintage teddy bear wearing a witch’s hat or a toy robot with glowing eyes can add a touch of whimsy and nostalgia to your decor.
- Fabric Scraps:Turn leftover fabric scraps into ghoulish ghosts, friendly bats, or even a creepy spiderweb. You can also use fabric scraps to create personalized banners or festive table runners.
DIY Halloween Decor Projects
Incorporate your family traditions and personal touches into your Halloween decor by crafting your own unique pieces. These DIY projects are fun and affordable, allowing you to create something truly special for your home.
- Family Photo Spooktacular:Create a spooky photo display by framing family photos and adding Halloween-themed embellishments like cobwebs, bats, or ghosts. This personal touch will add a unique element to your decor while showcasing cherished memories.
- Painted Pumpkins:Instead of carving pumpkins, paint them with whimsical designs, spooky faces, or even abstract patterns. You can even involve your children in the painting process, making it a fun family activity.
- Upcycled Mason Jars:Transform ordinary mason jars into spooky lanterns, glowing eyeballs, or even miniature haunted houses. Simply decorate them with paint, fabric scraps, and other creative materials. You can even add LED lights for a dramatic effect.
Halloween Decor for Kids

Halloween is a time for fun and excitement, especially for kids. Decorating your home for Halloween can create a magical atmosphere that your little ones will love. When decorating for kids, it’s important to choose age-appropriate decorations that are both fun and safe.
Age-Appropriate Halloween Decor
Choosing the right decorations for your children’s age group ensures they enjoy the festive atmosphere without being overwhelmed or scared. Here’s a table showcasing age-appropriate Halloween decor for different age groups:| Age Group | Decorations ||—|—|| Toddler | Soft, colorful decorations like pumpkins, bats, and ghosts.
Avoid anything scary or overly realistic. || Preschool | Interactive decorations like a spooky play area, a “monster” beanbag toss, or a Halloween-themed sensory bin. || Elementary School | More elaborate decorations that incorporate themes like spooky forests, haunted houses, or friendly monsters.
|
Fun and Interactive Halloween Decor for Kids
Creating a fun and interactive Halloween experience for children goes beyond just decorations. Here are some ideas:* Spooky Play Areas:Set up a designated play area with a spooky theme. Use pillows, blankets, and Halloween-themed toys to create a fun and engaging space for kids to play.
Themed Games
Organize Halloween-themed games like pumpkin bowling, monster pin the tail, or a spooky scavenger hunt.
Craft Activities
Engage kids in creative activities like making pumpkin-shaped cookies, decorating spooky masks, or painting Halloween-themed crafts.
Tips for Creating a Safe and Enjoyable Halloween Experience for Kids
Creating a safe and enjoyable Halloween experience for children is paramount. Here are some tips to keep in mind:* Choose Decorations Carefully:Avoid decorations that are too scary or realistic, especially for younger children. Opt for playful and whimsical designs instead.
Keep Decorations Secure
Ensure that all decorations are securely fastened and out of reach of children. This includes hanging decorations, placing them on high shelves, and avoiding decorations that could pose a choking hazard.
Supervise Children
Always supervise children when they are playing with Halloween decorations, especially those that are interactive.
Consider Allergies
Be mindful of any allergies your children or guests may have, particularly to latex or certain types of decorations.
Create a Welcoming Atmosphere
Make your home a fun and welcoming space for children to enjoy Halloween. Use warm lighting, play Halloween-themed music, and encourage playful activities.
Halloween Decor on a Budget: The Best Halloween Decor For Your Home

Creating a spooky and festive Halloween atmosphere doesn’t have to break the bank. With a little creativity and resourcefulness, you can transform your home into a hauntingly beautiful space without spending a fortune.
Sourcing Affordable Halloween Decor
Finding budget-friendly Halloween decor is easier than you think. Check out these resources:
- Thrift Stores and Consignment Shops:These treasure troves often have unique and vintage Halloween items at incredibly low prices. You can find everything from spooky figurines to antique lanterns.
- Dollar Stores:Dollar stores offer a wide selection of Halloween decorations, including banners, lights, and even costumes, all at affordable prices.
- Online Marketplaces:Sites like eBay and Craigslist are great for finding gently used Halloween decor, often at a fraction of the retail price.
- Garage Sales and Estate Sales:Keep an eye out for local garage sales and estate sales, where you can often find hidden gems of Halloween decor.
DIY Halloween Decor Techniques
Embrace your inner artist and create your own unique Halloween decor with these DIY techniques:
- Upcycle Old Items:Give old jars, bottles, and containers a spooky makeover with paint, glitter, and other embellishments. You can transform them into eerie candle holders or decorative accents.
- Paper Crafts:Paper is a versatile and inexpensive material for crafting Halloween decorations. Create paper bats, ghosts, and pumpkins, or use it to make spooky banners and garlands.
- Fabric Scraps:Use fabric scraps to create ghost-shaped cushions, spooky table runners, or even a creepy cobweb.
- Natural Materials:Use leaves, twigs, and pine cones to create natural Halloween decor. Arrange them in bowls, baskets, or create spooky wreaths.
Repurposing Existing Items
Transform everyday items into Halloween decor with these simple ideas:
- Pumpkins:Use pumpkins of all shapes and sizes to create unique decor. Carve them into jack-o’-lanterns, paint them with spooky designs, or use them as planters for spooky plants.
- Candles:Create a spooky ambiance with candles. Use votive candles in glass jars or tea lights in pumpkins to create a warm and inviting glow.
- Lights:Use string lights to create a magical Halloween atmosphere. Wrap them around trees, bushes, or hang them across your porch.