Wood burned photo frames DIY is a unique and captivating craft project that combines the artistry of wood burning with the sentimental value of cherished memories. It allows you to create personalized and meaningful gifts, while also expressing your creative flair.
This project is perfect for those who enjoy working with their hands, exploring artistic techniques, and adding a touch of rustic charm to their home décor.
The beauty of wood-burned photo frames lies in their ability to transform ordinary pieces of wood into extraordinary works of art. The intricate patterns and designs created by the burning process create a sense of depth and texture, adding a unique character to each frame.
Whether you choose to burn delicate floral motifs, geometric patterns, or personalized engravings, the possibilities for creativity are endless.
Introduction to Wood-Burned Photo Frames

Wood burning, also known as pyrography, is an art form that involves using a heated tool to create designs and images on wood surfaces. This technique has been practiced for centuries, and it continues to be a popular and versatile craft.
Wood-burned photo frames are a unique and charming way to showcase cherished memories and add a personal touch to your home decor.Wood-burned photo frames offer a distinct aesthetic appeal that sets them apart from traditional frames. The intricate details and warm, rustic tones created by the burning process add a touch of artistry and depth to the frame.
Each piece is unique, as the wood grain and the artist’s hand contribute to the overall design.
Historical Significance and Cultural Relevance, Wood burned photo frames diy
Wood burning has a rich history dating back to ancient times. Evidence suggests that this art form was practiced in various cultures around the world, including Egypt, China, and Japan. In these civilizations, wood burning was often used for decorative purposes, as well as for religious and ceremonial objects.
During the Victorian era, wood burning gained significant popularity in Europe and North America. It became a popular pastime and a form of artistic expression for both amateurs and professionals. The development of specialized wood-burning tools further contributed to its widespread adoption.
I’ve been having so much fun creating personalized wood-burned photo frames lately! It’s amazing how a little bit of heat and a simple design can transform a plain frame into a unique piece of art. I’m even thinking about making a set for my best friend and her boyfriend, inspired by their favorite movie, couples costumes the princess bride.
I could see them rocking the iconic “As you wish” and “Inconceivable!” costumes. Maybe I’ll add a little touch of wood-burning magic to their frames too!
Wood burning has been a cherished art form for centuries, showcasing the creativity and skill of artists across cultures.
Today, wood burning continues to be a popular and versatile craft. It is enjoyed by individuals of all ages and skill levels, and it offers endless possibilities for creative expression. Wood-burned photo frames are a testament to the enduring appeal of this art form, combining traditional techniques with modern sensibilities.
Essential Materials and Tools

Creating a wood-burned photo frame requires a combination of materials and tools that allow for precise burning, safe handling, and a finished product that showcases your artistic vision. This section will guide you through the essential materials and tools, providing detailed descriptions and safety precautions.
Wood burned photo frames are a great way to add a personal touch to your home decor, and they’re surprisingly easy to make. You can find inspiration for designs online, or come up with your own! If you’re looking for a fun and budget-friendly way to add some personality to your walls, check out this stamped star wall DIY money-saving wallpaper alternative project.
Once you’ve got your walls looking fabulous, you can showcase your wood burned photo frames for a truly unique and personalized look.
Wood Selection and Preparation
The type of wood you choose significantly influences the final appearance of your frame. Some woods are easier to burn than others, and each has unique grain patterns and colors.
| Material/Tool | Description | Purpose | Safety Precautions |
|---|---|---|---|
| Softwoods (Pine, Fir, Cedar) | These woods are lightweight, readily available, and have a soft grain that burns easily. | Suitable for beginners and projects requiring delicate details. | Use caution when handling, as softwoods can be more prone to splintering. |
| Hardwoods (Oak, Maple, Walnut) | Hardwoods are denser, offering a more robust frame with distinct grain patterns. They may require more effort to burn. | Ideal for projects requiring durability and a rich, textured look. | Wear appropriate protective gear, as hardwoods can be harder to work with. |
| Plywood | An affordable and versatile option, plywood is made of thin layers of wood veneer glued together. | Offers a smooth surface for burning and is available in various thicknesses. | Ensure the plywood is free of knots or defects before use. |
| Sandpaper | Available in various grits (roughness), sandpaper is used to smooth the wood surface and remove imperfections. | Prepares the wood for burning, ensuring a clean and consistent surface. | Wear a dust mask to prevent inhaling wood dust. |
Wood Burning Tools
Wood burning tools come in various shapes and sizes, allowing you to create intricate designs and textures.
| Material/Tool | Description | Purpose | Safety Precautions |
|---|---|---|---|
| Wood Burning Pen | A handheld device with a heated tip that allows for precise burning and shading. | Creates lines, curves, and intricate details in wood. | Use caution when handling the heated tip, and wear heat-resistant gloves. |
| Soldering Iron | A versatile tool with interchangeable tips, allowing for different burning styles and effects. | Provides more power and versatility for larger designs and deeper burns. | Use a soldering iron stand to prevent burns and always unplug the iron when not in use. |
| Wood Burning Kit | A collection of various wood burning tools, often including tips, stencils, and a stand. | Offers a range of tools for different burning techniques and styles. | Follow the safety instructions provided with the kit and wear appropriate protective gear. |
Protective Gear
Safety is paramount when working with wood burning tools.
Creating wood-burned photo frames is a great way to personalize your home decor and add a touch of rustic charm. The process involves carefully burning designs onto the wood using a wood-burning tool, which can be quite meditative. It reminds me of the early days of computing, when we had to manually input every command.
Now, with the emergence of self-operating computers, the self operating computer emerges , we’re seeing a shift towards more automated systems. Just like the self-operating computer, the wood-burning process can be mastered with practice and patience, leading to beautiful and unique creations.
| Material/Tool | Description | Purpose | Safety Precautions |
|---|---|---|---|
| Heat-Resistant Gloves | Protect your hands from burns when handling hot tools. | Essential for handling hot tools and preventing burns. | Ensure the gloves are made of a heat-resistant material and fit snugly. |
| Safety Glasses | Protect your eyes from flying wood chips and sparks. | Crucial for preventing eye injuries during burning. | Choose glasses that provide adequate protection and fit comfortably. |
| Dust Mask | Prevents inhalation of wood dust, which can be harmful to your respiratory system. | Important for protecting your lungs from wood dust, especially when sanding. | Choose a mask that provides a snug fit and has a filter for fine particles. |
Design and Preparation: Wood Burned Photo Frames Diy
The design of your wood-burned photo frame is the heart and soul of the project. It’s what will make it unique and personal. You can go with a simple design or something more elaborate, depending on your skill level and preferences.
Here’s how to get started:
Before you begin burning, it’s essential to prepare your wood. This will ensure that the burning process goes smoothly and that your final piece looks its best.
Design Ideas
There are countless possibilities when it comes to designing your wood-burned photo frame. Here are some ideas to get you started:
- Geometric Patterns: These are classic and versatile, and can be created with simple lines and shapes. Consider using squares, triangles, circles, or even more complex geometric forms. You can arrange them in a grid pattern, a spiral, or any other way that appeals to you.
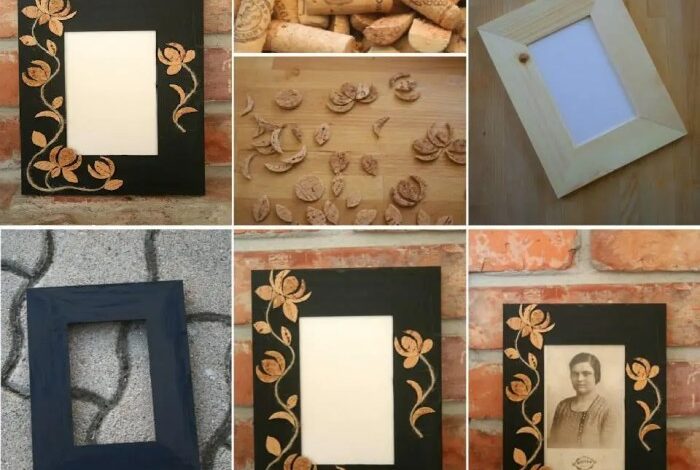
- Floral Motifs: Flowers add a touch of beauty and elegance to any design. You can choose from simple blooms, such as daisies or sunflowers, or more intricate designs like roses or lilies. You can also create a botanical theme by adding leaves, vines, or other natural elements.
- Landscapes: If you’re looking for a more complex design, try burning a landscape scene onto your frame. This could be a mountain range, a forest, a beach, or any other scenery that you love. You can even add a small house or a figure to give it a more personal touch.
- Personalized Engravings: Make your frame truly unique by adding a personalized engraving. This could be a name, a date, a quote, or a special message. You can use a font that you like or even create your own custom design.
Sketching and Transferring Designs
Once you’ve chosen your design, you’ll need to sketch it onto your wood surface. If you’re not confident in your drawing skills, you can use a tracing method to transfer your design. Here’s how:
- Print out your design on a sheet of paper. If you’re using a complex design, you might want to break it down into smaller sections.
- Tape the design to your wood surface using painter’s tape. Make sure that the paper is smooth and that there are no wrinkles or bubbles.
- Use a pencil to trace over the lines of your design. Press firmly to ensure that the lines are visible on the wood surface.
- Carefully remove the paper. You should now have a faint Artikel of your design on the wood surface.
Preparing the Wood for Burning
Before you begin burning, it’s essential to prepare your wood. This will ensure that the burning process goes smoothly and that your final piece looks its best.
- Sanding: Sand the wood surface with progressively finer grits of sandpaper. This will remove any imperfections and create a smooth surface for burning. Start with a coarse grit (80-100) to remove any rough spots. Then, use a medium grit (120-150) to smooth out the surface. Finally, finish with a fine grit (220-240) for a polished look.
- Staining: If you want to add color to your wood, you can stain it before burning. This will create a beautiful contrast between the burnt and unburnt areas. Choose a stain that complements your design. Apply the stain evenly with a brush or cloth. Let it dry completely before moving on to the next step.
- Sealing: Once the stain is dry, you can seal the wood. This will protect the wood from moisture and dirt and will help to prevent the burnt areas from fading. You can use a clear sealant, such as polyurethane or varnish. Apply the sealant evenly with a brush or cloth. Let it dry completely before handling the frame.
Wood Burning Techniques
Now that you have your design ready, it’s time to get creative and bring your vision to life. There are several wood burning techniques to choose from, each with its own unique advantages and aesthetic appeal. Let’s delve into the world of wood burning techniques.
Freehand Burning
Freehand burning is the most basic and versatile technique, allowing for artistic freedom and the creation of intricate designs. It involves directly applying the heated tip of the wood burning tool to the wood surface, controlling the amount of pressure and heat to achieve the desired line thickness and depth.
Freehand burning is like drawing with fire, requiring practice and a steady hand to achieve smooth, consistent lines.
Stenciling
Stenciling offers a precise and efficient way to create repetitive patterns or intricate designs. A stencil, typically made of thin material like paper or plastic, is placed on the wood surface. The design is then burned through the stencil, leaving a crisp and detailed imprint on the wood.
Stencils can be purchased pre-made or designed and cut out using a craft knife or a cutting machine.
Using Templates
Templates are similar to stencils, but they provide a more flexible approach to wood burning. Templates are typically made of thicker material like cardboard or wood and are often used for larger designs or those requiring multiple layers.
The template is traced onto the wood using a pencil or pen, and then the design is burned along the traced lines.
Finishing Touches
The final step in creating a beautiful and durable wood-burned photo frame is applying finishing touches. This process involves enhancing the natural beauty of the wood, protecting it from damage, and adding a touch of personal style.
Sanding and Polishing
Sanding and polishing are essential for achieving a smooth and even surface. This step helps to remove any rough edges, wood fibers, or imperfections that may have resulted from the wood-burning process.
- Start with a coarse-grit sandpaper (80-120 grit) to remove any major imperfections. Work with the grain of the wood to avoid scratching.
- Gradually progress to finer grits (150-220 grit) to smooth out the surface and remove sanding marks from the previous step.
- Finish with a very fine-grit sandpaper (400 grit or higher) to achieve a smooth, polished finish. You can use a sanding block or your hand to apply even pressure.
- Polishing is optional but can add a beautiful shine to the frame. Use a wood polish or wax specifically designed for the type of wood you are working with. Apply the polish according to the manufacturer’s instructions.
Applying Protective Coatings
Applying a protective coating is crucial for preserving the wood-burned design and protecting the frame from moisture, scratches, and UV damage.
- Polyurethane: A durable and water-resistant finish that provides excellent protection. It comes in both gloss and satin finishes, allowing you to choose the desired level of shine.
- Wax: A natural and easy-to-apply finish that enhances the wood’s natural beauty. Wax provides a subtle sheen and protects against minor scratches.
- Lacquer: A fast-drying finish that provides a hard, durable surface. Lacquer is available in various finishes, including gloss, semi-gloss, and satin.
- Oil-based finish: A traditional finish that penetrates the wood, enhancing its natural color and providing protection. Oil-based finishes are available in various formulas, including tung oil, linseed oil, and Danish oil.
Adding Embellishments
Adding embellishments is a great way to personalize your wood-burned photo frame and make it truly unique.
- Metal accents: You can add metal accents, such as decorative screws, hinges, or corner protectors, to enhance the frame’s design.
- Beads: Small wooden or metal beads can be glued around the frame’s edges for a decorative touch.
- Fabric: Covering the frame with fabric, such as velvet or burlap, can create a soft and elegant look.
- Paint: You can paint the frame with a complementary color or create a distressed look using various painting techniques.
Step-by-Step Guide to Finishing a Wood-Burned Photo Frame
- Sand the frame: Start with coarse-grit sandpaper and gradually progress to finer grits, working with the grain of the wood.
- Clean the frame: Wipe away any sanding dust with a damp cloth.
- Apply a protective coating: Choose the finish that best suits your needs and apply it according to the manufacturer’s instructions.
- Let the finish dry completely: Allow the finish to dry thoroughly before handling the frame.
- Add embellishments: If desired, add embellishments to personalize your frame.
Creative Variations and Ideas
The beauty of wood-burned photo frames lies in their endless possibilities for personalization and artistic expression. Let’s delve into some creative variations and ideas to elevate your wood-burning projects.
Exploring Different Wood Types, Textures, and Finishes
Beyond the standard pine or maple, consider experimenting with various wood types to create unique textures and visual effects.
- Walnut: Its rich brown tones and natural grain patterns add depth and sophistication to your frame.
- Cherry: Known for its reddish-brown hue and smooth grain, cherry wood brings warmth and elegance to any design.
- Oak: With its distinctive grain and durable nature, oak lends itself to bold, rustic frames.
- Reclaimed Wood: Embrace sustainability by incorporating reclaimed wood, adding character and history to your project.
Beyond wood types, textures play a significant role in the final look.
- Rough-Sawn Wood: This wood type retains its natural bark and uneven surface, creating a rustic and organic aesthetic.
- Smooth-Planed Wood: A polished surface allows for intricate details and crisp lines in your wood-burning design.
Finally, finishes enhance the visual appeal and protect your wood-burned creation.
- Polyurethane: Provides a durable, clear coating that protects the wood and enhances its natural beauty.
- Wax: A natural option that adds a subtle sheen and highlights the wood’s grain patterns.
- Stain: Adds color and depth to the wood, allowing you to create a range of visual effects.
Designing a Wood-Burned Photo Frame with a Specific Theme or Personal Touch
Infuse your photo frame with a personal touch by incorporating a theme or design that reflects your interests or a cherished memory.
- Nature-Inspired: Embellish your frame with wood-burned leaves, flowers, or animal silhouettes, capturing the beauty of the natural world.
- Travel: Depict landmarks, maps, or iconic symbols from your favorite travel destinations.
- Personalized Initials: Add a monogram or initials to personalize your frame and make it a unique gift.
- Quote or Verse: Incorporate a meaningful quote or verse that holds special significance for you.
Inspiring Examples of Wood-Burned Photo Frames with Intricate Designs and Creative Embellishments
Explore the world of wood-burning artistry for inspiration and discover how others have transformed simple frames into captivating works of art.
- Geometric Patterns: Intricate geometric patterns can be achieved using a wood-burning pen, creating a visually striking and modern aesthetic. Imagine a frame with a repeating pattern of triangles, squares, or circles, adding a touch of sophistication.
- Floral Motifs: Wood-burned floral motifs, from delicate blossoms to intricate vines, add a touch of elegance and romanticism.
Consider a frame adorned with a blooming rose or a delicate vine entwined around the perimeter.
- Landscapes: Create a miniature landscape on your frame, capturing a favorite scenic view or a cherished memory. Imagine a wood-burned scene of rolling hills, a majestic mountain range, or a tranquil beach.
- Abstract Art: Experiment with abstract designs, incorporating swirling lines, bold shapes, and contrasting textures. Allow your creativity to flow and create a unique and expressive piece.