Perpetual flip calendar DIY is a fun and rewarding project that lets you create a unique and functional piece for your home or office. Imagine a calendar that never needs replacing, always ready to display the current date with a simple flip.
It’s a timeless design that adds a touch of elegance and practicality to any space.
These calendars have a rich history, evolving from simple paper flips to intricate mechanisms. Today, you can find perpetual flip calendars in various styles, from sleek and modern to rustic and vintage. With a DIY project, you can personalize your calendar to perfectly match your aesthetic and needs.
DIY Perpetual Flip Calendar Materials

Creating a DIY perpetual flip calendar is a fun and rewarding project that allows you to personalize your space and keep track of time in a unique way. Before embarking on this project, it’s essential to gather the necessary materials.
This guide will Artikel the materials required for a DIY perpetual flip calendar, categorized by function.
Base
The base of the calendar serves as the foundation for the entire structure. It needs to be sturdy enough to support the weight of the flip mechanism and the numbers.
- Wood:Plywood, MDF (Medium-Density Fiberboard), or pine are popular choices for the base. They offer a good balance of strength and affordability.
- Acrylic:A clear acrylic base can create a modern and sleek look. It’s also lightweight and easy to clean.
I’m obsessed with DIY projects right now, especially those that add a touch of personality to my home. I recently made a perpetual flip calendar, and I’m loving how it looks on my bookshelf. It reminded me of Elsie’s beautiful Nashville BNB living room tour, which you can check out here , where she has a gorgeous vintage-inspired calendar hanging above her fireplace.
I think I might try incorporating a similar design element into my next DIY project!
- Metal:For a more industrial aesthetic, you can use sheet metal or metal bars.
The choice of base material depends on your design preference, budget, and desired aesthetic.
Frame
The frame surrounds the numbers and holds them in place. It should be strong enough to withstand the constant flipping motion.
A perpetual flip calendar is a great way to keep track of the days and months, and it’s also a fun DIY project. If you’re looking for a little something extra to add to your calendar, why not try making a matching pom pom bracelet?
You can find a great tutorial for making your own pom pom bracelet diy online. Once you’ve got your bracelet made, you can attach it to your calendar for a personalized touch. You can even make a new bracelet for each month to match the colors of your calendar!
- Wood:Similar to the base, wood is a common material for frames. You can use dowels, strips, or even picture frames.
- Metal:Metal frames can be made from aluminum, steel, or even copper. They offer a durable and modern look.
- Acrylic:Acrylic can be used to create a minimalist and transparent frame.
A perpetual flip calendar DIY project is a great way to add a touch of personality to your home, and it’s also a fun and easy craft project. Once you’ve mastered the basics of a flip calendar, you can even get creative with your designs.
For example, you could use recycled materials to make a unique and eco-friendly calendar, or you could create a seasonal calendar by incorporating elements from different holidays. If you’re looking for some inspiration, check out these easy DIY Christmas tree toppers – they could be a great starting point for a holiday-themed flip calendar.
Numbers, Perpetual flip calendar diy
The numbers are the heart of the perpetual flip calendar. They should be clear, legible, and durable.
- Cardstock:This is a cost-effective option for numbers. You can print numbers on cardstock and cut them out.
- Foam board:For thicker and more durable numbers, foam board is a good choice.
- Acrylic:Acrylic numbers can be laser-cut for a professional and polished look.
- Wood:Wooden numbers can be painted or stained for a rustic or contemporary look.
Flip Mechanism
The flip mechanism allows you to change the numbers easily.
- Simple Hinges:You can use basic hinges to attach the numbers to the frame.
- Small Gears:For a more intricate flip mechanism, you can use small gears.
- Metal Rods:Metal rods can be used to create a more robust flip mechanism.
Additional Materials
- Adhesive:Use a strong adhesive to attach the numbers to the frame and the frame to the base.
- Paint:You can paint the base, frame, and numbers to match your decor.
- Hardware:You may need screws, nuts, bolts, and washers for the frame and flip mechanism.
- Tools:Depending on the materials you choose, you may need tools such as a saw, drill, sander, and measuring tape.
Design Considerations for a Perpetual Flip Calendar
A perpetual flip calendar is a great way to keep track of the date without having to buy a new calendar every year. However, before you start building your calendar, you need to consider some design considerations.
Layout Design
The layout of your perpetual flip calendar will determine how it looks and functions. You’ll need to decide on the size, shape, and orientation of the calendar, as well as the number of digits you’ll need to display. Here’s a table that Artikels the design elements for a perpetual flip calendar:
| Element | Description | Material | Notes |
|---|---|---|---|
| Base | The base of the calendar will hold the flip mechanism and the display. | Wood, acrylic, or metal | The base should be sturdy and able to support the weight of the calendar. |
| Flip Mechanism | The flip mechanism allows you to change the date by flipping the digits. | Plastic, metal, or wood | The flip mechanism should be durable and easy to operate. |
| Digits | The digits will display the current date. | Plastic, metal, or wood | The digits should be clear and easy to read. |
| Display | The display will show the current date. | Acrylic, glass, or metal | The display should be clear and allow for easy viewing of the digits. |
| Mounting | The mounting will attach the calendar to a wall or other surface. | Metal, plastic, or wood | The mounting should be secure and easy to install. |
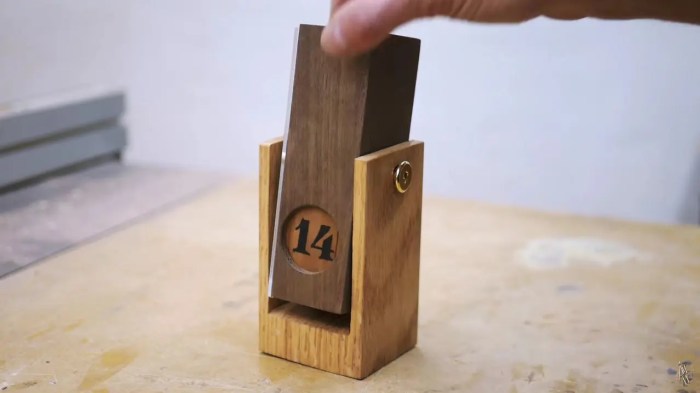
Visual Representation:Imagine a rectangular base made of wood with a sleek, modern design. The flip mechanism is located at the top of the base and consists of a series of rotating wheels with numbers from 0 to 9. The digits are displayed in a clear acrylic window, positioned in the center of the base.
Each digit is clearly visible, and the window is large enough to accommodate the numbers without appearing cramped. The calendar is mounted to a wall using a simple metal bracket, ensuring stability and a secure fit.
Construction Steps for a DIY Perpetual Flip Calendar: Perpetual Flip Calendar Diy
Now that you have your materials and design ready, it’s time to assemble your perpetual flip calendar. This process will involve several steps, each requiring attention to detail for a functional and aesthetically pleasing final product.
Preparing the Base
Before assembling the calendar, it’s crucial to prepare the base. This will ensure a sturdy foundation for the flipping mechanism and a clean, finished look.
- Cut the base:Use a saw to cut the baseboard to your desired size, ensuring it’s large enough to accommodate all the flip cards and the mechanism.
- Sand the edges:Smooth out any rough edges on the baseboard using sandpaper. This will prevent splinters and create a polished look.
- Paint or stain (optional):If desired, paint or stain the baseboard to match your design aesthetic. Let the paint or stain dry completely before proceeding.
Creating the Flip Mechanism
The flip mechanism is the heart of the perpetual calendar. It allows for easy flipping of the cards and ensures smooth operation.
- Attach the dowels:Secure the dowels to the baseboard using wood glue and screws. Position them at equal intervals, ensuring they are parallel to each other. These dowels will act as the support for the flip cards.
- Install the brackets:Attach the metal brackets to the baseboard, ensuring they are positioned above the dowels. These brackets will hold the flip cards in place and allow them to rotate.
- Secure the spring:Attach the spring to the baseboard, ensuring it’s positioned between the dowels and the brackets. The spring will provide the tension needed to keep the cards aligned and facilitate flipping.
Assembling the Flip Cards
The flip cards are the visual element of the calendar, displaying the dates and other information.
- Prepare the cards:Cut the cardstock into rectangular pieces, ensuring they are slightly larger than the dowels. This will ensure a snug fit and prevent the cards from slipping.
- Design and print the cards:Design the cards with the desired dates, days, and other information. You can use a computer program or hand-draw the designs. Print the designs onto the cardstock, ensuring they are centered and aligned.
- Punch holes:Punch holes in the top and bottom of each card, ensuring they are aligned with the dowels. These holes will allow the cards to be easily attached to the mechanism.
- Attach the cards:Attach the cards to the dowels using the metal rings. Make sure the cards are aligned and the rings are securely fastened.
Final Touches
Once the flip mechanism and cards are assembled, it’s time to add the finishing touches to your perpetual flip calendar.
- Decorate the base:Add any decorative elements to the base, such as paint, stencils, or decoupage. This will personalize your calendar and make it unique.
- Add a stand (optional):If desired, attach a stand to the back of the base for easy display. This will allow you to position the calendar on a desk or shelf.
- Enjoy your creation:Once you’re satisfied with the final result, enjoy your DIY perpetual flip calendar!
Customization Options for Perpetual Flip Calendars
A perpetual flip calendar, unlike traditional calendars, offers a unique opportunity to personalize your timekeeping. With a little creativity, you can transform a simple calendar into a beautiful and functional piece that reflects your style and interests.
Customization Options for Personalizing a Perpetual Flip Calendar
Personalizing your perpetual flip calendar goes beyond simply choosing colors. You can incorporate various design elements to create a truly unique and personalized timepiece.
| Feature | Description | Examples |
|---|---|---|
| Color Palette | Select a color scheme that complements your decor or reflects your personal style. You can choose a classic black and white theme, a vibrant rainbow palette, or a subtle monochromatic look. | A minimalist calendar with a black frame and white numbers, a vibrant calendar with bright colors for each month, or a calming calendar with soft pastels. |
| Materials | Experiment with different materials for the frame, numbers, and background. You can use wood, metal, acrylic, or even fabric to create a unique look and feel. | A wooden frame with metal numbers and a fabric background, a metal frame with acrylic numbers and a wooden background, or a fabric frame with paper numbers and a fabric background. |
| Typography | Choose fonts that reflect your personality and the overall style of your calendar. You can use bold and playful fonts, elegant and classic fonts, or modern and minimalist fonts. | A calendar with a bold, whimsical font for a playful feel, a calendar with a classic serif font for a traditional look, or a calendar with a minimalist sans-serif font for a modern feel. |
| Artwork and Imagery | Incorporate your favorite artwork, photographs, or patterns into the design. You can use prints, decals, or even hand-painted designs to add a personal touch. | A calendar with a floral print background, a calendar with a photograph of a favorite landscape, or a calendar with a hand-painted design featuring your favorite animal. |
| Additional Features | Add features that enhance the functionality and aesthetic appeal of your calendar. You can include a small whiteboard for writing notes, a built-in shelf for displaying mementos, or a magnetic strip for attaching reminders. | A calendar with a small whiteboard attached to the side for writing notes, a calendar with a built-in shelf for displaying photos or small trinkets, or a calendar with a magnetic strip for attaching notes, photos, or small objects. |
Tips for Maintaining a Perpetual Flip Calendar

A perpetual flip calendar, with its intricate mechanics and delicate parts, requires careful attention to ensure it remains a functional and aesthetically pleasing centerpiece in your home or office. Just like any other treasured object, a little care and maintenance go a long way in extending its lifespan and preserving its beauty.
Cleaning Your Perpetual Flip Calendar
Regular cleaning is crucial to keep your perpetual flip calendar looking its best and functioning smoothly. Dust, fingerprints, and other debris can accumulate over time, affecting the calendar’s appearance and hindering its movement.
- Dusting: Regularly dust your calendar with a soft, dry cloth or a feather duster. Avoid using abrasive materials or cleaners that could damage the finish. You can also use a compressed air can to blow away dust from hard-to-reach areas.
Example:Gently brush away dust from the calendar’s frame, numbers, and mechanism with a soft, dry cloth. Avoid pressing too hard, as this could damage the delicate parts.
- Cleaning the Surface: For stubborn stains or fingerprints, use a slightly damp cloth with mild soap and water. Gently wipe the surface, avoiding the mechanism. Ensure the cloth is not too wet, as this could damage the calendar’s materials.
Example:If a fingerprint is visible on the calendar’s acrylic surface, dampen a soft cloth with a mild soap solution and gently wipe the area.
Avoid pressing too hard, as this could leave scratches.
- Cleaning the Mechanism: The mechanism of a perpetual flip calendar is delicate and should be handled with care. If you notice any dust or debris within the mechanism, use a small, soft brush to gently remove it. Avoid using any liquids or sprays near the mechanism, as these could damage the delicate gears and springs.
Example:If you see dust accumulated near the gears of the calendar’s mechanism, use a small, soft brush to gently sweep it away. Avoid using any liquids or sprays, as these could affect the mechanism’s functionality.
Storing Your Perpetual Flip Calendar
Proper storage is essential for preserving the condition of your perpetual flip calendar, especially if you’re not using it regularly.
- Protection from Dust: When not in use, cover your calendar with a dust cover or a soft cloth to protect it from dust and other debris. This will help to prevent the accumulation of dirt and keep the calendar looking its best.
Example:Store the calendar in a clean, dry place, covered with a dust cover or a soft cloth. This will prevent dust and debris from accumulating on the calendar’s surface and mechanism.
- Storing in a Dry Environment: Store your calendar in a dry environment, away from moisture and humidity. Excessive moisture can damage the calendar’s materials and affect its functionality.
Example:Avoid storing the calendar in a damp or humid environment, such as a basement or attic.
These locations can cause moisture to accumulate on the calendar, leading to damage and deterioration.
- Handling with Care: When handling your perpetual flip calendar, always do so with care and avoid dropping or bumping it. Rough handling can damage the calendar’s delicate parts, including the mechanism and the frame.
Example:When moving the calendar, handle it with care and avoid dropping or bumping it.
This will help to prevent damage to the calendar’s mechanism and frame.
Repairing Your Perpetual Flip Calendar
While perpetual flip calendars are designed to be durable, they may occasionally require repairs.
- Identifying the Issue: If you notice any issues with your calendar, such as a malfunctioning mechanism or a broken piece, identify the problem before attempting any repairs.
Example:If the calendar’s mechanism is not flipping the numbers correctly, try to identify the specific part causing the issue.
This could be a broken gear, a jammed spring, or a loose screw.
- Seeking Professional Help: For more complex repairs or if you are unsure how to fix the issue, it’s best to seek professional help. A qualified repair technician can assess the problem and provide the necessary repairs.
Example:If the calendar’s mechanism is damaged or requires specialized repair, it’s best to take it to a qualified repair technician.
They have the experience and tools to diagnose and repair the issue effectively.
- Using the Right Tools: If you decide to attempt repairs yourself, ensure you have the right tools and materials. Using the wrong tools can cause further damage to the calendar.
Example:If you need to tighten a screw on the calendar’s mechanism, use a screwdriver that fits the screw size.
Using the wrong size screwdriver can damage the screw head or strip the threads.