Lauras master bathroom before after – Laura’s master bathroom before and after is a story of transformation, a journey from outdated and dreary to a luxurious oasis. The once-tired space, plagued by worn fixtures and a lackluster aesthetic, has been reborn as a haven of relaxation and style.
Join me as we explore the process of this incredible makeover, delving into the design inspiration, the meticulous execution, and the breathtaking results.
From the initial assessment of the bathroom’s shortcomings to the final reveal of a space that exudes elegance and functionality, we’ll uncover the key decisions and design choices that led to this remarkable transformation. Prepare to be inspired by Laura’s vision and the meticulous craftsmanship that brought it to life.
The Before
Laura’s master bathroom was a far cry from a luxurious oasis. It was a stark reminder of a bygone era, with outdated fixtures and a design that had seen better days. The space felt cramped and lacked the modern amenities that Laura desired.
Layout and Functionality
The layout of the bathroom was inefficient, with a small shower stall that felt cramped and a vanity that was too small to accommodate all of Laura’s essentials. The lack of storage space meant that toiletries and towels were constantly strewn about, creating a cluttered and disorganized atmosphere.
The lack of a separate tub and shower made it difficult for Laura to enjoy a relaxing soak.
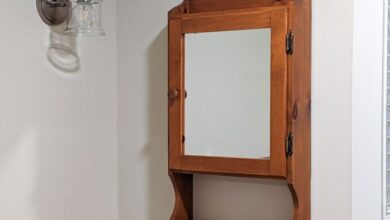
Fixtures and Finishes
The bathroom’s fixtures were outdated and worn. The showerhead was a single-spray head that provided a weak and inconsistent flow of water. The faucet handles were tarnished and difficult to turn. The vanity was made of outdated laminate, and the countertop was cracked and chipped.
The floor tiles were a dull beige, and the grout was stained and discolored.
Outdated Elements
The bathroom’s aesthetic was stuck in the past. The walls were painted a pale yellow, and the only decor was a dated floral print shower curtain. The lighting was inadequate, casting a dim and unflattering glow over the space. The overall impression was one of blandness and lack of style.
Laura’s master bathroom transformation was truly remarkable. The before and after photos were a testament to her design skills and the power of a good renovation. Speaking of transformations, I was intrigued by the recent article on royal watch can meghan markle reframe family feud , which explored the possibility of a fresh start for the Sussexes.
Just like Laura’s bathroom, a little bit of effort can go a long way in creating a positive change. I’m curious to see what the future holds for both Laura’s bathroom and the Sussexes!
Overall Aesthetic
The bathroom’s aesthetic was dated and uninspired. The color palette was drab, and the lack of any statement pieces or decorative elements made the space feel bland and lifeless. The overall impression was one of a room that was in dire need of a makeover.
The Transformation: Lauras Master Bathroom Before After

Laura’s master bathroom renovation wasn’t just about updating fixtures; it was about creating a sanctuary, a space that would inspire calm and rejuvenation. The design inspiration stemmed from a desire to blend modern elegance with a touch of spa-like serenity.
Design Inspiration and Key Elements
The design inspiration for Laura’s master bathroom renovation was a harmonious blend of modern elegance and spa-like serenity. The goal was to create a space that felt both luxurious and relaxing, a sanctuary where Laura could unwind and recharge. To achieve this, the design incorporated several key elements:
- Clean Lines and Minimalism:The bathroom features sleek, minimalist fixtures and cabinetry, creating a sense of spaciousness and order. This approach aligns with the modern aesthetic, prioritizing functionality and simplicity.
- Natural Materials:The use of natural materials like marble, wood, and stone adds warmth and texture to the space, contributing to a more organic and inviting feel. These materials also have a timeless quality, ensuring the bathroom remains stylish for years to come.
- Neutral Color Palette:A calming palette of white, gray, and beige serves as a backdrop for pops of color from the towels, accessories, and plants. This approach allows for flexibility in styling and ensures the bathroom feels fresh and inviting.
- Spa-Inspired Touches:Elements like a freestanding soaking tub, a rain shower head, and soft lighting create a spa-like atmosphere. These details enhance the sense of relaxation and indulgence, transforming the bathroom into a haven for rejuvenation.
Color Palette and Materials
The color palette for Laura’s bathroom is a soothing blend of neutrals, with white playing a dominant role. White walls and cabinetry create a sense of spaciousness and allow the natural materials to take center stage. Gray accents, such as the marble flooring and shower tiles, add a touch of sophistication and depth.
Laura’s master bathroom transformation was incredible! The before photos showed a dated, cramped space, but after the renovation, it’s a luxurious oasis. Speaking of renovations, I’ve been thinking about painting my roof, and I found this great article on how to paint roof shingles and when not to.
It’s full of helpful tips, like checking the condition of your shingles and choosing the right paint. I think it’s definitely a project I’ll tackle once I’m finished with Laura’s bathroom makeover!
Beige accents, like the wooden vanity and towel rack, introduce warmth and texture, creating a more inviting and homey feel.The materials chosen for the renovation were carefully selected to enhance both the aesthetic and the functionality of the space. The marble flooring and shower tiles are not only beautiful but also durable and easy to maintain.
The wooden vanity adds warmth and character, while the sleek chrome fixtures complement the modern design.
Mood and Atmosphere
The overall mood and atmosphere of Laura’s master bathroom is one of tranquility and rejuvenation. The clean lines, natural materials, and neutral color palette create a calming and serene space. The spa-inspired touches, such as the freestanding soaking tub and rain shower head, further enhance the sense of relaxation and indulgence.
The soft lighting and carefully curated accessories contribute to the overall feeling of peace and tranquility.
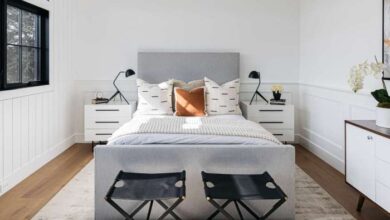
The After

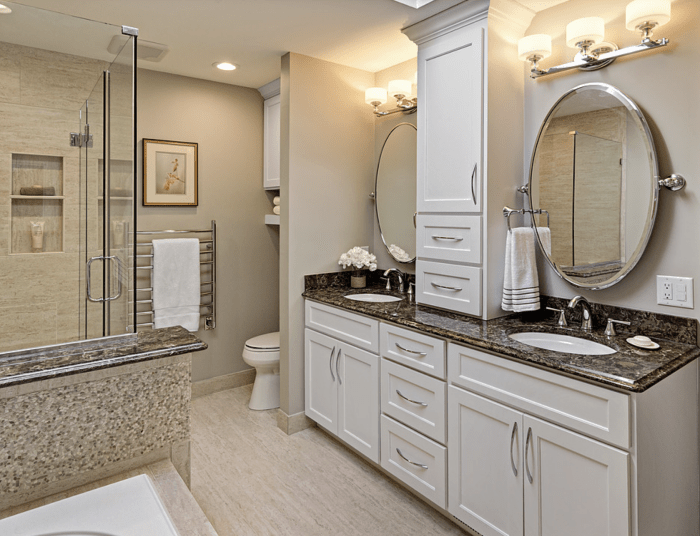
Stepping into Laura’s master bathroom now feels like entering a luxurious spa retreat. The transformation is nothing short of breathtaking, with every detail meticulously planned and executed to create a serene and functional space.
The New Layout
The renovation completely reimagined the bathroom’s layout, maximizing space and flow. The shower area was enlarged, offering a spacious and invigorating experience. The vanity was strategically positioned to create a sense of openness and allow for ample counter space. The addition of a freestanding soaking tub transformed the bathroom into a haven for relaxation and rejuvenation.
Laura’s master bathroom before and after is a testament to her amazing design skills! I’m always inspired by her creativity, and it reminds me of the incredible artistry of Bjork’s swan dress, which I found a fantastic tutorial for on exploreinsights.net.
I can’t wait to see what Laura does next with her bathroom, just like I can’t wait to see what Bjork does next with her fashion!
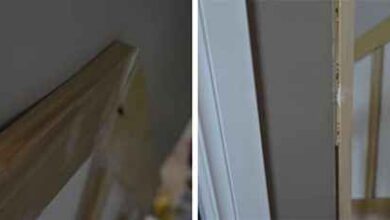
Fixtures and Finishes
The bathroom boasts a collection of high-quality fixtures and finishes that elevate its aesthetic appeal. The sleek, modern faucets and showerheads add a touch of sophistication. The vanity top is crafted from durable and elegant marble, complementing the calming color palette.
The walls are adorned with large, porcelain tiles that create a sense of spaciousness and sophistication.
Impact on Functionality and Aesthetics
The renovation significantly improved the bathroom’s functionality. The increased storage space ensures that everything has its place, while the new layout makes it easy to move around. The inclusion of a heated towel rack adds a touch of luxury and ensures that towels are always warm and inviting.
The overall design creates a sense of tranquility and harmony, making the bathroom a truly relaxing and rejuvenating space.
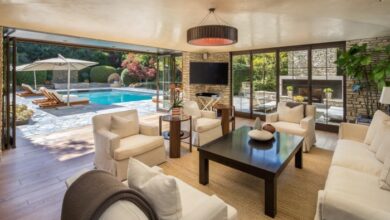
Overall Impression
Laura’s master bathroom is now a testament to the transformative power of renovation. The combination of thoughtful design, high-quality materials, and meticulous attention to detail has created a luxurious retreat that is both functional and aesthetically pleasing. The impact of the renovation is evident in every aspect of the bathroom, from the spacious shower to the elegant finishes.
The Details
Laura’s master bathroom renovation wasn’t just about replacing fixtures; it was about creating a spa-like retreat. The changes went beyond the superficial, focusing on functionality and aesthetics. Let’s delve into the key features that transformed this space.
Key Features of Laura’s Master Bathroom
| Feature | Before | After | Impact |
|---|---|---|---|
| Shower | A cramped, outdated shower stall with a single shower head and limited storage space. | A spacious walk-in shower with multiple shower heads, a built-in bench, and ample storage niches. | Improved functionality and accessibility, creating a luxurious showering experience. |
| Vanity | A dated vanity with limited counter space and storage, making it difficult to organize toiletries. | A modern vanity with a large countertop, multiple drawers, and a built-in medicine cabinet, providing ample storage and a streamlined look. | Enhanced functionality and aesthetics, creating a more organized and visually appealing space. |
| Lighting | Poor lighting with a single overhead fixture, making the bathroom feel dark and gloomy. | Multiple light sources, including recessed lighting, vanity lights, and a decorative pendant, creating a bright and inviting atmosphere. | Improved visibility and ambiance, creating a more luxurious and spa-like feel. |
| Flooring | Outdated and worn-out tile flooring that felt cold and uninviting. | Warm and inviting wood-look tile flooring that provides a comfortable and elegant touch. | Enhanced aesthetics and comfort, creating a more welcoming and luxurious space. |
The Inspiration
Laura’s bathroom renovation was a journey of discovery, filled with both challenges and triumphs. It taught us valuable lessons about planning, design, and execution, which we’re eager to share with you. Whether you’re embarking on a similar project or simply looking for inspiration, we hope these insights will help you create a bathroom that reflects your style and meets your needs.
Planning Your Bathroom Renovation
Planning is crucial for a successful bathroom renovation. It ensures that your project stays on track, within budget, and delivers the desired results. Here are some key steps to consider:
- Define Your Needs and Goals:Determine the primary functions of the bathroom, consider the size and layout, and envision the overall aesthetic. For example, do you need more storage, a larger shower, or a luxurious soaking tub?
- Set a Realistic Budget:Research costs for materials, fixtures, labor, and permits. Allocate funds for potential unexpected expenses. Be sure to factor in the cost of demolition, disposal, and any structural changes.
- Create a Detailed Design Plan:Work with a designer or create your own plans. Include measurements, material selections, fixture specifications, and desired finishes. This visual representation helps you visualize the finished product and identify potential issues early on.
- Research and Choose Contractors:Get recommendations, check licenses and insurance, and request quotes from multiple contractors. Consider their experience, communication style, and availability.
- Obtain Necessary Permits:Contact your local building department to understand the permitting process and requirements for your project. This ensures your renovation complies with safety regulations and local codes.
Selecting Materials, Fixtures, and Finishes, Lauras master bathroom before after
Choosing the right materials, fixtures, and finishes is essential for creating a bathroom that is both beautiful and functional. Here are some tips to guide your selection:
- Durability and Water Resistance:Select materials that can withstand moisture and wear and tear. For example, consider porcelain or ceramic tiles for floors and walls, waterproof paint, and moisture-resistant cabinetry.
- Style and Aesthetics:Choose finishes that complement your overall design aesthetic. Consider the color palette, texture, and patterns. For example, a modern bathroom might feature sleek, minimalist fixtures and chrome accents, while a traditional bathroom could incorporate ornate details and warm wood tones.
- Functionality and Accessibility:Choose fixtures and fittings that are easy to use and maintain. For example, consider a walk-in shower for accessibility, a dual-flush toilet for water conservation, and storage solutions that maximize space.
- Budget Considerations:Balance your desired features with your budget. Explore different price points and consider alternative materials or fixtures that offer similar functionality and aesthetics at a lower cost.