Diy six seat dining room table – DIY six-seat dining room table projects are incredibly popular, and for good reason. Building your own table not only saves you money, but it also allows for complete customization and a sense of accomplishment unlike any other. A six-seat dining table is a perfect choice for families and gatherings, providing ample space for everyone to enjoy a meal together.
In this guide, we’ll walk you through the entire process of designing, building, and finishing a stunning six-seat dining table that will become a cherished centerpiece in your home. From choosing the right materials and tools to mastering construction techniques and adding finishing touches, we’ll cover everything you need to know to bring your dream table to life.
Building Your Own Six-Seat Dining Table: A DIY Guide
The DIY trend is surging, especially in home decor. Building your own furniture is a satisfying and cost-effective way to personalize your space. A six-seat dining table is a popular choice for families and gatherings, providing ample space for meals and socializing.
Constructing your own table not only saves you money but also allows you to customize it to perfectly match your style and needs.
Benefits of Building Your Own Dining Table
Building your own six-seat dining table offers numerous benefits, making it a worthwhile project for any homeowner. Here are some key advantages:
- Cost Savings:Building your own table can significantly reduce the cost compared to buying a pre-made one. You can choose more affordable materials and avoid retail markups.
- Customization:A DIY project allows you to tailor the table to your exact specifications. You can select the desired dimensions, wood type, stain color, and even add unique features like a built-in wine rack or storage drawer.
- Sense of Accomplishment:Completing a DIY project like building a table provides a sense of accomplishment and pride. You’ll have a tangible reminder of your skills and effort.
Why Six Seats?
A six-seat dining table is a popular choice for many reasons:
- Family Gatherings:It comfortably accommodates a family of four with room for guests, making it ideal for regular meals and special occasions.
- Social Events:A six-seat table is perfect for hosting small gatherings, dinner parties, or game nights with friends.
- Versatility:It can be used for various purposes, from dining to working, playing games, or crafting.
Design Considerations: Diy Six Seat Dining Room Table
Designing a six-seat dining table involves considering various aspects, including dimensions, materials, and style. These factors influence the table’s functionality, aesthetics, and overall impact on your dining space.
Building a DIY six-seat dining room table has been a fun project, but it’s definitely time for a break. I’m feeling a little stressed, so I’m taking a moment to indulge in some self-care. Check out my recent blog post about 3 beauty products I am loving , which are helping me unwind.
Once I’m feeling refreshed, I’ll be back to tackling the table legs.
Dimensions
The dimensions of your dining table are crucial for accommodating six people comfortably. A standard six-seat dining table typically measures 72 inches in length and 42 inches in width. However, these dimensions can vary based on your preferences and the size of your dining room.
Building a six-seat dining room table is a rewarding project, and I’m always looking for ways to add a personal touch. I recently discovered a stitched photo art project that would be perfect for the table’s centerpiece. I imagine a stitched portrait of my family, adding a unique and sentimental element to the dining space.
For instance, if you have a smaller dining room, you might opt for a slightly smaller table, such as 60 inches in length and 36 inches in width.
Materials
The choice of materials for your dining table is a matter of personal preference and budget. Popular materials for tabletops include:
- Wood:Wood is a classic choice for dining tables, offering warmth, durability, and natural beauty. Popular wood types include oak, maple, cherry, and walnut.
- Glass:Glass tabletops create a sleek and modern look. They are easy to clean and can be paired with various base styles.
- Stone:Stone tabletops, such as granite or marble, offer a luxurious and durable option. They are resistant to scratches and heat.
- Metal:Metal tabletops, such as stainless steel or aluminum, provide a contemporary and industrial look. They are also durable and easy to maintain.
The base of the table can be made from various materials as well, including wood, metal, and stone. The choice of base material often complements the tabletop material, creating a cohesive look.
Styles
Dining table styles range from traditional to contemporary, reflecting various design aesthetics. Here are some popular dining table styles:
- Farmhouse:Farmhouse dining tables typically feature a rustic and welcoming design, often with distressed wood and a simple, rectangular shape.
- Modern:Modern dining tables are characterized by clean lines, minimalist designs, and sleek materials like glass or metal. They often have a geometric or organic shape.
- Rustic:Rustic dining tables embrace natural elements and textures, often featuring reclaimed wood, metal accents, and a distressed finish.
- Traditional:Traditional dining tables are elegant and timeless, often featuring intricate carvings, ornate details, and classic materials like mahogany or cherry wood.
Design Considerations
| Tabletop Material | Tabletop Shape | Base Material | Base Style |
|---|---|---|---|
| Wood | Rectangular, Round, Square, Oval | Wood, Metal, Stone | Pedestal, Trestle, X-shaped, Farmhouse, Modern |
| Glass | Rectangular, Round, Square, Oval | Metal, Wood | Pedestal, X-shaped, Modern |
| Stone | Rectangular, Round, Square, Oval | Metal, Wood | Pedestal, Trestle, Modern |
| Metal | Rectangular, Square, Oval | Metal, Wood | Pedestal, X-shaped, Modern |
Materials and Tools
Building a six-seat dining table requires careful selection of materials and tools to ensure a sturdy, aesthetically pleasing, and long-lasting piece of furniture. This section Artikels the essential materials and tools needed for this DIY project, along with tips for choosing the right wood.
Materials
The materials required for a six-seat dining table can vary depending on the design and size, but here’s a comprehensive list of common materials:
- Wood:The choice of wood is crucial and impacts both the aesthetics and durability of the table. Popular choices include:
- Hardwoods:Oak, maple, cherry, walnut, and mahogany are known for their strength, durability, and beautiful grain patterns. They are typically more expensive than softwoods.
- Softwoods:Pine, fir, and cedar are more affordable but less durable. They are often used for tabletops and legs, especially when painted or stained.
- Engineered wood:Plywood, MDF, and particleboard are cost-effective options that offer stability and consistency. They are often used for tabletops and base construction.
- Hardware:Hardware is essential for assembling and securing the table components. Common hardware includes:
- Screws:Various sizes and lengths of wood screws are needed for attaching the tabletop, legs, and aprons.
- Wood glue:A high-quality wood glue is essential for creating strong and durable joints.
- Fasteners:Depending on the design, you may need bolts, nuts, washers, or dowels for joining table components.
- Hinges:If you are building a drop-leaf table, you will need hinges for the leaves.
- Finishes:Finishes protect the wood and enhance its appearance. Common options include:
- Stain:Stain penetrates the wood and enhances its natural color and grain pattern.
- Paint:Paint provides a solid color and can be used to create a variety of finishes.
- Polyurethane:Polyurethane is a durable and protective coating that resists water and scratches.
- Wax:Wax provides a natural finish that enhances the wood’s natural beauty and protects it from scratches.
Tools
A variety of tools are essential for building a six-seat dining table. Here’s a list of essential tools:
- Measuring tools:Accurate measurements are crucial for building a table with the desired dimensions. Essential measuring tools include:
- Tape measure:A tape measure is essential for measuring the dimensions of the table and its components.
- Ruler:A ruler is useful for making precise measurements and marking lines.
- T-bevel:A T-bevel is used to transfer angles accurately.
- Cutting tools:Cutting tools are essential for shaping and sizing the wood. Essential cutting tools include:
- Circular saw:A circular saw is used for making straight cuts in wood. It is often used for cutting tabletops and legs.
- Jigsaw:A jigsaw is used for making curved cuts in wood. It is often used for cutting out intricate shapes or for creating a unique design.
- Hand saw:A hand saw is useful for making smaller cuts and for trimming wood. It is often used for making fine cuts or for cutting wood in tight spaces.
- Drilling and fastening tools:These tools are essential for assembling the table and attaching hardware. Essential drilling and fastening tools include:
- Drill:A drill is used for drilling holes in wood for screws, bolts, and dowels.
- Screwdriver:A screwdriver is used for driving screws into wood. It is often used for attaching the tabletop, legs, and aprons.
- Drill bits:A variety of drill bits are needed for drilling different sizes of holes. These are used for attaching hardware and for creating pilot holes before driving screws.
- Sanding tools:Sanding tools are essential for smoothing out rough edges and creating a smooth finish. Essential sanding tools include:
- Sandpaper:Sandpaper is used for smoothing out rough edges and preparing the wood for finishing.
- Orbital sander:An orbital sander is used for sanding large areas of wood quickly and efficiently. It is often used for sanding tabletops and legs.
- Palm sander:A palm sander is used for sanding smaller areas of wood and for sanding in tight spaces. It is often used for sanding around edges and for achieving a fine finish.
- Clamping tools:Clamping tools are essential for holding wood pieces together while gluing and attaching hardware. Essential clamping tools include:
- Bar clamps:Bar clamps are used for holding wood pieces together while gluing. They are often used for clamping tabletops to legs and for clamping aprons to the base.
- C-clamps:C-clamps are used for holding wood pieces together while attaching hardware. They are often used for clamping screws in place and for securing joints.
- Spring clamps:Spring clamps are useful for holding small pieces of wood together while gluing or attaching hardware. They are often used for clamping small pieces of wood or for holding pieces together in tight spaces.
Choosing the Right Wood
Choosing the right wood for your dining table is crucial. Consider these factors:
- Durability:Hardwoods like oak, maple, and walnut are known for their durability and resistance to scratches and dents. They are suitable for high-traffic areas and will withstand the wear and tear of daily use. Softwoods like pine and fir are less durable but can be treated with finishes to increase their resistance to scratches and dents.
- Aesthetics:Wood comes in a wide variety of colors and grain patterns. Consider the overall style of your dining room and choose a wood that complements the existing decor. For a rustic look, consider using reclaimed wood or wood with knots and imperfections.
For a modern look, choose a wood with a clean and simple grain pattern.
- Budget:Hardwoods are generally more expensive than softwoods. If you are on a tight budget, consider using engineered wood or softwoods that can be stained or painted to achieve the desired look.
Construction Steps

Now that you have your materials and tools ready, it’s time to get down to the actual construction of your dining table. The process can be broken down into distinct steps, making it easier to manage and ensuring a successful outcome.
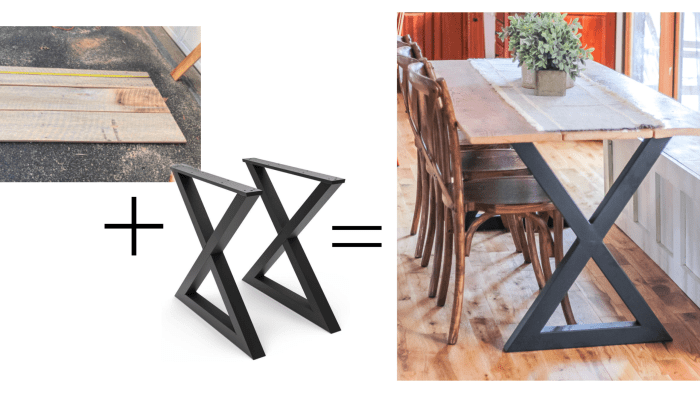
Building the Table Base
The table base is the foundation of your dining table, providing stability and support for the tabletop. It’s usually constructed using a combination of legs, rails, and supports, forming a sturdy frame.
- Cut the Legs:Using a miter saw or a circular saw, cut the legs to your desired length. Make sure to cut them all to the same length for a balanced table.
- Attach the Rails:Cut the rails to the length of the table top. Attach the rails to the legs using pocket holes, wood glue, and screws. Pocket holes are drilled at an angle, allowing for strong and hidden screw attachment.
- Add Supports:If your table top is large, you’ll need to add supports for additional stability. These can be placed in the center or along the edges of the base. Cut and attach the supports using the same method as the rails.
- Sand the Base:Once the base is assembled, sand it smooth using progressively finer grit sandpaper to remove any rough edges or imperfections.
Creating the Tabletop
The tabletop is the focal point of your dining table. It’s where you’ll serve your meals and enjoy your time with family and friends.
- Join the Boards:Cut your table top boards to the desired length and width. Join them together using glue and screws. If using a single board, make sure to choose a board with a wide grain pattern to minimize warping.
- Sand the Top:Sand the tabletop smooth using progressively finer grit sandpaper. This will remove any rough edges and prepare the surface for the finish.
- Apply Finish:Apply a finish to the tabletop, such as a varnish, polyurethane, or paint. The finish will protect the wood and enhance its natural beauty. Make sure to apply the finish in thin coats and allow it to dry completely between coats.
Attaching the Tabletop to the Base
Once both the tabletop and base are complete, you can attach them together.
Building a DIY six-seat dining room table is a great weekend project, but it can be a bit overwhelming when you’re staring at a pile of lumber. Sometimes, it helps to take a break and read about something completely different, like how First Atlantic Nickel is mobilizing a drill rig after new discoveries at the Atlantic Nickel Project and acquiring the Atlantis Nickel Project in Newfoundland.
It’s a reminder that even complex projects, like mining for nickel, start with a simple idea and a lot of hard work, just like your DIY table project.
- Center the Top:Place the tabletop on the base and ensure it’s centered. Use a level to ensure the top is level and straight.
- Secure the Top:Use screws to attach the tabletop to the base. If the tabletop is large, you may need to use multiple screws for added support. Pre-drill holes to prevent the wood from splitting.
Finishing Touches
The final step in building your six-seat dining table is applying a finish. This not only enhances the table’s appearance but also protects the wood from scratches, stains, and moisture.
Choosing the Right Finish
Selecting the right finish for your dining table depends on several factors, including the type of wood, the desired look, and the table’s intended use.
- Wood Type:Different wood types have varying porosities and grain patterns, affecting how they absorb and react to finishes. For instance, hardwoods like oak and maple generally require a finish that enhances their natural beauty, while softwoods like pine might benefit from a finish that hides imperfections.
- Desired Look:Do you want a natural, rustic look or a sleek, modern finish? Your choice of finish will significantly impact the final appearance.
- Intended Use:Consider how often the table will be used and the type of wear and tear it might endure. For high-traffic areas, a durable finish like polyurethane is recommended.
Types of Finishes
Here’s a breakdown of common dining table finishes, their application methods, and their pros and cons:
| Finish Type | Application Method | Pros | Cons |
|---|---|---|---|
| Stain | Brush, pad, or spray | Enhances wood grain, offers color variations | Requires sealing with a topcoat for protection |
| Paint | Brush, roller, or spray | Offers a wide range of colors, hides imperfections | Can obscure wood grain, may require multiple coats |
| Varnish | Brush, pad, or spray | Provides a durable, protective layer, enhances natural beauty | Can be difficult to apply evenly, requires careful preparation |
| Polyurethane | Brush, pad, or spray | Highly durable, water-resistant, protects against scratches | Can yellow over time, may require multiple coats |
| Oil | Brush, pad, or cloth | Penetrates wood, enhances natural beauty, easy to repair | Requires regular maintenance, may not be as durable as other finishes |
| Wax | Brush, pad, or cloth | Provides a natural, protective layer, easy to apply | Not as durable as other finishes, requires frequent reapplication |
Safety Precautions
Building a dining table is a rewarding project, but it’s essential to prioritize safety throughout the process. Woodworking tools and materials can be hazardous if not handled correctly. By following these safety precautions, you can minimize risks and ensure a safe and enjoyable DIY experience.
Importance of Safety Gear
Wearing proper safety gear is crucial when working with woodworking tools and materials. This gear acts as a barrier between you and potential hazards, protecting you from injuries.
- Eye Protection:Safety glasses or goggles should always be worn to protect your eyes from flying debris, sawdust, and wood chips.
- Gloves:Wearing gloves protects your hands from splinters, cuts, and rough surfaces. Choose gloves that provide a good grip and are suitable for the task at hand.
- Dust Mask:A dust mask, preferably an N95 respirator, should be worn to filter out fine sawdust particles that can irritate your lungs and respiratory system.
- Hearing Protection:Power tools can generate significant noise levels, so earplugs or earmuffs are essential to protect your hearing.
Safe Handling of Power Tools
Power tools can be incredibly useful for woodworking projects, but they also pose significant risks if not used correctly.
- Always unplug tools before making adjustments or changing blades.This prevents accidental starts that could cause injury.
- Use tools with sharp blades and bits.Dull blades can cause the wood to bind, leading to kickbacks and injuries.
- Keep your fingers away from the cutting path of blades and bits.Use push sticks or feather boards to guide wood safely.
- Securely clamp workpieces before cutting or sanding.This prevents the wood from moving during operation, reducing the risk of kickbacks and accidents.
- Avoid using power tools when tired or under the influence of drugs or alcohol.Fatigue and impaired judgment can lead to mistakes and injuries.
Safe Handling of Heavy Materials, Diy six seat dining room table
Moving and handling heavy materials like wood planks and tabletops requires careful planning and technique to avoid injury.
- Use proper lifting techniques.Bend your knees, keep your back straight, and lift with your legs, not your back.
- Get help from another person when lifting heavy items.Two people can safely lift and move heavy materials with less strain.
- Use lifting aids when available.Dollies, carts, and other lifting aids can make handling heavy materials easier and safer.
Safety Tips for Working with Wood
Wood itself can be a source of hazards if not handled properly.
- Always inspect wood for knots, cracks, and other defects.These imperfections can weaken the wood and make it more prone to breaking or splintering.
- Use caution when working with hardwoods.Hardwoods are more difficult to cut and can be more prone to splintering than softwoods.
- Avoid using wood that has been treated with chemicals.Treated wood can release harmful fumes and should not be used in furniture that will be in contact with food.
Inspiration and Ideas

Bringing your dining table vision to life is a rewarding journey that starts with inspiration. Before diving into the construction process, it’s crucial to explore various styles, designs, and unique details that resonate with your personal taste and the overall aesthetic of your dining room.The internet offers a vast treasure trove of DIY dining table projects, showcasing diverse styles and creative approaches.
Visualizing Your Dream Table
Visualizing the final design before embarking on the project is paramount. This involves considering various factors, such as:
- The size and shape of the table to accommodate your needs.
- The style of the table, whether modern, rustic, farmhouse, or contemporary.
- The type of wood you’ll use, its color, and grain patterns.
- The desired finish, such as stained, painted, or lacquered.
- Any additional design elements, such as inlays, carvings, or unique hardware.
Exploring Styles and Design Elements
Inspiration for your DIY six-seat dining table can come from various sources, such as:
- Modern Minimalism:Characterized by clean lines, simple shapes, and a focus on functionality. A modern table might feature a sleek, rectangular top with a minimalist metal base.
- Rustic Charm:Embraces natural textures and imperfections. A rustic table might be crafted from reclaimed wood with visible knots and grain patterns, complemented by sturdy legs made from rough-hewn timber.
- Farmhouse Elegance:Blends rustic elements with a touch of sophistication. A farmhouse table could feature a wide, distressed top with a distressed finish, paired with turned legs or a simple pedestal base.
- Contemporary Chic:Celebrates bold shapes, innovative materials, and a modern aesthetic. A contemporary table might showcase a unique geometric design, a sleek acrylic top, or a combination of wood and metal.
Adding Unique Details
Beyond the basic design, you can add unique details to personalize your dining table and make it truly your own. Here are some creative DIY techniques:
- Inlays:Inlaying contrasting wood species or materials like mother-of-pearl creates intricate patterns and adds a touch of elegance.
- Carvings:Carving simple geometric patterns or floral motifs on the table legs or apron adds a touch of artistry and sophistication.
- Paint Finishes:Experimenting with different paint colors, techniques, and distressing effects can create a unique and personalized look.
- Stencils:Stencils offer a simple way to add decorative patterns or motifs to the table top or legs.
- Unique Hardware:Replacing standard screws and bolts with decorative hardware, such as ornate hinges or antique-style knobs, can enhance the table’s overall aesthetic.