
DIY Clay Votive Holders: A Step-by-Step Guide for Effortless Ambiance
Creating your own custom clay votive holders is a remarkably accessible and rewarding DIY project. The inherent malleability of clay allows for a vast range of creative expression, from the minimalist and modern to the intricately textured and rustic. This guide provides a comprehensive, SEO-friendly approach to making beautiful, functional votive holders using air-dry clay, a material that requires no special firing and is readily available at most craft stores. We will delve into material selection, essential tools, shaping techniques, embellishment ideas, and finishing touches, ensuring you possess all the knowledge to craft your unique pieces with confidence and ease. The resulting votive holders not only serve as elegant candle holders but also act as decorative accents, infusing your living spaces with a warm, inviting glow and a personalized touch that mass-produced items simply cannot replicate. Whether you’re a seasoned crafter or a complete beginner, this project offers a low-barrier entry into the world of clay crafting, with immediate and impressive results.
The primary material for this project is air-dry clay. This type of clay hardens when exposed to air, eliminating the need for a kiln or specialized oven. It is typically white or terracotta in color and can be easily painted or sealed once dry. For beginners, using a store-bought air-dry clay is highly recommended due to its consistency and ease of use. Look for brands that are known for their smooth texture and minimal cracking upon drying. While some air-dry clays can be more prone to cracking than others, understanding the drying process and employing gentle handling techniques will mitigate this issue. If you are opting for a colored clay, be aware that the color may lighten slightly as it dries. For a truly custom color palette, uncolored air-dry clay offers the most flexibility for painting and staining. When selecting your clay, consider the project’s scale. Larger projects might benefit from a slightly more robust clay, while smaller votives can utilize a finer, more detailed clay. The amount of clay needed will depend on the number and size of votive holders you intend to create. A standard 1lb (approx. 450g) tub of air-dry clay is usually sufficient for several medium-sized votive holders.
Essential tools for this DIY project are minimal, making it an ideal choice for those with limited craft supplies. You will require a clean, flat work surface. A piece of parchment paper or a silicone mat is highly recommended to prevent the clay from sticking and to facilitate easy cleanup. A rolling pin or a smooth, cylindrical object (like a clean wine bottle) is necessary for flattening the clay to a uniform thickness. Various sculpting tools can be beneficial for shaping, smoothing, and adding details. This can include simple items like a butter knife, a toothpick, a skewer, or even the edge of a credit card. For cutting out shapes, a craft knife or a sharp kitchen knife will be useful. A small bowl of water is crucial for smoothing the clay and adhering pieces together. If you plan to incorporate texture, items like leaves, lace, stamps, or even textured fabrics can be employed. Lastly, a circular object of the desired diameter of your votive holder’s opening, such as a glass, jar, or cookie cutter, will serve as a guide for the internal dimensions. A ruler or measuring tape will also be helpful for ensuring consistency.
The initial step in creating your clay votive holders involves preparing the clay. Begin by kneading a portion of the air-dry clay on your prepared work surface until it becomes pliable and free of air bubbles. This process is similar to kneading dough and helps to create a smooth, workable consistency. Once the clay is properly conditioned, use your rolling pin to roll it out to an even thickness. For most votive holders, a thickness of approximately ¼ inch (0.6 cm) is ideal. This thickness provides sufficient sturdiness without being overly bulky. Avoid rolling the clay too thin, as it can become fragile and prone to breakage. Conversely, rolling it too thick can make it difficult to dry thoroughly and may result in a heavy, cumbersome votive holder. Ensure the edges of the rolled-out clay are relatively smooth, as this will translate to a neater finished product. If you are using a cookie cutter for a precise circular base, now is the time to cut out your desired shape. If you are freehanding your shapes, proceed to the next step.
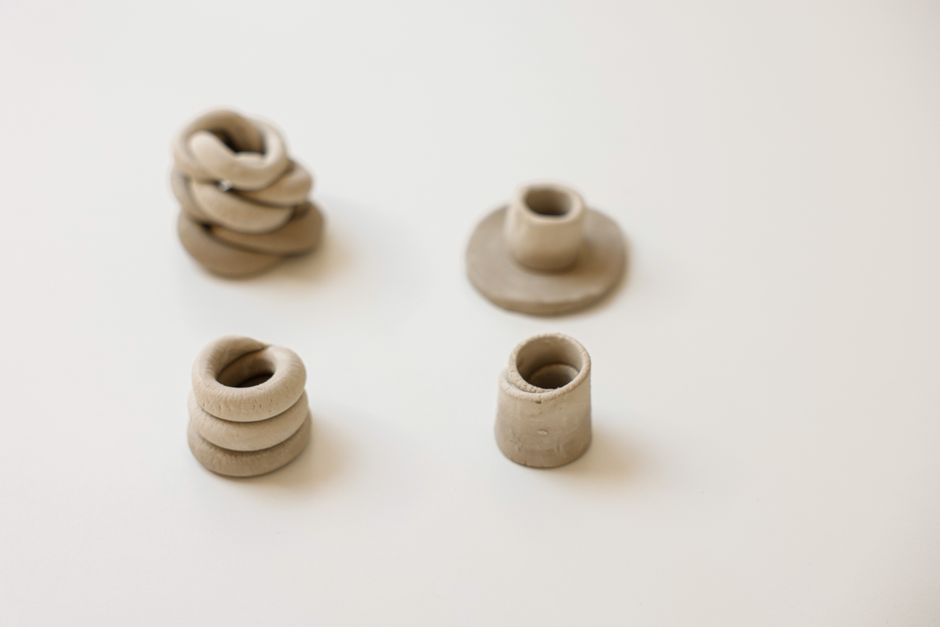
There are several methods for shaping your votive holders, depending on the desired form. A straightforward approach involves creating a cylindrical holder. Roll out a rectangular piece of clay and then carefully wrap it around a cylindrical object, such as a glass or a jar, ensuring it overlaps slightly. Use a damp tool or your finger to smooth the seam where the clay overlaps. This creates a seamless cylinder. Alternatively, you can form a free-standing cylinder by coiling thin ropes of clay and pressing them together, smoothing the interior and exterior surfaces. For a more organically shaped holder, you can sculpt the clay freehand, pressing it into a desired form. Another popular method is to create a base and then build up the sides. Cut a circular base and then roll out thin ropes of clay to form the walls, attaching them to the base with water and pressing to secure. This method allows for greater control over the height and shape of the sides. For a bowl-like votive holder, simply press a flattened disc of clay into a bowl-shaped mold or freehand shape it with your hands.
Adding decorative elements to your clay votive holders is where personalization truly shines. Texture can be introduced by pressing various objects into the wet clay. Leaves, for instance, can create beautiful natural imprints. Lace can be used to impart an intricate, delicate pattern. Stamps, whether they are rubber stamps designed for clay or everyday objects with interesting textures, can be pressed into the surface. For a more rustic look, you can score the clay with a fork or a toothpick to create linear patterns. Embossing tools can be used to create raised designs. If you wish to add dimensional elements, such as handles or decorative appendages, create these separately and then attach them to the main body of the votive holder while the clay is still wet. Use a bit of water and score both surfaces where they will meet to ensure a strong bond. Consider the heat generated by the candle when deciding on the placement of embellishments. Avoid adding flammable materials directly to areas that will be close to the flame.
Once your votive holders have been shaped and decorated, it’s time for them to dry. Air-dry clay needs to dry slowly and evenly to prevent cracking. Leave your creations on a flat surface in a well-ventilated area, away from direct sunlight or heat sources. The drying time will vary depending on the thickness of the clay, the humidity in your environment, and the size of the votive holder. Typically, it can take anywhere from 24 to 72 hours for the clay to dry completely. You will know your votive holder is dry when it feels hard to the touch and its color has lightened. If you notice any minor cracks appearing during the drying process, you can often fill them with a small amount of new clay and smooth them once dry. Patience is key during this stage. Rushing the drying process is a common cause of cracking and weakening. If you are in a humid climate, it might be beneficial to place a fan nearby to gently circulate air.
After the air-dry clay votive holders are completely dry, the finishing touches can be applied. Painting is a popular option to add color and personality. Acrylic paints are ideal for air-dry clay as they are water-based, easy to clean up, and dry quickly. You can paint your votive holders in solid colors, create intricate designs, or use stencils for a more polished look. Consider sealing the painted surface with a clear acrylic sealer or varnish. This not only protects the paintwork but also adds a subtle sheen and makes the votive holders more durable and easier to clean. Mod Podge is another excellent sealant and decoupage medium that can be used to adhere decorative papers or fabrics to the clay before sealing. For a more natural, unpainted look, you can stain the dried clay with wood stains or diluted acrylic paints to achieve a subtle, aged appearance. If you intend to use your votive holders outdoors, ensure your sealant is weather-resistant.
The structural integrity and safety of your DIY clay votive holders are paramount. It is crucial to ensure that the base is wide and stable enough to prevent tipping. If you are creating tall, slender votive holders, consider adding a wider base for increased stability. The interior cavity should be deep enough to safely house the votive candle, preventing the flame from coming into contact with the clay sides. When using your finished votive holders, always place them on a heat-resistant surface. Never leave a burning candle unattended. It is also advisable to use good quality votive candles that burn evenly and do not produce excessive dripping wax. The clay itself is not fireproof, so direct contact with the flame should be avoided. If you are concerned about heat transfer, you can opt to place a small metal insert or tray within the votive holder to catch any melted wax and provide an extra layer of heat protection. Regularly inspect your votive holders for any signs of wear or damage, particularly if they are exposed to moisture.
For those seeking to elevate their DIY clay votive holders, consider incorporating different types of clay or mediums. While air-dry clay is convenient, polymer clay offers a different set of properties. Polymer clay requires baking in a home oven to harden, resulting in a more durable and waterproof finish. This makes it a good option for votive holders that might be exposed to more moisture or handling. Techniques like marbling, cane work, and mokume-gane are also possible with polymer clay, allowing for incredibly intricate and unique designs. Beyond traditional clay, you can also experiment with paper clay, which is a lightweight blend of paper pulp and clay, offering a unique texture and excellent strength when dry. Mixed media approaches can also be explored, where elements like mosaic tiles, glass beads, or even small pieces of driftwood are incorporated into the clay design, adding layers of visual interest and tactile appeal.
When considering SEO optimization for your DIY clay votive holder article, several key elements are crucial. Firstly, the title itself, "DIY Clay Votive Holders: A Step-by-Step Guide for Effortless Ambiance," incorporates relevant keywords like "DIY," "clay votive holders," and "step-by-step guide." Throughout the article, consistently use variations of these keywords in headings, subheadings, and body text. For instance, headings like "Choosing Your Air-Dry Clay," "Essential Tools for Clay Votive Creation," and "Decorative Techniques for Clay Votive Holders" help to break down the content and make it easily scannable for both users and search engines. Incorporating long-tail keywords such as "easy air dry clay candle holder tutorial," "homemade rustic votive holder ideas," or "how to make decorative candle holders with clay" will attract a more targeted audience. Utilizing internal linking to other relevant DIY or crafting articles on your website can also boost SEO. Furthermore, ensuring the article is well-structured with clear paragraphs and concise language improves readability, a significant factor in SEO. The use of descriptive language and providing detailed instructions caters to users seeking practical information, which search engines favor. Finally, consider adding a section on frequently asked questions (FAQs) related to clay votive making, further enhancing keyword density and user engagement. The aim is to create a comprehensive resource that answers all potential user queries, positioning your article as an authority on the subject.
The environmental impact of DIY projects is increasingly important to consumers. When creating your clay votive holders, consider using eco-friendly materials. Opt for air-dry clays that are free from harmful chemicals and pigments. When painting, choose water-based acrylics or natural dyes. Sealants and varnishes should also be low in VOCs (volatile organic compounds). For a truly sustainable approach, consider repurposing materials. Old glass jars or tin cans can serve as molds or bases for your clay creations. Even the cardboard tubes from paper towels can be used as forms for cylindrical votive holders. Proper disposal of any unused clay and crafting supplies is also essential. Many air-dry clays can be composted once they are completely dry and free of non-biodegradable additives. Research local recycling and composting guidelines to ensure responsible disposal of your crafting waste. By making conscious choices about the materials you use and how you dispose of them, you can create beautiful and functional items while minimizing your environmental footprint. This aspect can also be highlighted in your SEO strategy by using keywords like "eco-friendly clay votive tutorial" or "sustainable DIY candle holders."
In conclusion, the creation of DIY clay votive holders offers a satisfying and accessible crafting experience, blending artistic expression with functional home décor. By meticulously following the outlined steps, from selecting the appropriate air-dry clay to implementing creative embellishment and finishing techniques, individuals can produce unique and personalized votive holders. The emphasis on essential tools, gradual drying processes, and safety considerations ensures a successful outcome. Furthermore, exploring diverse material options and embracing eco-conscious practices enhances the appeal and sustainability of this craft. The integration of SEO best practices, including strategic keyword utilization and content structuring, is paramount for maximizing the visibility and reach of this informative guide. Ultimately, these handmade creations serve not only as conduits for warm, ambient light but also as testaments to the joy and creativity inherent in DIY endeavors, enriching living spaces with a touch of individual artistry.
