
Color Block Terra Cotta Pots DIY: Vibrant Accents for Your Greenery
The charm of terra cotta pots is undeniable. Their earthy, natural aesthetic complements a wide range of interior and exterior decor styles. However, for those seeking a bolder, more contemporary statement, plain terra cotta can sometimes feel a little too understated. This is where the magic of color blocking comes in. DIY color block terra cotta pots offer a fantastic opportunity to inject personality, vibrancy, and artistic flair into your plant displays. This comprehensive guide will walk you through everything you need to know to create stunning, custom color block terra cotta pots, from choosing your colors to achieving a professional finish.
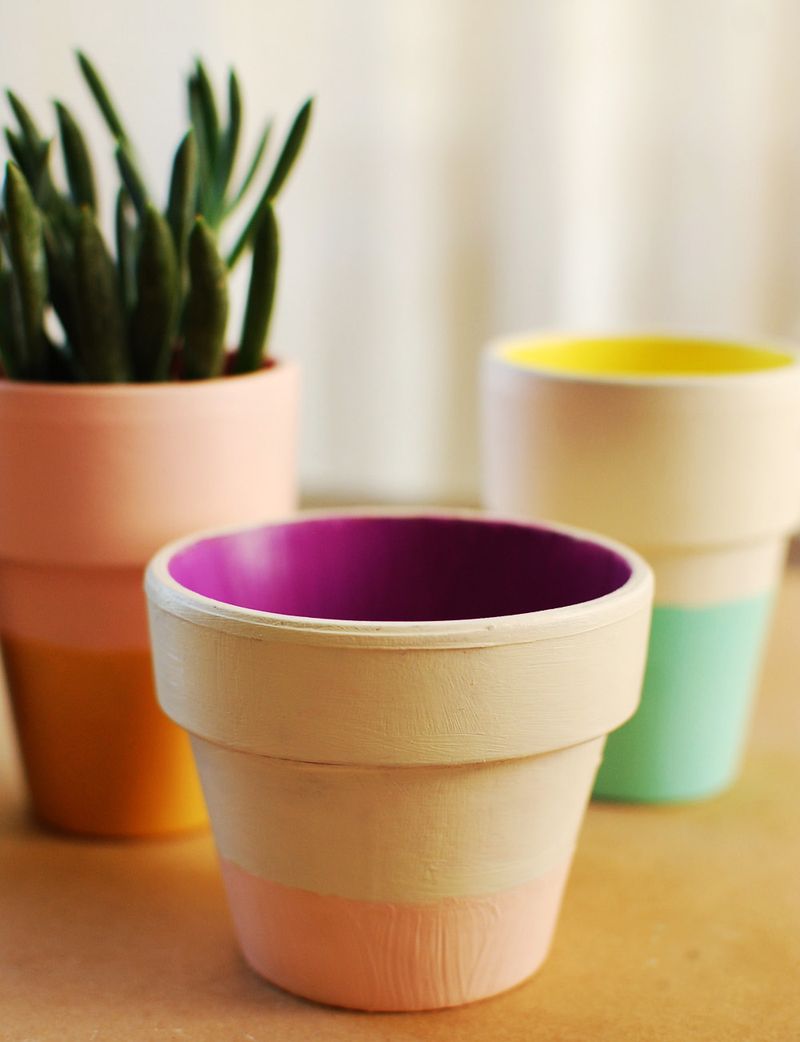
The appeal of color blocking lies in its simplicity and striking visual impact. By strategically dividing a pot into distinct, contrasting blocks of color, you create a dynamic and modern look that draws the eye. This technique is incredibly versatile, allowing you to tailor the color palette to match your existing decor, the specific plant you’ll be housing, or simply your personal preferences. Whether you’re aiming for a minimalist, two-tone design or a vibrant, multi-hued masterpiece, color blocking provides a straightforward yet effective way to elevate the humble terra cotta pot into a decorative object in its own right. Furthermore, the DIY aspect allows for complete creative control, ensuring your pots are truly one-of-a-kind.
Materials and Tools for Your Color Block Terra Cotta Pot Project:
To embark on your color block terra cotta pot adventure, you’ll need a few essential items. The quality of your materials will directly influence the longevity and overall appearance of your finished pots.
- Terra Cotta Pots: The foundation of your project. Select pots in various sizes to create visual interest. Ensure they are clean and dry before you begin. Unsealed terra cotta is best for paint adhesion.
- Painter’s Tape or Masking Tape: Crucial for creating crisp, clean lines between color blocks. Opt for high-quality painter’s tape, which is designed to prevent paint bleed.
- Paint: Acrylic paints are the most accessible and versatile option for terra cotta. Look for exterior-grade acrylics if your pots will be placed outdoors, as they offer better durability and weather resistance. For indoor use, standard craft acrylics will suffice. Consider matte, satin, or gloss finishes depending on the desired aesthetic.
- Paint Brushes: A variety of sizes will be helpful. A wider brush is good for covering larger areas, while smaller, finer brushes are ideal for detail work and reaching into crevices. Foam brushes can also be a good option for smooth, even application.
- Primer (Optional but Recommended): A primer specifically designed for porous surfaces like terra cotta will improve paint adhesion and create a more uniform base for your colors, especially if you are using lighter shades over the natural terra cotta.
- Sealant/Varnish (Optional but Recommended): To protect your painted pots from chipping, fading, and moisture, especially for outdoor use, a clear sealant or varnish is highly recommended. Matte, satin, or gloss finishes are available.
- Sandpaper (Fine-grit): For smoothing any rough patches on the terra cotta before painting and for light sanding between coats of paint or sealant.
- Drop Cloth or Newspaper: To protect your work surface from paint spills.
- Rags or Paper Towels: For wiping up excess paint and cleaning brushes.
- Gloves: To protect your hands from paint.
- Scissors or Craft Knife: For trimming painter’s tape.
- Pencil or Marker: For marking your color block lines if needed.
Preparing Your Terra Cotta Pots for Painting:
Proper preparation is paramount for a professional-looking and durable finish. Skipping this step can lead to paint peeling, chipping, or an uneven appearance.
- Cleaning: Thoroughly clean your terra cotta pots. Use a damp cloth or a soft brush to remove any dust, dirt, or debris. For stubborn marks or algae, you can use a mild soap and water solution or a diluted vinegar solution. Rinse well and allow the pots to dry completely. This can take 24-48 hours, depending on humidity.
- Sanding (Optional): If your pots have any rough spots or uneven surfaces, a light sanding with fine-grit sandpaper can help create a smoother base for the paint. Wipe away any dust with a dry cloth.
- Priming (Optional but Highly Recommended): Apply a thin, even coat of primer to the exterior of the pot. This is particularly important if you’re using bright or light colors, as it will provide a neutral base and prevent the terra cotta’s natural color from showing through. Allow the primer to dry completely according to the manufacturer’s instructions. You might need a second coat for optimal coverage.
Designing Your Color Blocks:
This is where your creativity truly shines. The possibilities for color block designs are endless. Consider the following to guide your design process:
- Color Palette: Choose colors that complement your existing decor or create a vibrant contrast. Think about color theory – complementary colors create high contrast, while analogous colors create a more harmonious feel.
- Number of Colors: Will you opt for a simple two-tone design, a sophisticated three-color scheme, or a bold, multi-colored arrangement?
- Placement of Blocks: Consider how the colors will wrap around the pot. Will they be horizontal bands, vertical stripes, geometric shapes, or abstract sections?
- Size and Proportion of Blocks: Experiment with different proportions to achieve the desired visual balance. Larger blocks can create a more dominant statement, while smaller blocks can add playful accents.
- Inspiration: Look to art, fashion, or nature for color block inspiration. Websites like Pinterest and Instagram are excellent resources for visual ideas.
Techniques for Creating Clean Color Block Lines:
The key to a successful color block design is achieving sharp, precise lines between the colors. Painter’s tape is your best friend here.
- Applying the First Color: Paint the first section of your pot with your chosen color. Ensure the paint is dry to the touch before proceeding.
- Applying Painter’s Tape: Once the first color is completely dry, carefully apply painter’s tape to create the boundary for your next color block. Press the edges of the tape firmly to create a good seal, preventing paint from seeping underneath. For curved surfaces like pots, it can be helpful to use tape specifically designed for curves or to make small cuts in the tape to allow it to conform to the shape.
- Creating a "Seal" with the First Color (Optional but Recommended): For an extra layer of protection against bleed, you can apply a very thin coat of the first color of paint over the edge of the tape. Once this is dry, you can then apply your second color. This acts as a sealant and helps to create an even crisper line.
- Painting the Second Color: Apply your second color within the taped-off section. Use even strokes and avoid overloading your brush. Allow the paint to dry to the touch.
- Removing the Tape: The most satisfying part! Once the second color is dry but not fully cured (this is crucial – if the paint is fully cured, it might peel away with the tape), carefully and slowly peel off the painter’s tape at an angle. This will reveal a clean, sharp line between your colors. If you notice any minor bleed, you can often touch it up with a small, fine-tipped brush once the paint is fully dry.
- Repeating for Additional Colors: Continue this process for each subsequent color block, allowing each layer to dry thoroughly and using painter’s tape to define new boundaries.
Painting Techniques for Different Designs:
- Horizontal Bands: This is the most straightforward color block technique. Measure and mark your desired band widths with a pencil or chalk before applying tape. Ensure your tape is level for a professional look.
- Vertical Stripes: Similar to horizontal bands, but tape is applied vertically. Consider varying the width of the stripes for visual interest.
- Geometric Shapes: This requires more intricate taping. You can create squares, rectangles, triangles, or even more complex polygons. Experiment with different angles and intersections.
- Ombre or Gradient Effect: While not strictly color blocking, you can achieve a similar visual effect by blending colors. This involves painting one color and then, while it’s still wet, gradually introducing the next color with a damp brush to create a smooth transition.
- Splatter or Drip Effects: Once your main color blocks are dry, you can add artistic flair with splattered or dripped paint. Use a stiff brush to flick paint onto the pot or allow paint to drip down from the rim.
Sealing Your Masterpiece:
Once all your paint is dry and you’re happy with your color block design, applying a sealant is a crucial step to protect your work and enhance its longevity.
- Choose Your Sealant: Opt for a clear acrylic sealant or varnish. Matte, satin, and gloss finishes are available. A matte finish will give a more natural, modern look, while a gloss finish will provide a shiny, more vibrant appearance. Ensure the sealant is suitable for outdoor use if your pots will be exposed to the elements.
- Apply Thin Coats: Apply the sealant in thin, even coats using a clean brush or foam applicator. Avoid applying too much at once, as this can lead to drips and an uneven finish.
- Allow to Dry: Let each coat of sealant dry completely according to the manufacturer’s instructions. This usually takes a few hours.
- Multiple Coats: For maximum durability, especially for outdoor pots, apply at least two to three coats of sealant.
Tips for Success and Troubleshooting:
- Work in a Well-Ventilated Area: Especially when using primers and sealants.
- Test Your Colors: Before committing to your pots, test your paint colors on a scrap piece of terra cotta or cardboard to see how they look and dry.
- Don’t Rush: Allow adequate drying time between coats of paint and sealant. Patience is key to achieving a professional finish.
- Clean Your Brushes Immediately: Acrylic paint dries quickly, so wash your brushes with soap and water as soon as you finish using them.
- Dealing with Paint Bleed: If you notice minor paint bleed, don’t despair. Once the paint is fully dry, you can often carefully touch up the lines with a small, fine-tipped brush using the correct color.
- Uneven Surfaces: Terra cotta can be porous and have slight imperfections. Embrace these character marks, or use a primer and multiple thin coats of paint to achieve a smoother finish.
- Outdoor Durability: For pots that will be outside, invest in exterior-grade paints and sealants. Consider the temperature fluctuations and moisture they will endure.
Styling Your Color Block Terra Cotta Pots:
Once your beautiful color block pots are dry and sealed, it’s time to fill them with your favorite plants and showcase them!
- Indoor Decor: Place them on bookshelves, windowsills, mantels, or coffee tables. Their vibrant colors can add a pop of personality to any room.
- Outdoor Spaces: Use them to accent patios, balconies, garden beds, or entryways. They can be grouped together for a striking visual display or used individually as focal points.
- Plant Pairings: Consider the colors of your plants and how they will complement your color block designs. Bright green foliage often pops against bold colors, while succulents can add a natural, textural contrast.
- Grouping: Arrange pots of different sizes and color combinations together to create a dynamic and visually appealing display.
SEO Keywords for this Article:
Color block terra cotta pots, DIY terra cotta pots, painted terra cotta pots, custom plant pots, decorative terra cotta, acrylic paint terra cotta, outdoor plant pots, indoor plant pots, home decor DIY, garden decor, vibrant plant pots, modern plant pots, easy DIY crafts, terracotta pot painting, plant pot ideas, colorful plant pots.
By following these detailed steps and incorporating your own creative vision, you can transform ordinary terra cotta pots into extraordinary, personalized works of art that will enhance the beauty of your plants and your living space. The process is rewarding, relatively inexpensive, and the end result is a collection of unique decorative pieces that are sure to impress.
