
Mastering the Drip Cake: A Comprehensive Guide to Creating Stunning Edible Masterpieces
The drip cake has ascended from a niche trend to a ubiquitous centerpiece in modern celebratory baking, celebrated for its striking visual appeal and the satisfying contrast of textures. This guide delves deep into the art and science of creating a perfect drip cake, covering everything from foundational cake structure to the nuanced application of ganache. Achieving a professional-looking drip cake requires meticulous attention to detail, understanding of ingredient properties, and a systematic approach. This article will equip bakers of all skill levels with the knowledge and techniques necessary to confidently craft these show-stopping desserts.
The Foundation: Cake Selection and Preparation
The success of any drip cake begins with a robust and stable cake structure. Drip cakes are often multi-tiered, and the cake layers must be able to withstand the weight of frosting and the decorative elements. Opt for dense, moist cake recipes that hold their shape well. Pound cakes, sturdy vanilla or chocolate cakes, or even a well-baked red velvet are excellent choices. Avoid overly light and airy cakes like angel food or chiffon, as they may crumble under pressure.
Baking the Layers: For optimal stability, bake cake layers in advance, ideally a day or two before assembly. This allows them to cool completely and firm up, making them easier to handle and level. Ensure your cake pans are properly greased and floured, or lined with parchment paper, to prevent sticking. Bake until a toothpick inserted into the center comes out clean. Over-baking will result in a dry cake, which is detrimental to the overall moisture and flavor profile.
Cooling and Storing: After baking, allow the cake layers to cool in their pans for 10-15 minutes before inverting them onto a wire rack to cool completely. Once fully cooled, wrap each layer tightly in plastic wrap and refrigerate. Refrigeration further firms the cake and makes it easier to slice cleanly.
Leveling for Precision: Even cake layers are paramount for a structurally sound and aesthetically pleasing drip cake. Use a serrated knife or a cake leveler to remove the domed top of each cake layer. Aim for perfectly flat surfaces to ensure even stacking and frosting application. Any imperfections here will be amplified in the final product.
Crumb Coating for a Flawless Finish: The crumb coat is a thin layer of frosting applied to the entire cake before the final frosting. Its primary purpose is to trap loose crumbs, preventing them from appearing in the final, smooth layer of frosting. Apply a thin, even layer of buttercream or ganache over the entire cake, ensuring all surfaces, including the sides, are covered. Use an offset spatula to spread the frosting smoothly. Once crumb-coated, refrigerate the cake for at least 30 minutes, or until the frosting is firm to the touch. This sets the crumb coat and provides a solid base for the final frosting.
The Frosting: Choosing the Right Medium
The choice of frosting is crucial for both taste and structure. Buttercream is a popular choice, but its consistency needs to be perfect for smoothing and holding the drip. Ganache, on the other hand, offers a luxurious finish and the ideal viscosity for dripping. Many bakers opt for a combination, using buttercream for the cake’s exterior and ganache for the drip.
Buttercream Basics: American buttercream, made with butter, powdered sugar, and a liquid, is generally too soft for a stable drip cake unless significantly chilled. Swiss meringue buttercream or Italian meringue buttercream, which are more stable due to their cooked sugar base, are better choices. The key is to achieve a smooth, firm, yet spreadable consistency. If your buttercream is too soft, add more powdered sugar incrementally. If it’s too stiff, add a touch of milk or cream.
Ganache for the Drip: Chocolate ganache, a simple mixture of chocolate and heavy cream, is the star player for the drip effect. The ratio of chocolate to cream determines the viscosity and how the ganache will drip.
- For a fluid, cascading drip: Use a higher ratio of cream to chocolate, typically 1:1 or even 1:1.5 (chocolate:cream). This will result in a thinner ganache that flows easily. Dark or semi-sweet chocolate works well as it sets firmer than milk chocolate.
- For a thicker, more controlled drip: Use a higher ratio of chocolate to cream, such as 2:1 or 3:1. This creates a more viscous ganache that will hold its shape better and create a more defined drip. Milk or white chocolate will result in a softer ganache.
Making the Ganache: Gently heat the heavy cream in a saucepan until it just begins to simmer. Do not boil. Pour the hot cream over finely chopped chocolate (or chocolate chips). Let it sit for 5 minutes without stirring to allow the chocolate to melt. Then, gently whisk the mixture from the center outwards until it is smooth and glossy. For an exceptionally smooth ganache, you can strain it through a fine-mesh sieve.
Achieving the Perfect Drip Consistency: The temperature of the ganache is critical. It needs to be cool enough to thicken but warm enough to flow. For a 1:1 ratio dark chocolate ganache, this usually means letting it cool at room temperature for 15-30 minutes, stirring occasionally, until it has a consistency similar to honey. You can also test its drip by taking a spoonful and letting it fall back into the bowl; it should create a continuous stream that breaks after a few seconds. If it’s too thin, let it cool longer. If it’s too thick, gently warm it in short bursts in the microwave (10-second intervals), stirring between each burst.
The Art of Frosting the Cake
With a stable cake and a well-prepared frosting, the next step is to apply the final layer of frosting. This requires patience and precision to achieve that smooth, professional finish.
Applying the Final Frosting Layer: After the crumb coat has set, apply a generous amount of your chosen frosting to the top of the cake. Use an offset spatula to spread it evenly, working from the center outwards. Then, apply frosting to the sides of the cake. Hold your offset spatula at a slight angle to the cake and rotate the cake stand (or move the spatula) in a continuous motion. Aim for a smooth, consistent layer with no gaps or bumps. A bench scraper can be a valuable tool here; hold it at a 90-degree angle to the cake and gently rotate the cake stand to smooth the sides.
Achieving a Smooth Finish: For an ultra-smooth finish, you can dip your offset spatula or bench scraper in hot water, wipe it dry, and then use it to smooth the frosting. This slight warmth can help to melt the surface frosting just enough to create a glass-like finish. Chill the frosted cake again for at least 30 minutes, or until the frosting is firm. This is essential before applying the drip.
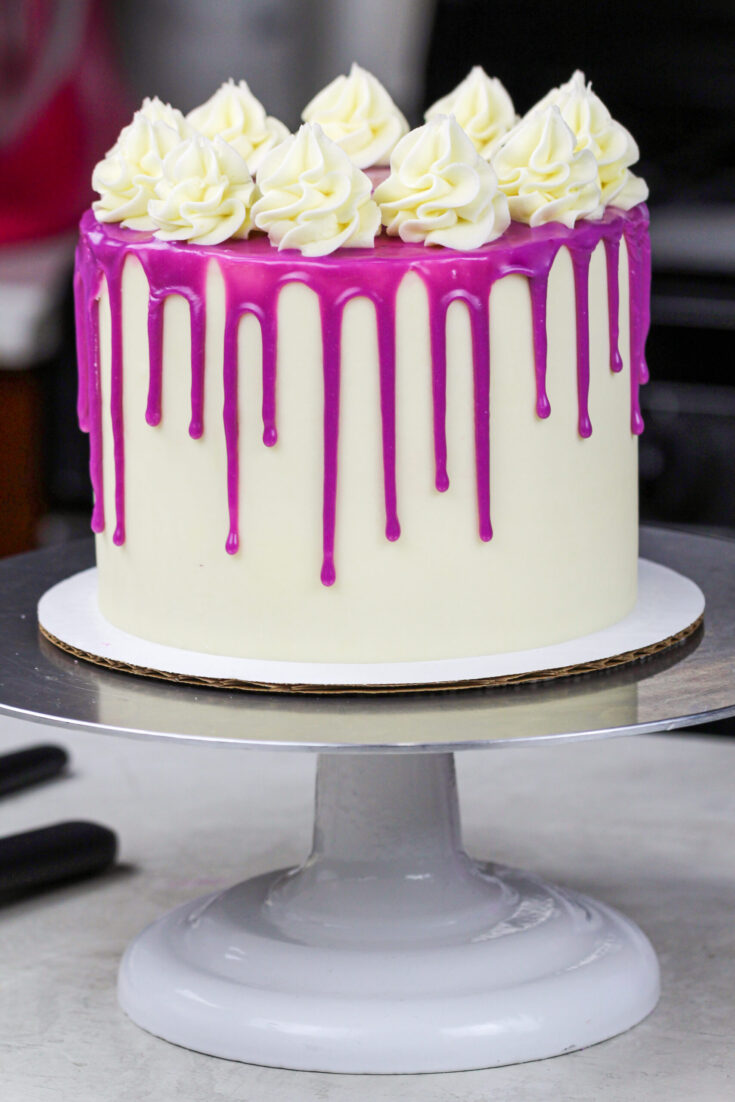
The Drip: Technique and Application
This is where the magic happens, transforming a well-frosted cake into a drip cake. The key is to apply the ganache at the correct temperature and with controlled, deliberate movements.
The Tool of Choice: While many use a squeeze bottle, a spoon or a piping bag with a small, round tip can also be effective. A squeeze bottle offers the most control for beginners. Ensure the nozzle of the squeeze bottle is a good size – too small and it might clog, too large and the drips might be too thick.
Starting the Drip: Begin by applying a small amount of ganache to the very edge of the cake’s top surface. Gently squeeze or spoon a small dollop of ganache onto the perimeter. The ganache should start to cascade down the side.
Creating the Drips: To create the drips, use your chosen tool to trace a circular motion around the top edge of the cake, applying a small amount of ganache with each pass. Allow the ganache to naturally drip down the sides. The length of the drips is determined by how much ganache you apply and its viscosity. For consistent drips, try to apply a similar amount of ganache at each interval.
Controlling Drip Length: If you want longer drips, apply more ganache at each point and allow it to flow further down. If you prefer shorter drips, use less ganache. The ganache will naturally thicken as it cools, so work relatively quickly once you start dripping.
Troubleshooting Drips:
- Drips are too thin and running too far: Your ganache is too warm or too thin. Chill the cake further and let the ganache cool more. You might need to scrape off excess ganache and reapply a thicker, cooler mixture.
- Drips are too thick and not forming: Your ganache is too cold or too thick. Gently warm the remaining ganache (in short bursts) and reapply. You might also need to coax the drips down with a small offset spatula.
- Uneven drips: This is common. You can try to even them out by gently nudging them with a small offset spatula or by carefully adding a little more ganache to shorter drips. Don’t overwork it, as you risk smudging the frosting.
Adding Edible Embellishments: Elevating Your Drip Cake
Once the ganache drip has set slightly, it’s time to add decorative elements to truly make your drip cake a masterpiece. This is where creativity shines.
Popular Embellishments:
- Fresh Fruit: Berries, figs, or sliced citrus can add color, texture, and a touch of freshness.
- Chocolate Decorations: Chocolate shards, curls, or truffles complement the ganache.
- Macarons: A popular and elegant addition, macarons provide a burst of color and flavor.
- Flowers: Edible flowers or carefully placed non-toxic fresh flowers can add a whimsical touch. Ensure any fresh flowers are washed and their stems are wrapped in floral tape to prevent direct contact with the cake.
- Sweets: Candies, sprinkles, or even small cookies can be used.
- Gold Leaf or Edible Glitter: For a touch of luxury and sparkle.
Placement Strategy: Consider the overall aesthetic. Grouping items, creating a cascading effect, or building a focal point are all effective design strategies. Apply embellishments while the ganache drip is still slightly soft to ensure they adhere well.
Achieving a Professional Polish: Final Touches and Storage
A few final touches can elevate your drip cake from homemade to haute cuisine.
Smoothing the Top: Ensure the top surface of the cake, around the drip, is also neatly frosted and smooth. Any stray ganache drips on the top can be carefully wiped away with a damp cloth or offset spatula.
Cooling and Setting: Allow the ganache drip to set completely before moving or serving the cake. This usually takes at least 30 minutes to an hour at room temperature, or faster if refrigerated.
Storage: Store drip cakes in the refrigerator, especially if they are frosted with buttercream or contain perishable fillings. To prevent the drip from becoming too soft or running, place the cake in an airtight container or cover it loosely with plastic wrap, ensuring the wrap doesn’t touch the decorations. If the cake has been at room temperature for an extended period, the ganache may soften; it will firm up again in the refrigerator.
Common Drip Cake Challenges and Solutions
- Cracked Drip: If the ganache cracks, it might be because it cooled too quickly or the cake frosting was too hard. Try gently warming the affected area with a small kitchen torch or by holding a warm offset spatula near it.
- Melted Drip: This indicates the cake is too warm or has been exposed to heat. Move it to a cooler environment or refrigerate.
- Ganache Dripping Too Far Down the Sides: This is a consistency issue. Ensure your ganache is cooled to the correct temperature and is not too thin. If it’s already happened, you might need to carefully remove the excess with a small offset spatula and reapply a thicker ganache.
Mastering the drip cake is a rewarding culinary journey. By understanding the fundamental principles of cake baking, frosting techniques, and the precise application of ganache, you can confidently create visually stunning and delicious edible art. Practice is key, and with each creation, you’ll refine your technique and develop your signature style.
