Basic needle felting on a photo is a unique and rewarding craft that combines the artistry of photography with the tactile nature of needle felting. This technique allows you to transform your favorite images into three-dimensional works of art, capturing the essence of a moment in a tangible form.
From choosing the perfect photo to mastering the delicate art of layering wool fibers, this guide will walk you through the entire process, equipping you with the knowledge and skills to create stunning needle felted masterpieces.
Introduction to Needle Felting

Needle felting is a fascinating craft that involves using specialized barbed needles to interlock fibers, typically wool, to create three-dimensional objects. It’s a versatile technique that allows you to craft a wide array of creations, from whimsical animals and charming characters to intricate sculptures and even functional items like jewelry and accessories.Needle felting offers a unique blend of creativity and tactile satisfaction.
The process involves manipulating wool fibers with a needle, gradually shaping and molding them into your desired form. It’s a meditative and therapeutic activity that allows for endless possibilities in terms of design and expression.
Basic Tools and Materials
The essential tools and materials for needle felting are readily available and relatively affordable.
- Felting Needles:These needles are the heart of needle felting. They come in various sizes and thicknesses, each designed for specific purposes. For example, star-shaped needles are great for initial shaping, while finer needles are used for detailing and finishing.
- Wool Roving:This is the primary material used in needle felting. Wool roving is a long, continuous strand of wool fibers that is easily manipulated and felted. It comes in a wide array of colors and textures, allowing you to create diverse and vibrant projects.
- Felting Mat:This is a dense, foam-like mat that provides a stable surface for needle felting. It helps to prevent the needle from piercing through the surface and also helps to protect your work surface from damage.
- Scissors:A pair of sharp scissors is essential for trimming and shaping the wool roving.
- Optional Tools:Additional tools, such as a foam sponge, a small brush, and a pair of tweezers, can be helpful for various tasks, such as smoothing the surface, removing stray fibers, and adding details to your creations.
Benefits and Challenges
Needle felting offers numerous benefits for both beginners and experienced crafters.
- Creative Freedom:Needle felting allows for immense creative freedom. You can create anything you can imagine, from realistic animals to abstract sculptures. The only limit is your imagination.
- Therapeutic and Relaxing:The repetitive motions and tactile nature of needle felting can be incredibly therapeutic and relaxing. It’s a great way to de-stress and unwind.
- Portable and Affordable:Needle felting is a portable craft that can be enjoyed anywhere. It’s also relatively affordable, with the basic tools and materials being readily available.
However, needle felting also presents some challenges:
- Patience and Precision:Needle felting requires patience and precision. It can take time to master the technique and achieve the desired results.
- Needle Safety:It’s important to handle the felting needles with care, as they are sharp. Always use a felting mat and avoid poking yourself or others.
- Learning Curve:Needle felting can have a bit of a learning curve. It takes practice to learn how to manipulate the wool fibers and create the desired shapes and textures.
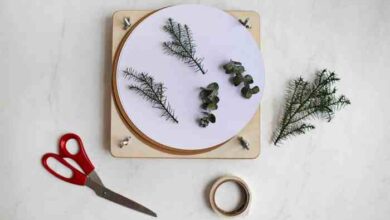
Preparing the Photo for Needle Felting
Once you’ve chosen your photo, it’s time to get it ready for felting. This involves transferring the image onto your felting surface and preparing it for needle felting.
Basic needle felting on a photo is a fun and easy way to add a personal touch to your décor. You can create anything from simple designs to intricate portraits. If you’re looking for a way to update a thrifted photo frame, try adding a felted image.
Check out these 5 ways to update a thrifted photo frame for more inspiration. You can even combine needle felting with other techniques, like decoupage or painting, to create a truly unique piece.
Choosing a Suitable Photo
The success of your needle felting project largely depends on the photo you choose. A good photo for needle felting is one that:
- Has a clear and simple design. Photos with intricate details or complex patterns can be challenging to recreate with needle felting.
- Has good contrast between the subject and the background. This will make it easier to distinguish between different colors and textures in your felting.
- Is in focus and well-lit. A blurry or poorly lit photo will be difficult to translate into a felted piece.
Consider using photos with clean lines, simple shapes, and limited colors.
Transferring the Photo
There are several methods for transferring a photo onto a felting surface:
- Tracing:You can use a lightbox or a window to trace the Artikel of the photo onto your felting surface with a pencil or pen. This is a simple and effective method for basic designs.
- Grid Method:Divide the photo and your felting surface into a grid of equal squares.
This allows you to accurately transfer the image by replicating the colors and shapes in each square. This method is suitable for more complex designs.
- Projector:You can use a projector to project the image onto your felting surface and trace the Artikel.
Basic needle felting on a photo is a relaxing hobby, allowing me to focus on the intricate details and textures. It’s a reminder that even in the complex world of cybersecurity, where professionals like mental health cybersecurity analysts face constant pressure, taking time for creative outlets is essential.
After a long day of analyzing threats, I find solace in the tactile process of needle felting, transforming a simple image into a unique piece of art.
This method is convenient for larger images and allows you to adjust the size of the projection.
Creating a Clear and Detailed Artikel, Basic needle felting on a photo
Once you have transferred the image onto your felting surface, you need to create a clear and detailed Artikel. This will serve as a guide for your needle felting.
- Use a Sharp Pencil or Pen:A sharp pencil or pen will ensure that your lines are clear and precise.
- Trace Carefully:Take your time and trace the Artikel of the image accurately.
- Add Details:If necessary, add additional details to your Artikel, such as shading or texture, to create a more realistic representation of the photo.
Basic Needle Felting Techniques
Now that you have your photo prepped and your felting supplies ready, it’s time to dive into the actual needle felting process! Needle felting is all about using specialized needles to manipulate wool fibers, creating intricate shapes and textures. Let’s explore some basic techniques to get you started.
Creating a Flat Surface
Creating a flat surface is a fundamental technique in needle felting. It serves as the foundation for your artwork, providing a stable base for adding details and shaping your design. To create a flat surface, start by placing a small amount of wool on your work surface.
Needle felting on a photo is a fun way to add dimension and texture to your artwork. It’s a great way to create personalized gifts or just to explore your creativity. I recently tried needle felting a photo of my cat, and it turned out so cute! It reminded me of another project I’ve been wanting to do, which is making leather hair clips.
If you’re looking for a fun DIY project that’s a bit more involved, you should check out this tutorial on making leather hair clips. After I finish felting my cat, I think I’ll give these leather hair clips a try!
Use a felting needle to repeatedly stab the wool fibers, pushing them together and creating a dense, compact surface. The more you stab, the denser the surface will become. Here’s a breakdown of the process:
- Gather your supplies:You’ll need felting wool, a felting needle, and a foam mat.
- Choose your wool:Select a color of wool that matches your photo.
- Place the wool:Lay a small amount of wool on the foam mat.
- Stab with the needle:Hold the needle perpendicular to the wool and repeatedly stab the wool fibers, pushing them together.
- Continue stabbing:Keep stabbing the wool until it becomes a dense, compact surface.
Using Different Needles for Texture and Detail
Felting needles come in various sizes and shapes, each designed to create specific effects.
- Star needles:These needles have multiple points, making them ideal for creating smooth surfaces and blending colors.
- Triangular needles:These needles have three points, providing a good balance between smoothness and texture.
- Round needles:These needles are the most common type, perfect for general felting and creating textures.
- Reverse needles:These needles have barbs that face upward, making them ideal for creating smooth, polished surfaces.
Felting Different Shapes and Elements
Once you have mastered the basics of needle felting, you can start to create more complex shapes and elements. Here are some common techniques for shaping your wool:
- Creating curves:To create curves, simply use a circular motion with your needle, gradually shaping the wool as you go.
- Creating points:To create points, use a series of stabs in a single direction, gradually narrowing the wool as you go.
- Adding details:Once you have your basic shape felted, you can add details like eyes, noses, and mouths by using different colors of wool and needles.
Felting the Photo: Basic Needle Felting On A Photo

Now that you have your photo ready and your wool fibers prepped, it’s time to bring your image to life with needle felting! This is where the magic happens, transforming your flat image into a 3D masterpiece. This process involves layering wool fibers and using a needle to sculpt and shape the wool into the photo’s details.
It’s like building a wool sculpture, layer by layer, to create the desired image.
Layering the Base
Start by creating a base for your photo. This base will act as the foundation for your felted image. You can use a piece of foam core, a piece of cardboard, or even a piece of felt. Secure your photo to the base using a tack or a light adhesive.
- To start, choose a wool color that closely matches the background of your photo. Lay down a thin layer of wool fibers, gently pressing them onto the base to create a smooth and even surface.
- Next, add more layers of wool fibers, gradually building up the thickness of the base. You can use different colors of wool fibers to create subtle transitions and variations in the background.
- For complex backgrounds with intricate details, use different shades of wool to create depth and dimension. This will help bring the photo to life and make it look more realistic.
Sculpting with Needles
Once you have a solid base, you can start using your needle felting needles to sculpt the details of your photo.
- Begin by outlining the main shapes and features of your photo. Use a sharp needle to gently push the wool fibers together, creating the Artikels of the subject, objects, and any prominent details.
- As you sculpt, use a variety of needle felting techniques to create different textures and effects. For example, you can use a star needle to create a fuzzy texture, a barbed needle to create a smooth surface, or a curved needle to create rounded edges.
- Remember to work slowly and carefully, gradually adding detail and definition to your photo. It’s a process that takes time and patience, but the results are worth it.
Creating Realistic Textures and Colors
- To create realistic textures, use different types of wool fibers. For example, use a coarse wool for a rough texture, a fine wool for a smooth texture, and a blended wool for a textured look.
- To create realistic colors, blend different colors of wool fibers together. You can use a needle felting tool called a “comb” to blend the fibers together and create subtle color variations.
- To create depth and dimension, use different shades of the same color. For example, you can use a light shade of blue for the sky, a medium shade of blue for the water, and a dark shade of blue for the shadows.
Finishing Touches

Your needle felted photo is almost complete! Now it’s time to add those final touches that will elevate your artwork to the next level. This stage is where you can personalize your creation and make it truly unique.
Embellishing the Photo
Embellishing your needle felted photo can add depth, texture, and visual interest. Here are some ideas for adding additional elements:
- Add details:You can use fine wool fibers to add details like eyelashes, hair strands, or even intricate patterns to clothing.
- Create a background:A simple background can enhance the overall composition. You can use a contrasting color of wool or even create a textured background using different needle felting techniques.
- Incorporate beads or sequins:Add a touch of sparkle and dimension by incorporating beads or sequins into your design. You can use needle felting techniques to secure them to the wool.
- Add other materials:Get creative and experiment with other materials like fabric scraps, yarn, or even dried flowers. These can be incorporated into your design to add texture and interest.
Framing and Displaying
Once your needle felted photo is complete, you’ll want to display it proudly. Framing is a great way to protect your artwork and enhance its presentation. Here are some tips for framing and displaying your finished piece:
- Choose a frame that complements the artwork:Consider the colors, textures, and overall style of your needle felted photo when selecting a frame.
- Use acid-free matting:Acid-free matting helps to protect your artwork from damaging chemicals.
- Consider different mounting options:You can mount your needle felted photo on foam board or even a wooden panel for added stability.
- Display your artwork in a well-lit area:Ensure your artwork is displayed in a place where it receives adequate light, but avoid direct sunlight, which can fade colors.