DIY Play Teepee: A Comprehensive Guide to Building Your Own Magical Hideaway
Constructing a play teepee for children offers a unique opportunity to foster imagination, provide a private sanctuary, and engage in creative crafting. This guide provides a detailed, step-by-step approach to building a durable, safe, and aesthetically pleasing teepee, complete with SEO-optimized keywords and considerations for various skill levels. The primary focus is on a simple yet robust design that can be adapted and personalized.
Materials and Tools: The Foundation for Your Teepee Project
Selecting the right materials is crucial for a successful teepee build. The core structure will require sturdy wooden poles. Pine or dowel rods are excellent choices due to their availability, affordability, and ease of working with. Aim for poles with a diameter of at least 1 inch and a length of 6-8 feet. The number of poles will depend on the desired size and complexity of your teepee, but four poles form the basis of a classic four-sided design. For the fabric covering, consider durable, breathable materials like cotton canvas, heavy-duty quilting cotton, or even sturdy linen. The amount of fabric needed will be calculated based on the dimensions of the finished teepee; a good rule of thumb is to buy enough to drape generously over the frame, with extra for seams and finishing. Beyond the structural elements, you’ll need strong cordage, such as paracord or thick cotton rope, for lashing the poles together securely. Fasteners like screws or bolts may be required if you opt for a more permanent joining method, though lashing is often preferred for its simplicity and flexibility. For securing the fabric, fabric glue, a sewing machine, or even heavy-duty staples can be used, depending on your chosen construction method. Essential tools include a measuring tape for precise dimensions, a saw (hand saw or power saw) for cutting poles to size if necessary, a drill with appropriate drill bits for creating holes for lashing or fasteners, scissors or a rotary cutter for fabric, and potentially a hammer or staple gun. Safety gear, including safety glasses and gloves, should always be worn during the construction process.
Planning and Design: Laying the Blueprint for Your Teepee
Before cutting any wood or fabric, meticulous planning and design are paramount. Determine the desired size of your teepee. A typical play teepee might have a base diameter of 3-4 feet and a height of 5-6 feet, providing ample space for a child or two to play comfortably. Consider the age and number of children who will be using it. For younger children, a lower height might be safer. For multiple children, a wider base is recommended. Sketching a simple diagram will help visualize the proportions and identify potential challenges. The design should also account for the entrance. A simple overlap of the fabric panels or a designated opening with ties can serve as the entryway. Think about the overall aesthetic. Will it be a rustic, natural teepee, or a brightly colored, whimsical structure? This will influence your fabric choices and any decorative elements. The method of joining the poles is another critical design decision. Lashing, where poles are tied together with rope, is the most traditional and often the simplest method for teepee construction. This creates a flexible structure that can be easily assembled and disassembled. Alternatively, you could create a more rigid frame by drilling holes and using bolts or screws at the points where the poles intersect. This method offers greater stability but is less portable. The way the fabric will be attached to the frame also needs consideration. Will it be sewn directly onto the poles, or will it be a separate cover that can be removed for cleaning? Planning these details upfront will streamline the building process and ensure a functional, aesthetically pleasing end product.
Constructing the Pole Frame: The Backbone of Your Teepee
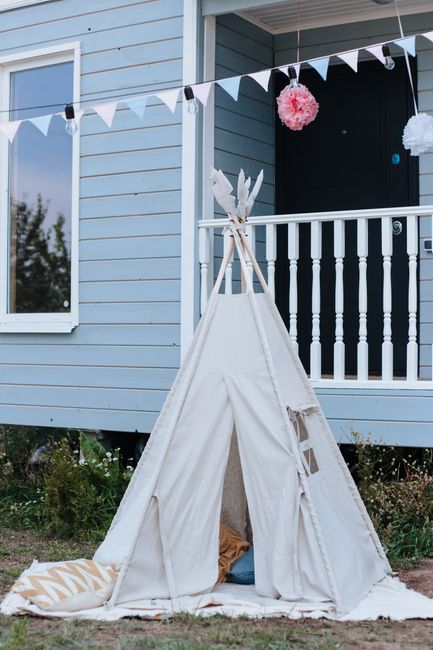
The foundation of any teepee is its pole structure. For a basic four-pole design, which is the most common and easiest to build, begin by ensuring all your poles are of equal length. If you purchased longer dowels, use your saw to cut them to your desired height, typically 6-8 feet. Accuracy here is important for a balanced structure. The crucial step is joining the tops of the poles. If you’re opting for the lashing method, which is highly recommended for its simplicity and traditional teepee aesthetic, you’ll need to create a strong, stable joint. Lay three of the poles on the ground, angled as they would be when forming a tripod. Wrap your cordage (paracord or thick rope) around the point where the three poles meet, several inches down from the top. Tie a secure knot, ensuring it’s tight enough to prevent slippage. Now, take the fourth pole. This will be the entrance pole. Position it in front of the other three, so that the gap between two of the existing poles creates the opening. Lash this fourth pole to the main tripod structure at the same point as the others. For an exceptionally sturdy lashing, you can use a series of criss-crossing wraps and then a clove hitch or a series of half hitches to secure the rope. Some builders also opt to drill a hole through the top of each pole and then thread the rope through these holes, tying them off securely. This method provides immense strength but requires more precise drilling. If you choose a more rigid frame construction, you would position the poles at your desired angle and then drill through them at the intersection point, securing them with bolts and nuts or sturdy screws. Ensure the bolts are countersunk or covered to prevent snagging on fabric or poking children. The angle of the poles will determine the width of the teepee’s base. A steeper angle results in a narrower base, while a shallower angle creates a wider, more stable footprint. Once the lashing or fastening is complete, carefully stand the pole structure upright. It should be stable on its own. If it wobbles, adjust the lashing or fasteners until it stands firm. This is the moment to appreciate the structural integrity you’ve created.
Cutting and Preparing the Fabric Panels: The Skin of Your Teepee
With the pole frame constructed, it’s time to prepare the fabric that will form the walls of your play teepee. The number of fabric panels needed depends on the number of poles. For a four-pole teepee, you’ll need four panels. The dimensions of each panel are critical. Lay your fabric flat and measure the length from the top of the lashing point to the desired bottom hem of your teepee. Add an extra 6-12 inches to this measurement to account for the fabric draping over the poles and to allow for hemming or securing the fabric to the base. The width of each panel should be sufficient to cover approximately one quarter of the teepee’s circumference at its widest point, plus an overlap for the entrance. To calculate the circumference, measure the distance around the base of your pole structure. Divide this circumference by the number of poles and then add several inches for overlap. It’s always better to err on the side of having too much fabric rather than too little. Carefully cut out your fabric panels using sharp scissors or a rotary cutter. For a cleaner finish and added durability, consider hemming the edges of each panel. This involves folding the raw edge over twice and stitching it down. A sewing machine makes this process quick and efficient, but hand-stitching is also a viable option. For the entrance panel, you might want to create a more defined opening. You can do this by cutting a vertical slit from the top or side, and then hemming the edges. Alternatively, you can leave the panels to overlap, creating a natural entrance that can be secured with ties. Think about how the fabric will attach to the poles. You can sew loops onto the edges of the fabric panels that will slip over the poles. Alternatively, you can sew ties onto the fabric to secure it to the poles directly. The latter offers more flexibility in adjusting the fabric’s position.
Attaching the Fabric: Bringing Your Teepee to Life
Now it’s time to bring your teepee to life by attaching the fabric panels to the pole frame. If you’ve sewn loops onto your fabric panels, carefully slip these over the poles, ensuring they are evenly distributed. The fabric should drape smoothly down the poles. If you’ve opted for ties, tie the fabric panels securely to the poles at various points – near the top, in the middle, and near the bottom. For a more permanent and taut fabric covering, you could consider sewing the panels together at their side edges before attaching them to the frame. This creates a seamless "tent" that can then be draped over the structure. However, sewing the panels together makes it harder to remove for cleaning. A simpler approach for a removable cover is to attach Velcro strips along the edges of the fabric panels and the corresponding poles. This allows for easy on and off. For a truly finished look, consider adding a bottom hem to each fabric panel to prevent fraying and give the teepee a cleaner appearance. You can also add decorative elements at this stage. Consider adding ribbons, tassels, or even painted designs to the fabric. If your teepee is intended for outdoor use, consider using weather-resistant fabric and potentially applying a fabric sealant for added protection. Ensure the fabric is pulled taut enough to create a neat appearance but not so tight that it puts undue stress on the frame. Adjust the fabric as needed, making sure the entrance is easily accessible and that there are no large gaps where light might excessively penetrate, which could detract from the cozy hideaway feel. If you’ve decided on a removable cover, ensure it can be easily lifted off the frame for cleaning or storage.
Personalization and Decoration: Making Your Teepee Unique
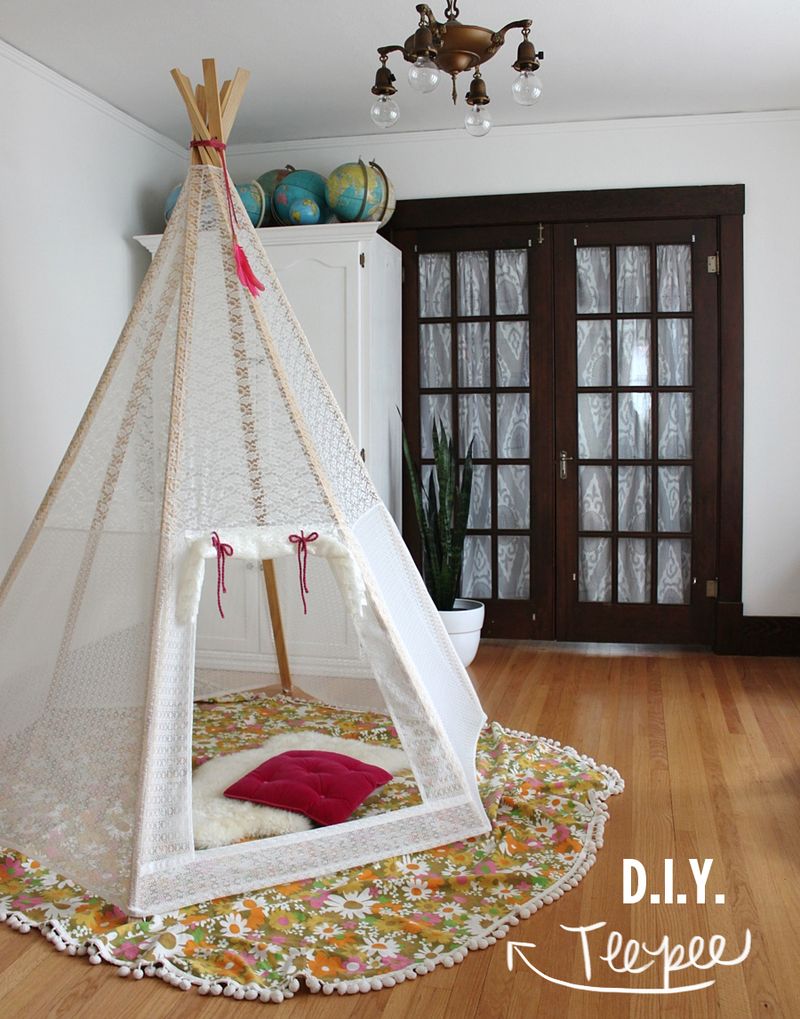
The true magic of a DIY play teepee lies in its potential for personalization. Once the basic structure is complete, unleash your creativity to make it a truly special space. For a rustic, natural look, you can leave the wooden poles unfinished or stain them with a natural wood stain. The fabric itself can be a canvas for imagination. Consider using fabric paints to add stars, clouds, flowers, or geometric patterns. Stencils can be a great tool for creating precise designs. Fabric markers offer another option for drawing directly onto the material. For a more whimsical feel, attach pom-poms, tassels, or even fairy lights around the top or edges of the fabric. Braided ropes with decorative knots can also add an artisanal touch. If your teepee is intended for indoor play, consider adding soft furnishings like floor cushions, a small rug, or even battery-operated LED candles for a cozy ambiance. Small shelves or hooks can be added inside to store favorite toys or books. For a themed teepee, research relevant motifs. A space-themed teepee could feature glow-in-the-dark stars, while a fairy teepee might be adorned with fabric flowers and glitter. The entrance can also be personalized. Consider adding a small fabric curtain with ties, or even a nameplate for your child. Safety is paramount, even during decoration. Ensure all decorative elements are securely attached and do not pose a choking hazard for younger children. Avoid using anything sharp or fragile. If you’re using fabric paints or markers, ensure they are non-toxic and washable. The goal is to create a space that sparks joy and encourages imaginative play, so have fun with the process.
Safety Considerations: Ensuring a Secure Play Environment
Prioritizing safety is non-negotiable when building a play teepee. The structural integrity of the frame is the first line of defense. Ensure all poles are securely lashed or fastened. Regularly inspect the lashing or fasteners for signs of wear and tear. If any components appear loose or damaged, repair them immediately before allowing children to play in the teepee. The height of the teepee should be appropriate for the age of the children using it. For very young children, a shorter teepee reduces the risk of falls. Ensure the teepee is stable and will not tip over easily. If it feels wobbly, reinforce the base or adjust the pole angles for greater stability. Fabric choices are also important. Opt for breathable, natural fabrics like cotton. Avoid synthetic materials that can trap heat and reduce airflow, especially in warmer environments. Ensure all fabric edges are neatly hemmed to prevent fraying, which can create loose threads that could be a tripping hazard. Any decorative elements attached to the teepee should be securely fastened and pose no choking hazard for young children. Avoid using small, detachable items. If you’re using fairy lights, opt for low-voltage, battery-operated LED lights for safety. Always supervise young children when they are playing in and around the teepee. Teach them about safe play practices, such as not climbing on the structure or throwing objects inside. If the teepee is intended for outdoor use, consider the environment. Ensure it is placed on a level surface and is not in an area prone to strong winds. If the teepee is placed outdoors, consider securing it to the ground with stakes for added stability. Regularly clean the teepee to maintain hygiene. For fabric covers, ensure they are washable and can be easily cleaned of dirt, spills, and potential allergens. A well-maintained and safely constructed teepee will provide hours of enjoyable and secure play.
Maintenance and Care: Extending the Lifespan of Your Teepee
Proper maintenance and care will significantly extend the lifespan of your DIY play teepee and keep it looking its best. Regularly inspect the entire structure for any signs of wear and tear. Check the lashing or fasteners for looseness and tighten or repair them as needed. Wooden poles can be susceptible to damage if exposed to moisture. If your teepee is used outdoors, consider applying a wood sealant or varnish to protect the poles from the elements. This will help prevent warping, cracking, and rot. For the fabric covering, spot clean any minor spills or stains as soon as they occur. For more thorough cleaning, most fabric teepee covers can be machine washed. Check the fabric care label for specific instructions. If the fabric is not machine washable, hand wash it with mild soap and water. Ensure the fabric is completely dry before reattaching it to the frame to prevent mildew growth. Air drying is the best option. If the teepee is used frequently, the fabric may experience some fading over time, especially if exposed to direct sunlight. To minimize this, consider rotating the teepee’s position or bringing it indoors during the sunniest parts of the day. Decorative elements, such as pom-poms or tassels, should also be checked for security and reattached if they become loose. Over time, the fabric may develop small tears or holes. These can often be repaired with a needle and thread or a fabric patch, extending the life of the cover. Proper storage when the teepee is not in use is also crucial. If the teepee is easily disassembled, store the poles and fabric separately in a dry, cool place to protect them from moisture and pests. Avoid storing it in a damp basement or garage. By dedicating a little time to regular maintenance, you can ensure your DIY play teepee remains a beloved feature in your child’s play space for years to come, offering continued opportunities for imaginative adventures.
