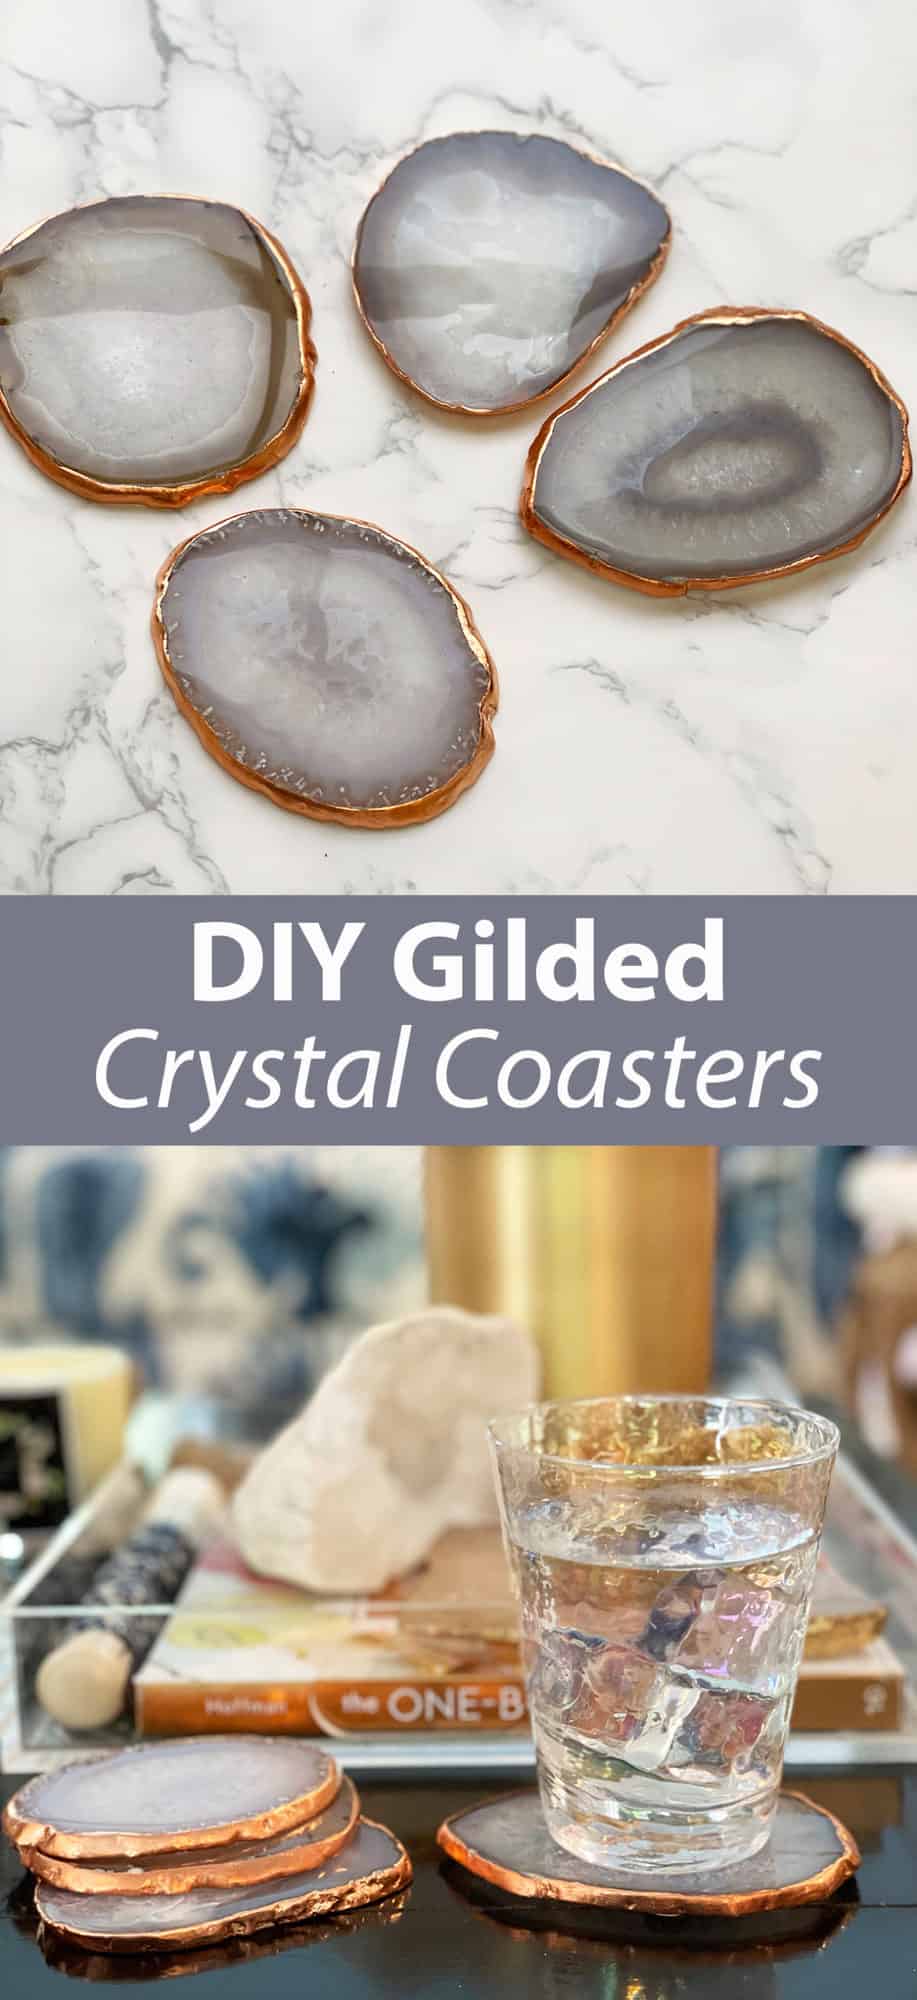
DIY Gilded Crystal Coasters: A Luxurious and Accessible Craft Project
Creating your own gilded crystal coasters is a sophisticated yet surprisingly achievable DIY project that can elevate your home décor and impress guests. These coasters combine the timeless elegance of clear crystals with the opulent shimmer of gold, offering a touch of luxury without the hefty price tag of designer pieces. This comprehensive guide will walk you through the entire process, from selecting materials to achieving a professional-looking finish, ensuring your DIY gilded crystal coasters are both beautiful and functional. We’ll delve into the specifics of each step, providing tips for success and exploring variations to personalize your creations. Understanding the fundamental principles of adhering, sealing, and finishing will be key to mastering this craft.
The allure of gilded crystal coasters lies in their ability to catch and refract light, creating a mesmerizing display. The metallic sheen of the gold accentuates the facets of the crystal, adding depth and dimension. This DIY project is ideal for crafters of all skill levels, offering a satisfying creative outlet and a tangible, beautiful result. Whether you’re looking to add a personal touch to your living space, create unique gifts, or even explore a new crafting hobby, this guide provides all the information you need to embark on your gilded crystal coaster journey. We will address common challenges and offer solutions, ensuring a smooth and enjoyable crafting experience.
Materials You’ll Need:
To embark on this DIY gilded crystal coaster project, gather the following essential materials. The quality of your materials will directly impact the final aesthetic and durability of your coasters, so it’s worth investing in decent supplies.
- Clear Acrylic or Resin Blanks: The foundation of your coasters. Opt for thick, clear acrylic or resin blanks. These can be found in various shapes – squares, circles, hexagons are popular choices. Look for blanks that are at least 1/4 inch thick to provide a substantial feel and enough surface area for gilding. Ensure they are smooth and free of scratches or imperfections, as these will be magnified by the gilding.
- Gold Leaf or Gold Rub ‘n Buff: This is where the glamour comes in.
- Gold Leaf: Available in sheets or flakes. Edible gold leaf is a good option as it’s food-safe and readily available. Transfer leaf (applied with a tip applicator) is easier for beginners than loose leaf. Loose leaf requires more practice to handle.
- Gold Rub ‘n Buff: A metallic wax-based compound that offers a quicker and often less messy application than gold leaf, especially for smaller projects or edges. It provides a beautiful metallic sheen.
- Adhesive (if using Gold Leaf): If you choose to use gold leaf, you’ll need a suitable adhesive.
- Gilding Adhesive/Size: Specifically designed for adhering gold leaf. Water-based adhesives are generally easier to clean up.
- Mod Podge: A versatile decoupage medium that can also function as a gilding adhesive for gold leaf. Choose a clear-drying formula.
- Brush Set: You’ll need a few different brushes.
- Soft Bristle Brushes: For applying adhesive and buffing off excess gold leaf. A small, soft brush is ideal for delicate work.
- Sponge Brushes: Useful for applying larger areas of adhesive or sealing coats.
- Clear Sealant/Top Coat: Crucial for protecting the gilding and providing a durable, water-resistant finish.
- Mod Podge (Hard Coat or Dishwasher Safe): These formulas offer superior durability and water resistance, making them excellent choices for coasters.
- Clear Acrylic Sealer (Spray or Brush-on): Look for a high-gloss or satin finish depending on your preference. Ensure it’s non-yellowing.
- Epoxy Resin (Optional but Recommended for Ultimate Durability): For a truly professional and long-lasting finish, a thin layer of clear epoxy resin is ideal. This will provide a thick, glass-like protective layer.
- Rubbing Alcohol or Isopropyl Alcohol: For cleaning the surfaces of your coasters before you begin.
- Paper Towels or Lint-Free Cloths: For cleaning and wiping away excess materials.
- Craft Knife or Scalpel (Optional): For precise trimming of excess gold leaf.
- Protective Gloves: To keep your hands clean, especially when working with adhesives and Rub ‘n Buff.
- Workspace Protection: Newspaper, a drop cloth, or a craft mat to protect your work surface from spills and debris.
Step-by-Step Guide to Creating Your Gilded Crystal Coasters:
Now that you have your materials ready, let’s dive into the creative process. Patience and attention to detail will be your best allies throughout these steps.
Step 1: Prepare Your Coaster Blanks
Begin by thoroughly cleaning the surface of your acrylic or resin blanks. Use rubbing alcohol and a lint-free cloth to remove any dust, fingerprints, or manufacturing residue. A clean surface is paramount for proper adhesion of your adhesive and gold leaf. Ensure the blanks are completely dry before proceeding. Any oil or dirt will prevent the adhesive from bonding effectively, leading to patchy or peeling gilding. For extra assurance, you can lightly sand the edges of your blanks with very fine-grit sandpaper (e.g., 400-600 grit), but this is usually unnecessary if your blanks are already smooth.
Step 2: Apply Your Gold Element
This is where your coasters start to transform. The method here depends on whether you’re using gold leaf or Rub ‘n Buff.
-
Using Gold Leaf:
- Apply Adhesive: Using a soft brush or sponge brush, carefully apply a thin, even layer of your chosen adhesive (gilding adhesive or Mod Podge) to the desired areas of your coaster. You can choose to cover the entire surface, just the edges, or create specific patterns. For a more organic, abstract look, you can dab the adhesive on with a sponge brush. For a cleaner edge, use a fine brush to trace a line. Allow the adhesive to become tacky. This is a crucial stage; if it’s too wet, the gold leaf will clump, and if it’s too dry, it won’t adhere. The time this takes will vary depending on the adhesive and humidity, so test a small area.
- Apply Gold Leaf: Gently lay a sheet or flake of gold leaf onto the tacky adhesive. Use a dry, soft brush to gently press the gold leaf onto the surface, encouraging it to adhere. Work from the center outwards. If using loose leaf, be extremely delicate. For transfer leaf, gently press the backing paper onto the tacky surface and then peel it away. Overlap sheets slightly if covering a larger area to avoid gaps.
- Brush Away Excess: Once the gold leaf is applied, use a dry, soft brush to gently brush away any loose or excess gold leaf. Work in the direction of the gilding to avoid disturbing the adhered leaf. You can use a craft knife or scalpel to carefully trim any stray edges if necessary for a sharper finish.
-
Using Gold Rub ‘n Buff:
- Apply Rub ‘n Buff: Put on your protective gloves. Squeeze a small amount of Gold Rub ‘n Buff onto your fingertip or a soft cloth. Gently rub it onto the desired areas of your coaster. You can cover the entire surface, focus on the edges, or create a distressed, antiqued look by rubbing more heavily in some areas and lighter in others.
- Buff to a Shine: Once applied, use a clean, soft cloth to buff the Rub ‘n Buff to a high shine. This will create a smooth, metallic finish. You can build up layers for a deeper color if desired.
Step 3: Allow to Dry and Cure
Whether you used gold leaf or Rub ‘n Buff, it’s essential to allow the gold element to dry and cure completely according to the product’s instructions. For adhesives used with gold leaf, this usually means waiting at least 24 hours. Rub ‘n Buff typically dries to the touch relatively quickly but benefits from a longer curing period before sealing.
Step 4: Apply the Sealant/Top Coat
This is a vital step for protecting your beautiful gilded finish and making your coasters functional.
-
Using Mod Podge or Acrylic Sealer:
- First Coat: Apply a thin, even coat of your chosen sealant (Mod Podge Hard Coat, Dishwasher Safe, or clear acrylic sealer) over the gilded areas. Use a soft brush or sponge brush to avoid disturbing the gold. Work carefully and smoothly. Allow this coat to dry completely.
- Subsequent Coats: Apply 2-3 more thin, even coats, allowing each coat to dry thoroughly in between. This layering provides crucial durability and protection. For a truly water-resistant coaster, especially if using Mod Podge Dishwasher Safe, ensure you follow the recommended number of coats and drying times.
-
Using Epoxy Resin (Recommended for Ultimate Durability):
- Prepare Resin: If using epoxy resin, carefully read and follow the manufacturer’s instructions for mixing the resin and hardener. This is a critical step for achieving a proper cure. Work in a well-ventilated area.
- Pour Resin: Gently pour a thin, even layer of the mixed epoxy resin over the gilded surface of your coaster. Use a craft stick or a gloved finger to spread the resin and ensure it covers the gilded areas completely and evenly. Avoid overfilling, as this can create a messy edge.
- Remove Bubbles: Use a heat gun on a low setting or a butane torch (held at a distance) to carefully remove any air bubbles that rise to the surface. Sweep the heat source quickly across the surface; do not hold it in one spot for too long, as this can damage the resin.
- Cure: Allow the epoxy resin to cure completely according to the manufacturer’s instructions. This can take 24-72 hours, depending on the product and ambient temperature. Ensure the coasters are on a level surface during curing.
Step 5: Finishing Touches and Curing
Once your final sealant coat or epoxy resin has cured, inspect your coasters for any imperfections. If you used epoxy resin, you might have a very slight unevenness on the edges. You can lightly sand these with very fine-grit sandpaper (800-1000 grit) and then polish them with a plastic polish or car wax for a super smooth finish. Ensure your coasters are completely cured before using them. This means they are hard to the touch and no longer feel tacky.
Tips for Success and Variations:
- Practice Makes Perfect: If you’re new to gilding, practice on scrap materials before working on your coaster blanks. This will help you get a feel for handling gold leaf and applying adhesive.
- Layering for Depth: Experiment with applying adhesive and gold leaf in multiple layers, allowing each layer to dry slightly before applying the next. This can create a more textured and dimensional gilded effect.
- Edge Gilding: For a subtle touch of luxury, focus your gilding efforts solely on the edges of the coasters. This creates a refined and elegant look.
- Patterned Gilding: Use stencils to apply adhesive in specific patterns before applying gold leaf. This can create intricate designs.
- Two-Tone Gilding: Combine gold leaf with silver or copper leaf for a unique, multi-metallic effect.
- Incorporate Other Embellishments: After the adhesive is tacky but before applying gold, consider adding fine glitter or mica powders for an extra sparkle.
- Matte vs. Glossy Finish: The choice of sealant will determine the final finish. Mod Podge offers both matte and glossy options, while acrylic sealers come in various sheens. Epoxy resin typically provides a high-gloss, glass-like finish.
- Durability is Key: For coasters that will see frequent use, opting for a hard-coat sealant or, ideally, epoxy resin is crucial for longevity and water resistance.
Troubleshooting Common Issues:
- Patchy or Incomplete Gilding: This is often due to the adhesive not being at the right tackiness level, or the gold leaf not being applied gently enough. Ensure your adhesive is properly tacky, and use a soft brush to gently press the leaf.
- Cracked or Peeling Gold Leaf: This can happen if the adhesive wasn’t fully dry before the gold was applied, or if the sealant wasn’t applied evenly or in enough layers. Proper drying times and multiple sealant coats are essential.
- Bubbles in Sealant/Resin: Ensure you are applying sealant in thin, even coats. For epoxy resin, proper mixing and prompt bubble removal with a heat source are critical.
- Adhesive Showing Through Gold Leaf: This is usually a sign of not enough gold leaf being applied or the adhesive layer being too thin. Ensure full coverage and sufficient adhesive.
Conclusion:
The creation of DIY gilded crystal coasters is a rewarding project that allows you to infuse your living space with personalized elegance. By following these detailed steps, selecting quality materials, and embracing a spirit of creative exploration, you can craft stunning coasters that are both visually appealing and functional. The ability to customize the design, the level of gilding, and the final finish ensures that your gilded crystal coasters will be a unique reflection of your personal style. This craft offers a tangible way to bring a touch of bespoke luxury into your home, turning an everyday item into a statement piece. The satisfaction derived from using handmade, elegant accessories is unparalleled, making this DIY endeavor a worthwhile pursuit for any crafting enthusiast.
