DIY decorative wire vases are a fantastic way to add a touch of personality and creativity to your home décor. These versatile and visually appealing creations offer a unique blend of modern and rustic charm, allowing you to express your individual style.
From simple geometric shapes to intricate floral patterns, the possibilities for wire vase designs are endless. The malleability of wire makes it an ideal material for crafting, allowing you to easily bend, twist, and shape it into your desired form.
The beauty of DIY wire vases lies in their ability to be customized to your liking. You can choose from a variety of wire materials, including copper, aluminum, and iron, each offering distinct aesthetic qualities. The thickness of the wire also plays a crucial role in determining the overall look and feel of your vase.
From delicate and intricate designs to bold and statement pieces, the choice is entirely yours.
DIY Decorative Wire Vases
There’s something undeniably charming about crafting your own decorative wire vases. They bring a unique, handcrafted touch to any space, and their versatility allows you to experiment with different shapes, sizes, and finishes. Plus, creating them is a fun and rewarding project that allows you to unleash your creativity.
DIY decorative wire vases are a great way to add a touch of rustic charm to your home. They’re also incredibly versatile, allowing you to experiment with different textures and colors. If you’re looking for a natural touch, consider incorporating eucalyptus into your designs.
You can even learn how to make beautiful eucalyptus hair wreaths, following a detailed guide like this one. The same earthy elegance that makes eucalyptus hair wreaths so captivating can be brought to your wire vases, creating a cohesive and stylish look throughout your space.
Materials for Wire Vases
Wire vases can be crafted from a variety of materials, each with its own unique properties and aesthetic appeal.
DIY decorative wire vases are a fun and affordable way to add a touch of personality to your home. You can create all sorts of unique designs, from simple geometric shapes to intricate floral patterns. And if you’re looking for some spooky inspiration, check out these 5 easy clean beauty Halloween looks for a touch of gothic glamour.
After all, a stylishly spooky vase is a great way to set the mood for a Halloween party or to add a touch of whimsy to your everyday décor.
- Copper Wire:Known for its warm, reddish-brown hue, copper wire adds a touch of rustic elegance to vases. It’s also relatively malleable, making it easy to shape and bend.
- Aluminum Wire:Aluminum wire offers a sleek, modern look and is lightweight and durable. It’s also readily available in a variety of colors, allowing for customization.
- Iron Wire:Iron wire is strong and sturdy, making it ideal for creating larger and more intricate vase designs. It can be painted or left in its natural, industrial finish.
Benefits of Using Wire for Decorative Vases
Wire is an excellent material for creating decorative vases due to its numerous benefits:
- Malleability:Wire is incredibly flexible and easy to bend and shape, allowing you to create unique and intricate designs.
- Durability:Wire is a strong and durable material that can withstand everyday use and resist bending or breaking.
- Affordability:Wire is a relatively inexpensive material, making it an accessible option for crafting projects.
Design Inspiration for Wire Vases

The beauty of DIY wire vases lies in their versatility. You can create a unique and personal piece that complements your style and décor. From simple geometric shapes to intricate floral patterns, the possibilities are endless.
Wire Gauge and Thickness
The thickness of the wire you choose will significantly impact the overall aesthetic of your vase. Thicker wire, typically measured in gauges with lower numbers, creates a sturdier and more substantial vase. Conversely, thinner wire, with higher gauge numbers, offers greater flexibility and allows for more intricate designs.
- Thicker wire: Provides a strong and robust structure, ideal for larger vases or those with complex designs.
- Thinner wire: Offers flexibility for intricate details and delicate patterns, suitable for smaller vases or those with intricate designs.
Incorporating Textures and Patterns, Diy decorative wire vases
Adding textures and patterns to your wire vase elevates its visual appeal and adds depth. Various techniques can be employed to achieve this:
- Weaving: Interlacing wire strands creates a textured surface and can be used to form intricate patterns.
- Twisting: Twisting wire strands together creates a visually interesting texture and can be used to add dimension to the vase.
- Knotting: Incorporating knots into the wire structure adds a decorative element and can be used to create unique shapes and patterns.
Step-by-Step Guide to Crafting a Wire Vase

This comprehensive guide will walk you through the process of creating a stunning wire vase from scratch. You’ll learn how to choose the right materials, shape the wire, and create a stable and visually appealing base. Whether you’re a seasoned crafter or a beginner, this guide will equip you with the knowledge and techniques to craft your own unique wire vase.
Materials and Tools
Gathering the right materials and tools is crucial for a successful wire vase project. You’ll need:
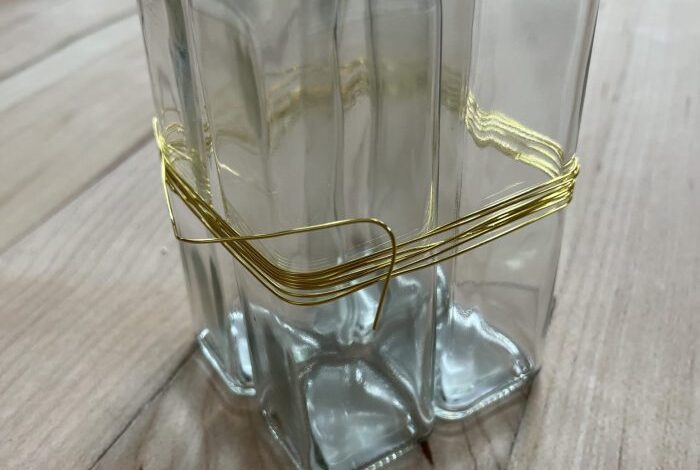
- Wire:Choose a wire that is sturdy enough to hold its shape but flexible enough to bend and twist. Aluminum wire is a popular choice due to its malleability and affordability. You can also use copper wire, which offers a more rustic aesthetic.
I love the way DIY decorative wire vases can add a touch of modern whimsy to any space. They’re so versatile, you can create them in all sorts of shapes and sizes. And speaking of shapes and sizes, I recently got inspired by the bold lines and geometric patterns of palm springs inspired glasses cases , which I think would be amazing for a minimalist wire vase design.
I’m thinking of incorporating some of those elements into my next wire vase project, maybe using a geometric pattern for the base or adding some interesting angles to the overall shape.
- Wire Cutters:These are essential for cutting the wire to the desired lengths. Choose a pair of cutters that are sharp and durable enough to handle the wire gauge you’re using.
- Pliers:Pliers will be used to bend and shape the wire, as well as to secure the wire structure. You’ll need both round-nose pliers and flat-nose pliers for different shaping techniques.
- Wire Template (Optional):A wire template can help you create a consistent and symmetrical vase shape. You can use a pre-made template or create your own using cardboard or a sturdy material.
- Optional:You may also want to have wire cutters, pliers, and a wire template on hand.
Shaping and Forming the Wire
Once you have your materials, you can start shaping the wire into a vase. Here’s a step-by-step guide:
- Cut the Wire:Cut the wire into the desired lengths for the vase. You’ll need enough wire to create the base, the body, and the neck of the vase.
- Form the Base:To create a stable base, you can twist the wire into a circle or a spiral. You can also use a pre-made base or create your own using cardboard or a sturdy material.
- Create the Body:Bend the wire into the desired shape for the vase body. You can use a wire template to guide you or freehand it. To create a smooth curve, gently bend the wire around a cylindrical object, such as a water bottle or a rolling pin.
- Shape the Neck:To create the neck of the vase, twist the wire into a spiral or a cone. You can also use a pre-made neck or create your own using cardboard or a sturdy material.
- Secure the Structure:Once you have the desired shape, secure the wire structure by twisting the wire ends together. You can also use pliers to crimp the wire ends to ensure a strong connection.
Creating a Stable Base
The base of your wire vase is crucial for its stability. Here are some techniques for creating a strong and visually appealing base:
- Twisted Wire Base:To create a twisted wire base, twist two or more lengths of wire together to form a circle or a spiral. Secure the ends of the wire by twisting them together or using pliers to crimp them.
- Wire Grid Base:To create a wire grid base, weave together multiple lengths of wire to form a grid. This type of base provides a sturdy and airy foundation for the vase.
- Cardboard Base:To create a cardboard base, cut a circle or a square from cardboard and wrap it with wire. This base provides a stable and affordable foundation for the vase.
- Pre-Made Base:You can also use a pre-made base, such as a metal ring or a wooden disc. These bases provide a quick and easy solution for creating a stable vase.
Decorating Wire Vases

Now that you’ve crafted your wire vase, it’s time to add your personal touch and transform it into a unique decorative piece. The beauty of wire vases lies in their versatility, allowing you to experiment with various decorative elements and finishes to create a style that reflects your taste.
Embellishing with Decorative Elements
Adding decorative elements can enhance the visual appeal of your wire vase and make it a truly unique piece. There’s a wide range of materials you can use, from beads and ribbons to fabric scraps and natural elements.
- Beads:Beads come in a wide variety of colors, shapes, sizes, and materials. You can use beads to create patterns, embellish the wire frame, or even weave them into the wire itself. Consider using beads that complement the color and style of your vase.
- Ribbons:Ribbons can add a touch of elegance and softness to your wire vase. You can tie ribbons around the vase, create bows, or even weave them into the wire frame. Choose ribbons that match the color scheme of your vase or the flowers you plan to display.
- Fabric Scraps:Fabric scraps can be used to create unique textures and patterns on your wire vase. You can glue fabric scraps onto the wire frame, wrap the vase in fabric, or even create fabric flowers to adorn it. Experiment with different textures and colors to create a unique look.
- Natural Materials:Natural materials like twigs, leaves, and dried flowers can add a rustic and organic touch to your wire vase. You can attach these elements to the wire frame with glue or wire, or simply place them inside the vase for a natural and elegant display.
Creating Unique Finishes
Beyond decorative elements, you can also enhance your wire vase by applying different finishes. This can transform the look and feel of your vase, giving it a unique character.
- Painting:Painting your wire vase is a simple yet effective way to add color and personality. You can use spray paint, acrylic paint, or even metallic paint for a glamorous look. Experiment with different colors and techniques to create a unique finish.
- Staining:Staining is a great option if you want to preserve the natural look of the wire while adding a touch of color. Wood stains can be used to create a warm and rustic finish. You can also use fabric dye to create a more vibrant and colorful look.
- Distressing:Distressing techniques can add a vintage and aged look to your wire vase. You can use sandpaper, wire brushes, or even a hammer to create a distressed effect. Consider using a dark paint or stain to enhance the distressed look.
Choosing Colors and Textures
When decorating your wire vase, it’s crucial to consider the overall design aesthetic you’re aiming for. Choosing the right colors and textures can complement the style of your vase and enhance its beauty.
“The key is to create a cohesive look that blends the vase with its surroundings and the flowers it will hold.”
- Color Harmony:Consider the color scheme of your home decor and the flowers you plan to display. Choose colors that complement each other and create a visually pleasing effect.
- Texture Contrast:Experiment with different textures to create visual interest. For example, you can combine smooth beads with rough fabric scraps or natural elements. This contrast can add depth and dimension to your vase.
Displaying and Styling Wire Vases: Diy Decorative Wire Vases
Now that you’ve crafted your beautiful wire vases, it’s time to showcase them! The right flowers and foliage, along with thoughtful placement, can elevate your wire vases from DIY projects to stunning design elements.
Selecting Flowers and Foliage
Choosing the right floral companions for your wire vases is key to creating a harmonious and eye-catching display. Consider the size, color, and texture of the flowers and foliage when making your selection.
- Size:The size of your wire vase will dictate the scale of the flowers you choose. For smaller vases, opt for delicate blooms like baby’s breath, Queen Anne’s lace, or sprigs of lavender. Larger vases can accommodate more substantial blooms like hydrangeas, sunflowers, or lilies.
- Color:The color of your flowers should complement the color of your wire vase. For example, a silver wire vase would look stunning with white or pastel-colored flowers, while a copper wire vase would pair well with warm-toned flowers like orange or yellow.
- Texture:Adding different textures to your arrangement can add visual interest and depth. Consider incorporating foliage with contrasting textures, like feathery ferns, smooth eucalyptus leaves, or prickly succulents.
Incorporating Wire Vases into Different Interior Design Styles
Wire vases are versatile and can be incorporated into a variety of interior design styles. Here are some ideas for styling wire vases in different aesthetics:
- Modern:Modern interiors often feature clean lines and minimalist designs. A sleek, geometric wire vase filled with a simple arrangement of white or cream-colored flowers would be a perfect fit for this style. Consider adding a single, bold statement piece like a large succulent or a sculptural branch to enhance the minimalist aesthetic.
- Farmhouse:Farmhouse style is characterized by its rustic charm and natural elements. A wire vase with a distressed finish would complement this aesthetic beautifully. Fill it with a mix of wildflowers, herbs, or sprigs of wheat for a truly farmhouse feel.
Incorporate other natural elements like burlap or wooden accents to further enhance the rustic ambiance.
- Boho:Boho style is all about embracing eclecticism and free-spirited vibes. A wire vase with a bohemian flair, perhaps adorned with macrame or beads, would be a perfect addition to this style. Fill it with a vibrant mix of flowers and foliage, incorporating textures like feathers, dried grasses, or even crystals for an authentic bohemian touch.
Creating a Balanced and Visually Appealing Arrangement
The key to creating a visually appealing arrangement is balance. Here are some tips for achieving a harmonious and balanced display:
- Consider the shape of the vase:A tall, slender vase will look best with a tall, upright arrangement of flowers. A wide, round vase can accommodate a more cascading arrangement.
- Use a variety of heights and textures:This will create visual interest and prevent the arrangement from looking flat or monotonous. Experiment with different heights and textures to find what works best for your wire vase.
- Avoid overcrowding:Too many flowers in a small vase will make the arrangement look cluttered and overwhelming. Allow space for the flowers to breathe and showcase their beauty.