DIY Spider Web Chocolate Bars: A Spooktacularly Simple Sweet Treat
Creating visually striking and delicious spider web chocolate bars at home is an achievable and rewarding DIY project for any occasion, especially Halloween. These bars offer a delightful combination of rich chocolate and an intricate, edible web design, making them perfect for party favors, bake sales, or simply a fun culinary adventure. The process involves melting chocolate, tempering it for a professional finish, and then artfully decorating it with a contrasting chocolate spider web. This guide will walk you through every step, from selecting the right ingredients to executing the delicate web design, ensuring a successful and impressive outcome.
The foundation of any great chocolate bar is the quality of the chocolate itself. For spider web chocolate bars, you have several excellent options, each offering a distinct flavor profile and working texture. Dark chocolate, with its intense cocoa notes, provides a sophisticated base and often a satisfying snap when properly tempered. Milk chocolate offers a sweeter, creamier experience and is a crowd-pleaser for all ages. White chocolate, while requiring a slightly different approach to tempering due to its lower cocoa butter content, creates a stark, beautiful contrast for the dark chocolate web, making the design pop. A good quality couverture chocolate, which contains a higher percentage of cocoa butter, is highly recommended for its superior melting properties, smooth texture, and excellent temper. This means it will set with a glossy finish and a satisfying snap, crucial for a professional-looking chocolate bar. Avoid using standard chocolate chips unless specifically formulated for melting and coating, as they often contain stabilizers that can affect texture and temper. When purchasing chocolate, look for bars labeled "couverture" or those with a short ingredient list, primarily consisting of cocoa solids, cocoa butter, and sugar. The percentage of cocoa solids in dark chocolate, for instance, indicates the richness and intensity of the flavor; a 60-70% cocoa content is generally a good starting point for a balanced, not-too-bitter dark chocolate. For milk chocolate, a 30-40% cocoa content is typical. White chocolate will primarily contain cocoa butter, sugar, and milk solids.
Tempering chocolate is the process of controlling its temperature to align the cocoa butter crystals into a stable form. This is what gives tempered chocolate its signature glossy sheen, hard snap, and prevents it from blooming (developing a white, chalky coating) as it melts and re-hardens. There are several methods for tempering chocolate at home. The "seeding" method is a popular and effective technique. You’ll need a thermometer for accuracy. First, chop your chocolate into small, uniform pieces. Reserve about two-thirds of the chocolate. Gently melt the remaining one-third of the chocolate over a double boiler or in the microwave on 50% power, stirring frequently, until it is smooth and completely melted. Avoid overheating, as chocolate can scorch easily. Once melted, remove from heat and gradually stir in the reserved, chopped chocolate. Continue stirring until all the reserved chocolate is melted and the mixture reaches a temperature of around 82-86°F (28-30°C) for dark chocolate, 80-84°F (27-29°C) for milk chocolate, and 77-80°F (25-27°C) for white chocolate. This process, known as seeding, introduces stable crystals that encourage the rest of the chocolate to crystallize properly. After seeding, you may need to gently rewarm the chocolate slightly, but never exceeding the temperatures mentioned above, to ensure it is fluid enough for pouring and decorating. The chocolate should feel smooth and fluid, coating the back of a spoon evenly. If the chocolate seizes (becomes thick and grainy), it’s often due to a small amount of water contamination or overheating. At this point, it’s usually best to start over.
To create the actual chocolate bars, you will need appropriate molds. Silicone chocolate bar molds are ideal for DIY projects as they are flexible, easy to use, and produce perfectly shaped bars. These molds come in various sizes and shapes, from classic rectangular bars to more intricate designs. Alternatively, you can use clean, uncreased parchment paper or silicone baking mats to create free-form bars. If using parchment paper or mats, you’ll be pouring the chocolate directly onto the surface and spreading it into rectangular shapes. For molds, ensure they are clean and completely dry. Any moisture can negatively impact the tempering process and the final appearance of the chocolate. Fill each cavity of the silicone mold with your tempered chocolate, tapping the mold gently on the counter to release any air bubbles and ensure even distribution. If you’re free-forming, spread the tempered chocolate onto the prepared surface using an offset spatula to create uniform rectangles. Aim for a thickness of about ¼ to ½ inch for a substantial bar. For a more refined finish, you can smooth the surface of the chocolate with an offset spatula after filling the molds. Allow the chocolate to set completely. This can be done at room temperature if your environment is cool, or by placing the molds in the refrigerator for about 15-30 minutes. Over-chilling can sometimes lead to condensation and a dull finish, so monitor the chocolate closely.
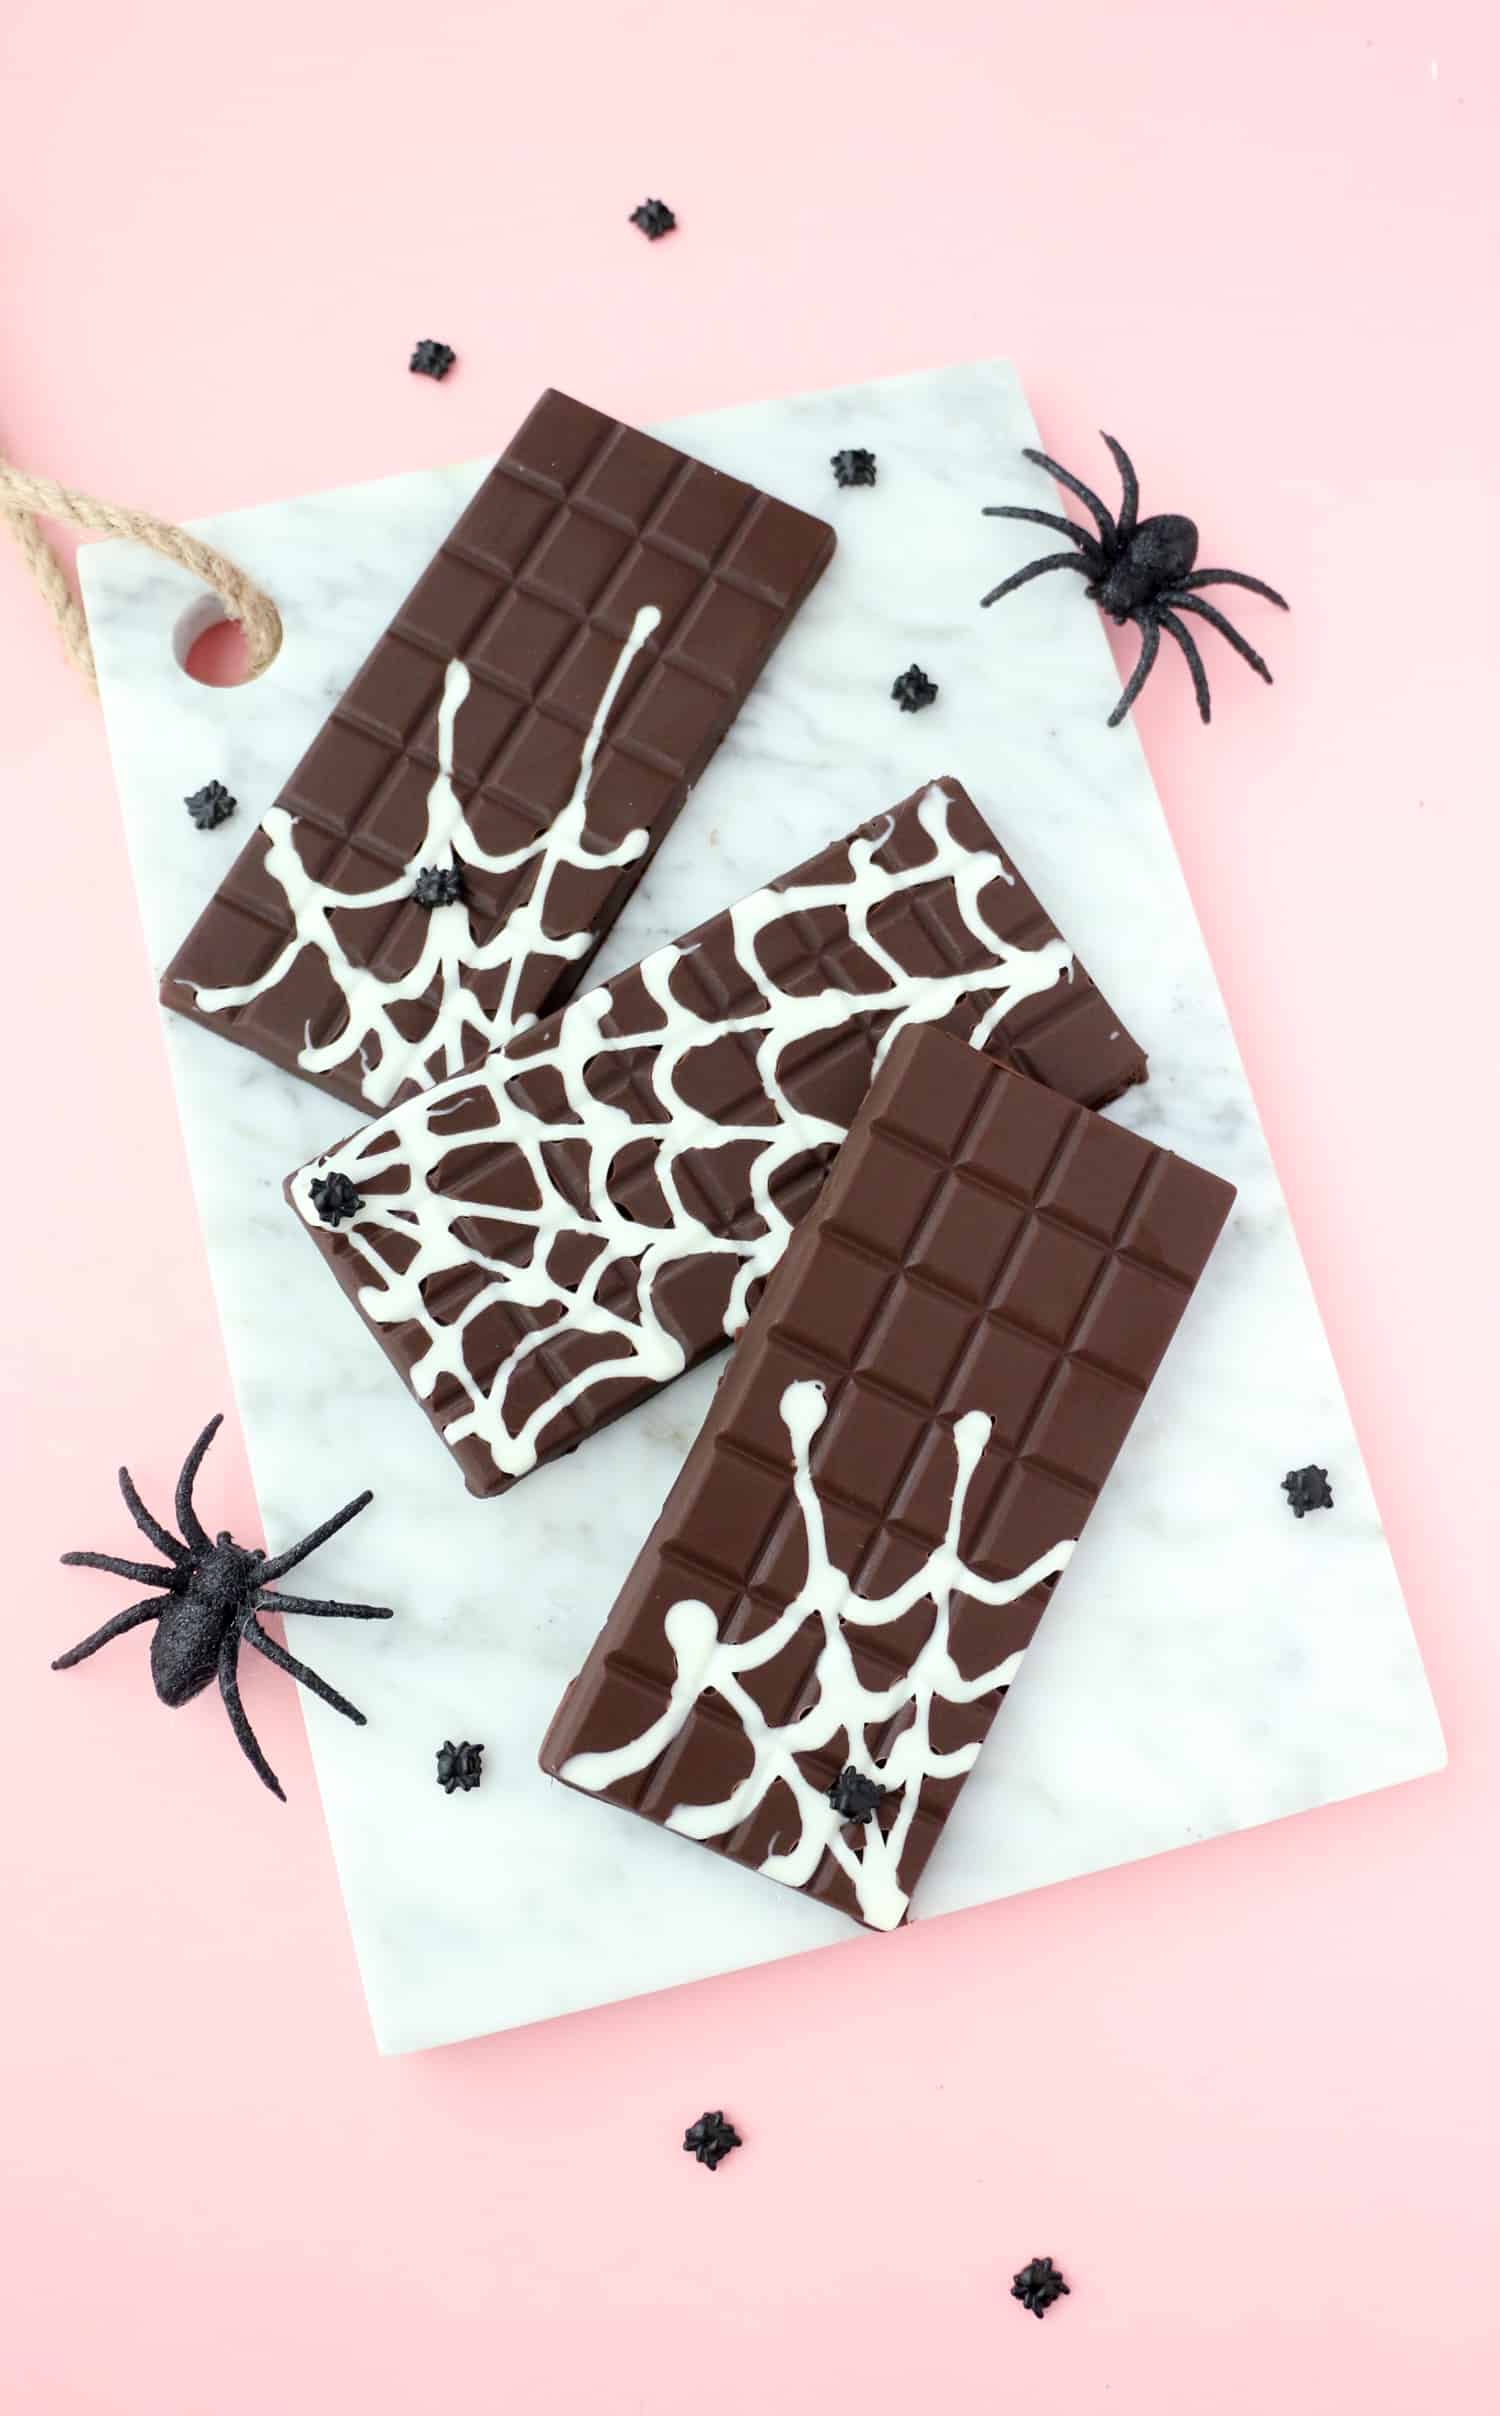
The star of this DIY project is the spider web design. This is typically achieved using a contrasting color of melted chocolate. For a classic look, melt white chocolate to create a web on a dark chocolate bar, or vice versa. You can also use colored candy melts for a more vibrant and playful effect. The key is to ensure the secondary chocolate is also properly tempered or at least melted to a fluid consistency that will set firmly. Once your main chocolate bars have set and you are ready to decorate, you have a few options for creating the spider web. One popular method involves using a piping bag fitted with a small, round tip or a zip-top bag with a tiny corner snipped off. This allows for precise control over the chocolate flow. For the web itself, pipe thin, concentric circles of the contrasting chocolate onto the surface of the set chocolate bars, starting from the center and working outwards. Don’t worry if your circles aren’t perfectly uniform; slight imperfections add to the handmade charm. Once the concentric circles are complete, use a toothpick or a fine skewer to drag lines from the center of the bar outwards, through each of the concentric circles. This action pulls the chocolate and creates the iconic spider web pattern. Drag the toothpick in a radial motion, starting from the center and extending to the outer edge of the bar. Repeat this process around the entire bar, creating multiple radial lines that connect to your concentric circles.
Alternatively, for a more spontaneous and perhaps easier approach to the spider web, you can use a drizzle technique. Melt your contrasting chocolate and, using a spoon or a piping bag with a slightly larger opening, drizzle thin streams of chocolate back and forth across the surface of the set chocolate bars. Then, while the drizzles are still wet, use a toothpick to gently drag lines through the drizzles, creating a more abstract web-like pattern. This method is less precise but can still yield beautiful results. For a truly spooky touch, consider adding a small chocolate spider to the web. You can purchase pre-made chocolate spiders, or you can pipe small spider shapes onto parchment paper using your contrasting chocolate and let them set. Once hardened, carefully place these edible spiders onto your chocolate bars. If your bars are still slightly tacky, the spider will adhere easily. If they are fully set, you can use a tiny dab of melted chocolate as "glue" to attach the spider. This adds an extra layer of detail and thematic relevance to your spider web chocolate bars.
For those seeking an even more simplified approach to the spider web, a melt-and-drizzle method can be employed without the rigorous tempering of the decorative chocolate, provided it’s used quickly and at the right consistency. However, for the best aesthetic and structural integrity, tempering is always recommended. When using white chocolate for the web on a dark chocolate bar, ensure it’s melted to a smooth, fluid consistency. If it becomes too thick, you can add a tiny amount of neutral oil, like vegetable or canola oil (no more than ½ teaspoon per cup of chocolate), to thin it slightly. Be cautious not to add too much oil, as it can make the chocolate greasy and prevent it from setting properly. If using colored candy melts for the decorative element, follow the manufacturer’s instructions for melting, as they generally do not require tempering. They are designed to melt easily and set firm.
Storing your finished spider web chocolate bars is crucial for maintaining their appearance and freshness. Once the decorative chocolate has completely set, carefully remove the bars from their molds. If you free-formed them, ensure they are fully hardened before handling. Store the chocolate bars in an airtight container at a cool, dry place, ideally between 60-68°F (15-20°C). Avoid storing them in the refrigerator unless absolutely necessary, as condensation can form on the chocolate, leading to a dull finish and potentially affecting the temper. If refrigeration is unavoidable, place the bars in a sealed container and allow them to come to room temperature slowly before unwrapping to minimize condensation. Properly stored, these DIY spider web chocolate bars can last for several weeks, making them ideal for making in advance for parties or events.
To enhance the SEO of this article, focus on incorporating relevant keywords naturally throughout the text. Primary keywords include "DIY spider web chocolate bars," "chocolate bar recipe," "easy chocolate decorations," "Halloween treats," "tempering chocolate," "chocolate mold ideas," "homemade candy," and "spider web candy." Secondary keywords and related terms that can be woven in include: "chocolate making," "couverture chocolate," "silicone molds," "chocolate piping," "edible decorations," "party favors," "bake sale ideas," "creative chocolate," "sweet treats," "dessert recipes," "how to make chocolate webs," "chocolate tutorial," and "holiday baking." Using these terms within headings, subheadings, and the body of the text will improve search engine visibility for users looking to create these specific treats. For instance, sections could be titled: "Selecting the Best Chocolate for Your Spider Web Creations," "Mastering Chocolate Tempering for Glossy Bars," "Creating the Perfect Spider Web Design," and "Storing and Serving Your Spooktacular Chocolate Bars." Including these descriptive and keyword-rich titles will guide readers and search engines alike.
The versatility of this DIY project extends beyond just Halloween. While the spider web motif is undeniably festive for the spooky season, you can adapt the decoration technique for other holidays or themes. For Valentine’s Day, use red or pink chocolate to pipe hearts or swirling patterns. For Easter, pastel colors and spring-themed designs can be employed. Even for everyday occasions, a simple contrasting drizzle or pattern can elevate a homemade chocolate bar. Experimenting with different chocolate flavors, adding inclusions like chopped nuts or dried fruit to the base chocolate before setting, or even layering different colored chocolates can create unique and personalized treats. The foundational skills of melting, tempering, and decorating chocolate are transferable to a wide range of confectionery creations, making this spider web chocolate bar project a valuable learning experience for any home baker. Ultimately, the goal is to create a visually appealing and delicious chocolate confection that brings joy to both the maker and the recipient. The process is engaging, the results are impressive, and the taste is undeniably satisfying.
