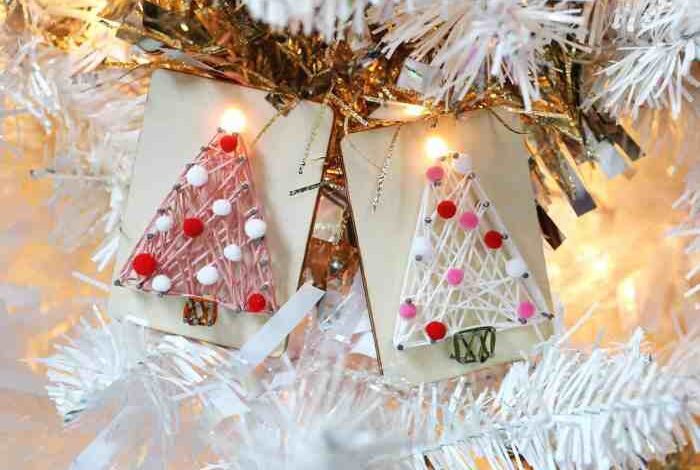
DIY string art ornaments are a fantastic way to add a personal touch to your home décor or create unique gifts for loved ones. These intricate designs, crafted by wrapping string around nails hammered into a wooden base, offer endless possibilities for creativity and customization.
The history of string art dates back to the 19th century, with its origins in the Victorian era. Over time, it has evolved into a popular craft, inspiring countless artists and hobbyists with its versatility and accessibility. From simple geometric shapes to intricate animal portraits, the possibilities for string art designs are truly boundless.
Introduction to DIY String Art Ornaments
String art ornaments are a charming and versatile craft that allows you to create unique and personalized decorations for your home or as thoughtful gifts. The process of wrapping colorful threads around nails hammered into a base to create intricate designs is both relaxing and rewarding.
The beauty of string art lies in its adaptability. You can experiment with different shapes, patterns, and colors to express your creativity and style. Whether you prefer simple geometric designs or intricate floral patterns, string art offers endless possibilities for customization.
The History and Evolution of String Art
String art, also known as thread sculpture, has a fascinating history. Its origins can be traced back to the 19th century, where it was initially used as a teaching tool for geometry and mathematics. The intricate patterns created by string art helped students visualize geometric concepts and explore the relationship between lines and shapes.The popularity of string art as a decorative art form began to rise in the mid-20th century, gaining traction during the 1960s and 1970s.
During this period, string art became associated with the counterculture movement, where its handcrafted nature and vibrant colors resonated with the spirit of creativity and self-expression.Over the years, string art has evolved beyond its traditional forms. Artists and crafters have experimented with various materials, techniques, and designs, pushing the boundaries of this art form.
DIY string art ornaments are a fun and easy way to add a touch of personality to your holiday decor. I love the way the colorful threads create unique patterns and textures. For a more sophisticated look, you could even try incorporating some of the gorgeous details found in these gold leaf brooches for fall into your string art designs.
Imagine the intricate details of those brooches translated into a stunning string art piece!
From three-dimensional string art sculptures to intricate wall hangings, the possibilities for creative expression are endless.
Materials and Tools for DIY String Art Ornaments
Creating string art ornaments requires a few essential materials and tools. These items will help you bring your creative vision to life and craft beautiful, unique decorations. Let’s explore the key components you’ll need to get started.
Choosing the Right String
The type of string you choose can significantly impact the look and feel of your string art ornaments. Different types of string create distinct visual effects, so selecting the right one is crucial.
- Embroidery floss:This popular choice offers a wide array of colors and is readily available. It creates a delicate and intricate look, ideal for fine details and intricate patterns.
- Yarn:Yarn comes in various textures, thicknesses, and colors. It provides a bolder and more textured look, making it suitable for larger patterns or creating a rustic aesthetic.
- Metallic thread:For a touch of elegance and sparkle, metallic thread is a great option. It adds a glamorous feel to your ornaments and can be used to create striking accents.
- Twine:Twine offers a natural and rustic look. It comes in various materials, including jute, hemp, and cotton, and can be used to create a more relaxed and earthy feel.
- Ribbon:Ribbon can be used to add a touch of color and dimension to your ornaments. It comes in various widths, patterns, and textures, allowing you to create unique designs.
Essential Materials
The core materials for string art ornaments are readily available at craft stores and online retailers.
DIY string art ornaments are a fun and creative way to add a personal touch to your holiday decor. They’re also a great way to use up leftover yarn or string. But even with all the DIY inspiration out there, sometimes it’s hard to know where to start.
That’s where content marketing comes in. If you’re wondering if content marketing is still relevant in today’s digital landscape, check out this article for some insightful perspectives. Once you’ve got your creative juices flowing, you can start designing your own unique string art ornaments.
- Wood:Choose a wood that is smooth and easy to work with. Plywood, MDF, or even small pieces of scrap wood are suitable options. The thickness should be sufficient to hold the nails securely.
- Nails:Use small finishing nails or thumbtacks. They should be short enough to not protrude through the back of the wood but long enough to hold the string securely.
- Templates:Templates are crucial for guiding your nail placement. You can find pre-made templates online or create your own using paper, cardboard, or stencils.
Alternative Materials
While the traditional materials work well, you can explore alternative options to add a unique touch to your ornaments.
I love the way string art ornaments can transform simple shapes into whimsical decorations. The intricate lines and patterns remind me of the delicate details you can create with a needle and thread, like the beautiful floral embroidery featured on this floral embroidered top DIY project.
Just like string art, floral embroidery adds a touch of handmade charm and personality to any project.
- Nails:Instead of traditional nails, you can use decorative tacks, push pins, or even small screws for a different aesthetic.
- String:Experiment with unconventional materials like wire, fishing line, or even colorful yarn scraps for a more textured and unique look.
Design Ideas and Inspiration for DIY String Art Ornaments
String art ornaments offer a fantastic way to express your creativity and add a personal touch to your holiday decor. With a little imagination, you can create unique and beautiful ornaments that reflect your style and interests.
Geometric Shapes
Geometric shapes are a great starting point for string art designs. Simple shapes like circles, squares, and triangles can be easily transformed into eye-catching ornaments. You can create a variety of patterns within these shapes, using different colors and string thicknesses to add visual interest.
- Circles:Create a classic snowflake design by wrapping string around a circle in a radial pattern, alternating colors for a festive look.
- Squares:Transform a square into a modern geometric design by creating diagonal lines across the shape, experimenting with different colors and textures.
- Triangles:A simple triangle can be turned into a minimalist ornament by creating a series of parallel lines that intersect at the center.
Animals
Animal-themed string art ornaments are a charming and whimsical way to add personality to your decor. From playful kittens to majestic deer, the possibilities are endless.
- Birds:Create a delicate bird silhouette by wrapping string around a simple bird shape template, adding details like a beak and wings.
- Deer:A deer head silhouette can be turned into a rustic ornament by using natural twine or brown yarn to create the antlers and body.
- Fish:A fish silhouette can be turned into a colorful underwater scene by using different colors of string to create scales and fins.
Seasonal Themes
String art ornaments are perfect for capturing the essence of different seasons. You can create designs that reflect the colors, textures, and symbols of each season.
- Fall:Create a warm and inviting fall ornament by using shades of orange, brown, and yellow string to create leaves, pumpkins, or acorns.
- Winter:A snowflake design is a classic choice for winter ornaments. You can also create a whimsical snowman or a snowy scene.
- Spring:Celebrate the arrival of spring with a cheerful flower ornament. Use bright colors and playful patterns to create a vibrant design.
Resources for Inspiration
Finding inspiration for your string art designs is easy. There are many resources available online and in libraries.
- Pinterest:Pinterest is a great source of inspiration for all types of crafts, including string art. You can search for specific designs or browse through different boards.
- Etsy:Etsy is a popular online marketplace where you can find a wide variety of string art templates and supplies.
- String Art Books:There are many books available that offer step-by-step instructions and design ideas for string art.
Custom Designs
Don’t be afraid to experiment and create your own custom string art designs. Combine different shapes, patterns, and colors to create unique and personal ornaments.
- Geometric Patterns:Mix and match different geometric shapes to create abstract and modern designs.
- Nature-Inspired Designs:Draw inspiration from the natural world, creating designs that feature leaves, flowers, or animals.
- Personalized Designs:Create ornaments that feature your initials, a special date, or a meaningful quote.
Step-by-Step Guide to Creating DIY String Art Ornaments

Now that you have gathered your materials and tools, let’s dive into the process of creating your own string art ornaments. This step-by-step guide will walk you through each stage, from transferring your design to wrapping the string around the nails.
Transferring the Design
Before you start hammering nails, you need to transfer your chosen design onto the wood. This step ensures your string art ornament will have the desired shape and pattern.
- Using a Pencil and Template:This is a simple and straightforward method. Print or draw your design on paper, then use a pencil to trace the Artikel onto your wooden surface. Ensure the template is securely positioned before tracing.
- Freehand Drawing:If you’re confident with your artistic skills, you can freehand draw your design directly onto the wood. This method allows for more creative freedom and unique patterns.
- Stencils:For intricate designs, stencils can be incredibly helpful. They provide a precise Artikel for your string art, making it easier to achieve detailed shapes.
Hammering the Nails
Once your design is transferred, it’s time to hammer in the nails. This step requires patience and a steady hand.
- Spacing:The spacing between your nails will influence the overall look of your string art. For a more intricate design, use closer spacing. For a bolder design, use wider spacing.
- Nail Size:Choose nails that are long enough to hold the string securely but not so long that they protrude through the back of the wood.
- Hammering Technique:Use a light and consistent hammering technique to avoid bending or damaging the nails. Tap gently until each nail is securely in place.
Wrapping the String
The most exciting part of creating string art is wrapping the string around the nails to form your design. This step allows for endless creativity and experimentation.
- Starting Point:Begin by tying the string to one of the nails. This will be your starting point for wrapping.
- Wrapping Techniques:Experiment with different wrapping techniques to create unique patterns and textures.
- Straight Lines:Wrap the string in straight lines from one nail to another. This creates a clean and geometric look.
- Curved Lines:Wrap the string in curved lines to create flowing patterns and shapes.
- Cross-Stitching:Wrap the string in a criss-cross pattern to create a textured effect.
- Color Combinations:Use multiple colors of string to add depth and dimension to your design.
Tips and Techniques for Successful DIY String Art Ornaments

String art ornaments are a fun and creative way to add a personal touch to your holiday decor or any occasion. With a little patience and practice, you can create stunning and unique pieces that are sure to impress. Here are some tips and techniques to help you achieve a neat and polished finish on your string art ornaments.
Choosing the Right Materials
Selecting the right materials is crucial for creating high-quality string art ornaments. The type of wood you choose will affect the overall look and feel of your ornament. For a rustic look, consider using reclaimed wood or driftwood. For a more polished finish, opt for smooth, sanded wood.
- Wood:Choose a wood that is smooth and free of knots or imperfections. Pine, basswood, or plywood are all good choices.
- Nails:Use nails that are long enough to penetrate the wood but not so long that they protrude through the back. Finish nails are a good option for string art.
- String:Choose a string that is strong and durable. Embroidery floss, yarn, or even thin wire can be used for string art.
- Template:Use a template to create your design. You can find templates online or create your own.
Achieving a Neat and Polished Finish
To achieve a neat and polished finish on your string art ornaments, follow these tips:
- Use a template:A template will help you create a consistent and symmetrical design. You can find templates online or create your own using graph paper or a computer program.
- Plan your design:Before you start hammering nails, take some time to plan out your design. This will help you avoid mistakes and ensure that your ornament looks the way you want it to.
- Hammer carefully:Hammer the nails in straight and at a consistent depth. This will help to create a smooth and even surface for your string.
- Use a ruler:Use a ruler to measure the spacing between your nails. This will help you create a neat and symmetrical design.
- Wrap the string tightly:Wrap the string tightly around the nails. This will help to create a smooth and even finish.
- Use a variety of colors:Don’t be afraid to use a variety of colors to create a unique and eye-catching ornament.
- Finish the back:Once you’ve finished wrapping the string, use a hot glue gun to secure the back of the ornament. This will help to keep the string in place and prevent it from unraveling.
Creating Smooth Transitions Between Colors and Patterns
Creating smooth transitions between colors and patterns in string art can be challenging, but it’s a rewarding technique that adds depth and complexity to your ornaments. Here are some tips:
- Use a gradient:To create a gradual transition between colors, use a gradient. This can be achieved by using different shades of the same color or by using two or more colors that blend together smoothly.
- Overlapping patterns:You can create smooth transitions by overlapping patterns. For example, you could overlap a simple geometric pattern with a more intricate pattern.
- Use a variety of string thicknesses:Varying the thickness of the string can also create smooth transitions. For example, you could use a thicker string for the main Artikel of your design and a thinner string for the details.
Troubleshooting Common Issues, Diy string art ornaments
Here are some common issues encountered in string art and how to troubleshoot them:
- Uneven nails:If your nails are uneven, it will be difficult to create a smooth and even finish. To fix this, you can use a hammer and nail setter to drive the nails in straight and at a consistent depth.
- Loose string:If the string is loose, it will be difficult to create a tight and even finish. To fix this, you can use a glue gun to secure the string to the nails.
- Uneven spacing:If the spacing between your nails is uneven, it will be difficult to create a symmetrical design. To fix this, use a ruler to measure the spacing between your nails.
- Wrinkled string:If the string is wrinkled, it will be difficult to create a smooth and even finish. To fix this, you can gently smooth out the wrinkles with your fingers.