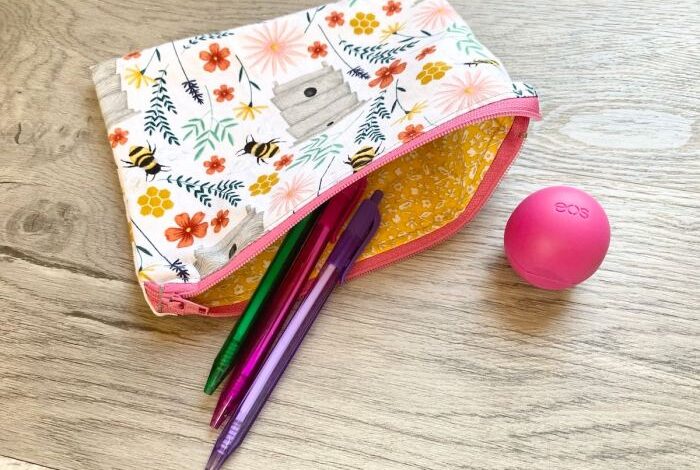
Diy water resistant zip pouch – DIY water-resistant zip pouches are a fantastic way to keep your belongings safe and dry, whether you’re heading out on a hike, commuting to work, or simply want a reliable way to organize your everyday essentials. These pouches are surprisingly easy to make, offering a sense of accomplishment and a personalized touch to your gear.
Crafting your own water-resistant pouch allows you to choose the perfect size, shape, and features for your specific needs. You can select durable and water-resistant fabrics, customize the design with embellishments and pockets, and even experiment with different closure methods to ensure a secure seal.
The process is rewarding, and the final product is a functional and stylish addition to your everyday life.
Introduction to DIY Water-Resistant Zip Pouches
In the realm of practical and stylish accessories, water-resistant zip pouches have emerged as indispensable companions for everyday life, travel, and outdoor adventures. These versatile pouches offer a secure and protective haven for your valuables, safeguarding them from the elements and ensuring their safety.Creating a DIY water-resistant zip pouch allows you to personalize your accessory, tailoring it to your specific needs and preferences.
You can choose from a wide range of materials, colors, and designs, unleashing your creativity and crafting a unique pouch that reflects your style.
Uses of Water-Resistant Zip Pouches
Water-resistant zip pouches find numerous applications, catering to diverse needs and situations. Their versatility extends from everyday carry to travel and outdoor activities.
- Everyday Carry:These pouches serve as convenient organizers for essential items like keys, phone, wallet, and small electronics, keeping them secure and accessible. They can be easily slipped into a backpack, purse, or pocket, providing a compact and protective storage solution.
Making a DIY water-resistant zip pouch is a great way to keep your essentials safe and dry, especially if you’re a fan of outdoor adventures. While I was researching waterproof materials for my project, I stumbled upon an interesting article about the bold chatbot David Byttow secret – it seems there’s a lot of intrigue surrounding this innovative technology.
Anyway, back to my pouch – I decided to use a combination of waterproof fabric and heat-sealable tape for a truly durable and watertight finish.
- Travel:Water-resistant zip pouches are invaluable for travel, protecting your passport, boarding pass, and other important documents from spills and moisture. They can also be used to store toiletries, electronics, and other travel essentials, keeping them organized and safe.
- Outdoor Activities:Whether you’re hiking, camping, or engaging in water sports, a water-resistant zip pouch is an essential companion. It can protect your phone, wallet, and other valuables from rain, splashes, and dust, ensuring their functionality and longevity.
Advantages of DIY Water-Resistant Zip Pouches
Creating your own water-resistant zip pouch offers numerous advantages over purchasing a pre-made one.
A DIY water-resistant zip pouch is a fantastic way to keep your belongings safe and dry. Once you’ve got your pouch ready, why not fill it with some of your own art prints? Check out 3 easy ways to make your own art prints for some inspiration.
You can use your prints to personalize your pouch or even give them as gifts to friends and family. With a little creativity, you can turn your DIY water-resistant zip pouch into a unique and functional accessory.
- Customization:DIY pouches allow you to personalize your accessory, choosing the materials, colors, and design that best suit your needs and style. You can create a pouch that reflects your individual taste and complements your existing gear.
- Cost-Effectiveness:Making your own pouch can be significantly more cost-effective than buying a pre-made one. You can source materials from local craft stores or online retailers at affordable prices, saving you money in the long run.
- Sense of Accomplishment:Crafting your own water-resistant zip pouch provides a sense of accomplishment and satisfaction. The process of creating something from scratch is both rewarding and empowering, fostering a sense of pride in your handiwork.
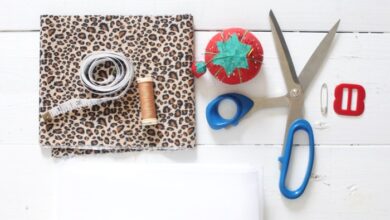
Materials and Tools

To embark on this DIY journey, you’ll need a collection of materials and tools, each playing a crucial role in constructing your water-resistant zip pouch. Let’s explore these essentials, ensuring your project is both functional and aesthetically pleasing.
I’ve been on a roll with DIY projects lately, and my latest obsession is making water-resistant zip pouches. They’re perfect for keeping small items safe and dry, especially when I’m out and about. I even use them to store my favorite jewelry, which I keep organized in my Elsie’s Super Secret Storage Cabinet – it’s a lifesaver for keeping everything tidy! Anyway, back to the pouches – I’m planning to make a whole batch to give as gifts, so if you’re interested in learning how to make them, let me know!
Fabric Choices
Choosing the right fabric is paramount, as it directly impacts the pouch’s water resistance and durability. Here’s a rundown of popular options:
- Polyester:Known for its strength and water-repellent properties, polyester is a versatile choice for a water-resistant pouch. It’s easy to sew, resists wrinkles, and dries quickly, making it ideal for everyday use.
- Nylon:Similar to polyester, nylon is lightweight, durable, and water-resistant. Its smooth texture makes it easy to clean, making it a practical option for pouches that may be exposed to dirt or grime.
- Waxed Canvas:This classic fabric offers a rustic charm and excellent water resistance. Its natural fibers are treated with wax, creating a protective barrier against moisture. However, waxed canvas can be more challenging to sew than synthetic fabrics.
- Cordura:This high-performance nylon fabric is known for its exceptional durability and abrasion resistance. It’s often used in outdoor gear and luggage, making it an excellent choice for pouches that need to withstand heavy use.
Zippers, Diy water resistant zip pouch
The zipper is the heart of your pouch, ensuring secure closure and preventing water from seeping in. Here’s what to consider:
- Water-resistant Zippers:Opt for zippers specifically designed for water resistance. These often feature a waterproof tape or coating that prevents water from entering the zipper track.
- Coil Zippers:These flexible zippers are commonly used in pouches and are available in various colors and sizes. They are relatively inexpensive and easy to work with.
- Metal Zippers:While not as common in pouches, metal zippers offer superior durability and a more robust look. However, they can be heavier and more challenging to sew.
Adhesives
Adhesives play a crucial role in sealing seams and creating a waterproof barrier. Consider these options:
- Seam Sealant:This specialized adhesive is designed to seal seams in waterproof fabrics, creating a watertight barrier. It’s typically applied to the seam allowance before sewing, ensuring a secure seal.
- Fabric Glue:This adhesive is versatile and can be used to bond different fabrics, including those with water-resistant properties. It’s ideal for reinforcing seams and creating a strong bond.
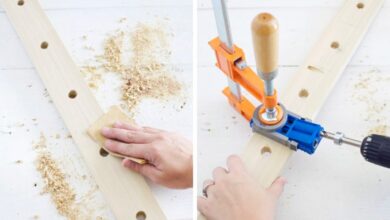
Essential Tools
A collection of tools will help you cut, sew, and assemble your pouch efficiently:
- Fabric Scissors:Sharp, dedicated fabric scissors are essential for clean, precise cuts. Avoid using regular scissors as they can dull and damage the fabric.
- Sewing Machine:A sewing machine is the workhorse of your project, making it easier to sew straight lines and secure seams. If you don’t own a sewing machine, you can hand-sew the pouch, but it will require more time and effort.
- Sewing Pins:These are essential for holding fabric layers together before sewing, ensuring precise alignment and preventing shifting.
- Zipper Foot:A specialized foot designed for sewing zippers, allowing you to stitch close to the zipper teeth for a clean and secure finish.
- Measuring Tape:Essential for accurately measuring and cutting fabric to the desired dimensions.
- Iron:An iron is helpful for pressing seams and removing wrinkles from the fabric, creating a polished look.
- Rotary Cutter:This tool is a valuable addition for cutting fabric quickly and accurately, especially when working with large pieces.
- Cutting Mat:A self-healing cutting mat protects your work surface and provides a stable base for cutting fabric.
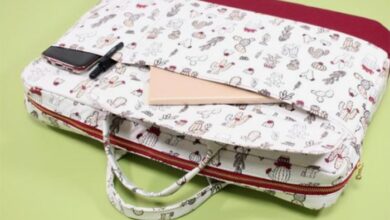
Design and Pattern: Diy Water Resistant Zip Pouch

The design of your water-resistant zip pouch will depend on its intended use. A pouch for carrying electronics will need to be more robust and have more padding than a pouch for carrying toiletries. You can also get creative with the shape, size, and features of your pouch.
Here are some design ideas for water-resistant zip pouches:
Design Ideas
- Size: Consider the size of the items you plan to carry. A small pouch for carrying a phone and keys will be different from a large pouch for carrying a laptop or tablet.
- Shape: The shape of your pouch will also affect its functionality.
A rectangular pouch is good for carrying flat items, while a cylindrical pouch is good for carrying round items.
- Features: You can add features to your pouch to make it more functional, such as a carrying handle, a strap, or an external pocket.
Creating a Pattern
There are two main ways to create a pattern for your water-resistant zip pouch:
- Create a Simple Pattern: A simple pattern can be created by hand. Start by drawing a rectangle on a piece of paper, then add the dimensions of your pouch. You can also add any features you want, such as a carrying handle or a strap.
Once you have your pattern, you can cut it out and use it as a template for your fabric.
- Use a Pre-made Template: There are many pre-made templates available online that you can use to create your pouch. These templates are often free and can be downloaded and printed.
It is important to consider the intended use of your pouch when choosing a design. For example, if you are making a pouch for carrying electronics, you will need to choose a fabric that is strong and durable. You will also need to add padding to protect your electronics.
Customization and Finishing Touches

Now that you’ve got the basic pouch constructed, it’s time to unleash your creativity and personalize it! Adding embellishments, pockets, and straps can make your pouch truly unique and functional. We’ll also cover techniques for finishing the edges and sealing the pouch to ensure water resistance.
Embellishments and Additions
Adding embellishments can transform your pouch from basic to stylish. Here are some ideas:
- Patches:Iron-on patches with your favorite designs, logos, or quotes add a personalized touch.
- Embroidery:Stitch your initials, a simple design, or a fun quote for a handmade look.
- Beads and Charms:Attach beads or charms to the zipper pull or along the edges for a whimsical touch.
- Fabric Appliques:Cut out shapes from contrasting fabrics and sew them onto the pouch for a unique design.
- Printed Fabric:Use a fabric with a fun print, like a floral pattern or geometric design, to add visual interest.
Adding Pockets
Extra pockets can be incredibly useful for organizing your belongings.
- Exterior Pocket:Sew a small pocket onto the front of the pouch for quick access to items like your phone or keys.
- Interior Pockets:Add a zippered pocket or a few open pockets inside the pouch to separate items and keep them organized.
- Mesh Pockets:Use mesh fabric for pockets to allow for ventilation and visibility of items inside.
Adding Straps
Straps add versatility and allow you to carry your pouch in different ways.
- Shoulder Strap:Attach a wide, adjustable shoulder strap for hands-free carrying.
- Wrist Strap:Add a shorter wrist strap for a secure grip when carrying your pouch.
- Carabiner Clip:Attach a carabiner clip to the strap so you can easily clip it to a bag or belt loop.
Finishing the Edges
Cleanly finished edges enhance the appearance and durability of your pouch.
- Serging:Use a serger to create a professional-looking, overlocked edge that prevents fraying.
- Zigzag Stitch:A zigzag stitch on a sewing machine is a simple and effective way to finish edges.
- Binding:Apply a fabric binding around the edges for a neat and durable finish.
Sealing the Pouch
Proper sealing is crucial to ensure water resistance.
- Seam Sealing Tape:Apply seam sealing tape to all seams, including the zipper seam, to create a waterproof barrier.
- Waterproof Fabric:Use a waterproof fabric for the pouch’s exterior to prevent water from penetrating.
- Water-Resistant Coating:Apply a water-resistant coating, such as a fabric sealant spray, to the entire pouch.
Water Resistance Testing
It’s crucial to test the water resistance of your DIY water-resistant zip pouch before using it in wet conditions. This ensures that your pouch is effectively protecting your belongings from water damage. Here’s how you can test the water resistance of your pouch:
Testing Methods
The most common way to test water resistance is by using the spray method. This involves spraying water directly onto the pouch and observing if any water penetrates the fabric.
- Spray Method:Use a spray bottle to gently mist the pouch with water. Pay attention to seams, zippers, and any areas where water could potentially seep in. Observe the pouch for any signs of water penetration. If water droplets start appearing inside the pouch, it indicates a leak.
- Immersion Method:For a more rigorous test, you can partially immerse the pouch in a container of water. This will allow you to assess the pouch’s resistance to water pressure. Again, observe for any signs of water leaking into the pouch.
Identifying Leaks
If you detect leaks, it’s important to identify their source. Examine the pouch carefully, paying attention to:
- Seams:Check for any gaps or holes in the seams. If you notice any, you can reinforce them by sewing a second layer of seam tape or using a waterproof sealant.
- Zipper:Make sure the zipper is properly sealed and that there are no gaps around the zipper teeth. You can use a waterproof zipper tape or a sealant to ensure a tight seal.
- Fabric:If the fabric itself is leaking, you may need to consider using a different type of fabric that is more water-resistant.
Addressing Potential Issues
Once you’ve identified the source of the leak, you can address it by:
- Reinforcing Seams:Use a waterproof seam tape or sealant to reinforce any weak seams. This will create a more watertight seal.
- Sealing Zippers:Apply a waterproof zipper tape or sealant around the zipper to ensure a tight seal.
- Using a Waterproof Liner:If the fabric itself is not waterproof, you can use a waterproof liner inside the pouch to protect your belongings from water damage.
Importance of Testing
It’s essential to test your pouch before using it in wet conditions. This will help you identify any potential leaks and address them before they cause damage to your belongings.
Remember, a properly tested and sealed water-resistant pouch will provide reliable protection for your belongings in wet environments.