DIY Faux Fur Flannel Blanket: The Ultimate Guide to Cozy Comfort
Creating your own faux fur flannel blanket is a rewarding and surprisingly straightforward DIY project. It offers a perfect blend of luxurious softness and practical warmth, making it an ideal addition to any home or a thoughtful handmade gift. This comprehensive guide will walk you through every step, from selecting the right materials to finishing your bespoke blanket, ensuring a professional-looking and incredibly comfortable result. We’ll cover the benefits of this project, material considerations, step-by-step instructions, and tips for customization and care, all optimized for search engines to help you find the information you need.
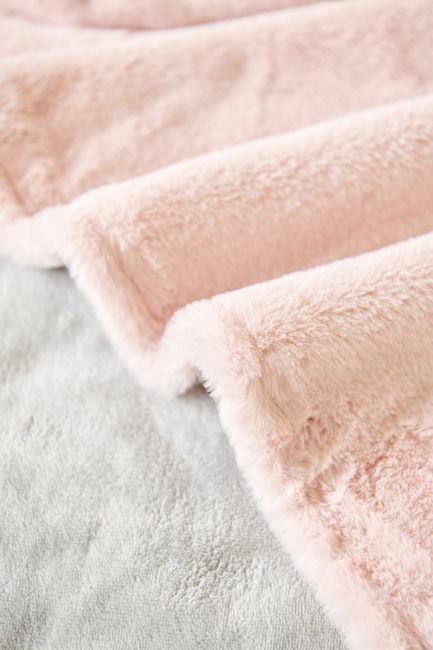
The allure of a faux fur flannel blanket lies in its dual-texture appeal. The faux fur side provides an unparalleled sense of opulence and snuggle-factor, mimicking the look and feel of real fur without the ethical concerns. Its plush pile traps air, offering exceptional insulation, while its visual richness adds a touch of elegance to any living space. The flannel side, on the other hand, offers a familiar, comforting softness. Flannel, typically made from cotton, is known for its brushed texture, which makes it incredibly soft and warm against the skin. This combination creates a blanket that is not only aesthetically pleasing but also supremely functional, perfect for warding off chills on a cold evening, adding an extra layer of warmth to a bed, or simply for curling up with a good book. The DIY aspect allows for complete customization of size, color, and even the specific types of faux fur and flannel to perfectly match your décor and personal preferences. This makes it a far more personal and potentially more cost-effective option than purchasing a comparable pre-made blanket, especially when considering high-end faux fur materials.
Selecting the right materials is paramount to the success and longevity of your faux fur flannel blanket. For the faux fur, consider the pile length and density. Shorter, denser piles are generally easier to work with and less prone to shedding than longer, sparser piles. Look for faux fur with a good quality backing, preferably one that is tightly woven and doesn’t stretch excessively, as this will provide stability during sewing. Common faux fur types include acrylic, polyester, and blends. Acrylic often offers excellent softness and a luxurious sheen, while polyester can be very durable and less expensive. When choosing, feel the fabric; it should be soft to the touch and have a consistent texture. For the flannel, opt for 100% cotton flannel for the best breathability and softness. Pre-washing your flannel is a crucial step to prevent shrinkage after your blanket is completed. This also helps to remove any residual chemicals from the manufacturing process. Consider the weight of the flannel; a medium to heavy weight will provide more warmth and durability. Both fabrics should be purchased with a generous seam allowance in mind, typically at least 1 inch on all sides, to accommodate sewing and potential finishing techniques. The colors and patterns of your chosen faux fur and flannel should complement each other and your intended use of the blanket. Solid colors offer a classic look, while patterned flannel can add a playful element, especially when paired with a complementary solid or subtly patterned faux fur.
Now, let’s move on to the step-by-step process of creating your faux fur flannel blanket. Begin by pre-washing and drying both your faux fur and flannel fabrics separately. This is essential to account for any shrinkage. Once dry, lay out your fabrics flat on a large, clean surface, such as a cutting mat or a clean floor. If you are following a specific pattern or have a desired size in mind, measure and cut your fabrics accordingly. Ensure that you are cutting both pieces to the exact same dimensions. For a simple rectangular blanket, you will need two identical pieces. Use a sharp rotary cutter and a self-healing mat for precision, or fabric scissors if preferred. For faux fur, it’s often best to cut from the back, using a craft knife or the tip of your scissors to carefully cut only through the backing fabric, leaving the fur pile intact as much as possible. This minimizes shedding.
Once your two fabric pieces are cut to the same size, it’s time to prepare them for sewing. For the faux fur, you will want to trim any excess loose fibers or loose threads from the cut edges. For the flannel, ensure the edges are clean and straight. Now, place the two fabric pieces right sides together. This means the soft, visible sides of the faux fur and the flannel should be facing each other. Align the edges carefully. Pin the fabrics together all around the perimeter, placing pins about every 4-6 inches to ensure the layers don’t shift during sewing. Pay extra attention to aligning the corners precisely.
The next crucial step is sewing the two fabrics together. You will need a sewing machine equipped with a walking foot or an even-feed foot. This type of foot is highly recommended when sewing with multiple layers of fabric, especially with slippery materials like faux fur, as it helps to feed both layers evenly, preventing puckering and uneven stitches. If you don’t have a walking foot, you can try using a piece of tissue paper or stabilizer under the faux fur side to help it feed more smoothly, but a walking foot is the superior solution. Set your sewing machine to a medium stitch length. Begin sewing along one edge, approximately 1/2 to 1 inch from the raw edge, depending on your chosen seam allowance. Sew slowly and steadily, guiding the fabric with your hands without pushing or pulling.
When you reach a corner, stop with your needle down in the fabric, lift the presser foot, pivot the fabric 90 degrees, and continue sewing along the next edge. You will need to leave an opening for turning the blanket right side out. This opening should be at least 8-10 inches long and should be located somewhere along one of the longer sides of the blanket. Do not sew this section closed. Once you have sewn all the way around, excluding the opening, carefully backstitch at the beginning and end of your stitching line for added security.
After sewing, you will need to trim the seam allowance, especially in the corners, to reduce bulk. Carefully clip the corners diagonally, getting close to the stitching line but not cutting through it. For the faux fur, you can also gently trim away some of the excess backing material from the seam allowance if it appears particularly bulky, but be cautious not to cut into the fur itself.
Now comes the exciting part: turning the blanket right side out. Reach through the opening you left and carefully pull the fabric through. Work slowly and methodically, gently easing the corners out. You can use a blunt tool, like a chopstick or a knitting needle, to help gently push out the corners and ensure they are crisp and well-defined. Once the blanket is fully turned, lay it flat and smooth out all the seams and corners.
The next step is to close the opening. You can do this by hand using a ladder stitch (also known as a blind stitch), which will create an almost invisible seam. Fold the raw edges of the opening inward, aligning them with the sewn seam, and then use a needle and thread to carefully stitch the opening closed, taking small, discreet stitches. Alternatively, for a less visible but still strong closure, you can carefully machine stitch the opening closed, stitching very close to the folded edge.
Once the opening is closed, you’ll want to secure the two layers of fabric together and create a more finished look. This is typically done by topstitching around the entire perimeter of the blanket. Set your sewing machine to a stitch length slightly longer than your previous seam. Again, using a walking foot is highly recommended. Begin topstitching about 1/4 to 1/2 inch from the outer edge of the blanket, stitching all the way around. This not only adds a decorative element but also helps to keep the faux fur and flannel layers from shifting independently. When you reach the corners, pivot as you did before to create neat corners.
For an even more luxurious finish and to add extra durability, especially for a blanket that will see a lot of use, you can add a binding. Bias tape is a popular choice for binding blankets as it allows for a neat finish around curves and corners. You can purchase pre-made bias tape or make your own from a coordinating fabric. To apply, fold the bias tape in half lengthwise, encasing the raw edge of the blanket within. Pin it securely all the way around. Then, stitch along the edge of the bias tape, catching both sides. For a truly professional look, you can then flip the blanket over and topstitch the bias tape down on the other side, catching the edge of the bias tape on the underside.
Alternatively, for a simpler and very cozy finish, you can choose to leave the topstitching as your final step. However, some crafters prefer to add a few more rows of topstitching spaced evenly across the surface of the blanket to further secure the layers and add a quilted effect. This can be done in straight lines, creating a grid pattern, or even more decorative patterns if you are feeling adventurous.
Customization is where your DIY faux fur flannel blanket truly shines. Beyond the choice of fabrics, consider adding embellishments. For a child’s blanket, consider appliqueing felt shapes or embroidered designs onto the flannel side. For a more sophisticated look, you could add a decorative trim along the edge, such as a faux fur pom-pom fringe or a contrasting satin ribbon. If you’re creating a themed blanket, such as for a sports fan, you could incorporate fabric panels with team logos or colors. Think about the intended recipient and their style preferences. If the blanket is for a baby, ensure all embellishments are securely attached and pose no choking hazard.
The size of your blanket is also a key customization factor. You can create a small lap blanket, a generous throw for the sofa, or even a full-sized bed blanket. Measure your desired space or bed and adjust your fabric cuts accordingly. Remember to factor in enough fabric for your seam allowance and any binding you might choose to add.
Caring for your faux fur flannel blanket is relatively straightforward, but it’s important to follow best practices to maintain its softness and appearance. Always check the care labels of your specific faux fur and flannel fabrics. Generally, washing in cool or lukewarm water on a gentle cycle is recommended for both. Use a mild detergent and avoid fabric softeners, as they can coat the fibers and reduce their fluffiness, especially for faux fur. For faux fur, it’s best to wash it separately from other items to prevent snagging and pilling.
Drying is another critical step. Tumble drying on a very low heat or air-dry setting is ideal. Avoid high heat, as it can melt or damage the faux fur fibers. Gently shake out the blanket after washing and before drying to help fluff up the faux fur. Once dry, you can further revitalize the faux fur by gently brushing it with a wide-toothed comb or a soft-bristled brush. This helps to restore its loft and prevent matting. For stubborn wrinkles on the flannel side, you can iron on a low setting with a press cloth, but avoid ironing the faux fur directly. If your blanket is very large, consider spot cleaning minor stains rather than washing the entire blanket.
The benefits of a DIY faux fur flannel blanket extend beyond personal comfort and aesthetic appeal. It’s a sustainable choice, as you can often repurpose old blankets or curtains, giving them new life. It’s a fantastic way to practice and hone your sewing skills, moving from simple projects to more complex ones. The finished product is a testament to your creativity and effort, a unique item that carries sentimental value far beyond its material cost. Whether you’re a seasoned seamstress or a complete beginner, this project offers an accessible entry point into creating beautiful and functional textiles for your home.
The SEO-friendly keywords naturally integrated into this guide, such as "faux fur flannel blanket DIY," "how to make a cozy blanket," "handmade throw blanket," "no-sew blanket tutorial" (though this guide focuses on sewing for durability and a professional finish, variations can be found), "DIY home décor," and "custom blanket projects," are designed to help individuals searching for this type of project find this comprehensive resource. By breaking down the process into manageable steps and providing detailed advice on materials, techniques, and care, this article aims to be the ultimate go-to guide for anyone looking to create their own luxurious faux fur flannel blanket. The emphasis on material selection, construction methods, and finishing touches ensures that the resulting blanket will not only be beautiful but also durable and exceptionally comfortable, providing years of cozy enjoyment.
