Floating acrylic frame DIY is a fantastic way to showcase your artwork in a modern and minimalist way. This technique uses clear acrylic sheets instead of traditional glass to create a sleek and almost invisible frame that allows the artwork to appear as if it’s floating in space.
Acrylic frames offer a unique advantage over glass frames, as they are lighter, shatterproof, and provide better clarity for showcasing artwork.
This guide will take you through the process of creating your own floating acrylic frame, from choosing the right materials to assembling the frame and customizing it to your liking. We’ll also explore the different design considerations, safety tips, and inspiration for showcasing your artwork in a truly unique way.
Introduction to Floating Acrylic Frames
Floating acrylic frames are a modern and stylish alternative to traditional picture frames. They offer a unique way to display artwork, photographs, and other cherished items by creating the illusion that the piece is floating in mid-air.The term “floating” refers to the frame’s design, which features a thin acrylic sheet that sits slightly away from the artwork, creating an air gap between the two.
This gap gives the impression that the artwork is suspended in space, enhancing its visual appeal and adding a touch of contemporary elegance.
Floating acrylic frames are a great way to showcase your favorite prints or photos. They add a modern and minimalist touch to any space. I recently finished a project where I used acrylic frames to create a gallery wall, and while working on it, I stumbled upon an article about the Diablo Immortal Netease reskin , which reminded me of how important it is to be aware of potential copyright issues when creating art.
Now, back to my acrylic frames, I’m excited to see how they look when the light catches the edges and makes them appear to float.
Advantages of Acrylic over Glass
Acrylic offers several advantages over traditional glass for framing, making it a popular choice for modern art enthusiasts and collectors.
- Lightweight:Acrylic is significantly lighter than glass, making it easier to handle and transport, especially for larger frames. This is particularly beneficial for wall displays, as the lighter weight reduces stress on the hanging hardware.
- Durability:Acrylic is more resistant to breakage than glass, making it a safer option for framing valuable or fragile artwork. It is also less prone to scratches and abrasions, ensuring that your artwork remains protected and pristine.
- Clarity:Acrylic offers excellent clarity, allowing for a clear and undistorted view of the artwork. It also has a lower reflectivity than glass, reducing glare and enhancing the viewing experience.
- UV Protection:Acrylic can be treated with UV-resistant coatings to protect artwork from harmful ultraviolet rays, which can cause fading and discoloration over time. This feature is essential for preserving the vibrancy and longevity of your artwork.
Materials and Tools
This section provides a comprehensive list of materials and tools needed for crafting floating acrylic frames. Understanding these elements is crucial for a successful project.
Acrylic Sheets
Acrylic sheets are the primary component of floating frames. They provide a clear, durable, and lightweight surface for showcasing artwork or photographs.
- Thickness:Choose acrylic sheets with a thickness of 1/8 inch (3 mm) or 1/4 inch (6 mm) for optimal stability and clarity. Thicker sheets offer greater rigidity and resistance to warping.
- Clarity:Opt for optically clear acrylic sheets, ensuring minimal distortion or yellowing.
- Size:Select acrylic sheets that are slightly larger than the artwork or photograph to allow for a border around the piece.
Adhesives
Adhesives play a vital role in securing the artwork or photograph to the acrylic sheet and creating a clean, seamless finish.
- Double-Sided Tape:This option provides a strong, removable bond, making it suitable for delicate artworks or photographs.
- Acrylic Adhesive:Acrylic adhesive offers a permanent bond, ideal for larger and heavier artworks.
- Silicone Adhesive:Silicone adhesive provides a flexible and waterproof bond, suitable for outdoor applications or projects requiring moisture resistance.
Hardware
Hardware components ensure the stability and functionality of the floating frame.
- Standoffs:These spacers are used to create the floating effect by separating the acrylic sheets and creating an air gap between the artwork and the frame. Standoffs are typically made of metal or acrylic and come in various sizes and finishes.
- Mounting Hardware:This includes brackets, clips, or hooks used to secure the frame to the wall or a stand. The type of mounting hardware will depend on the size and weight of the frame and the desired display method.
Tools
The right tools make the crafting process easier and ensure a professional finish.
- Measuring Tape:Essential for accurately measuring the artwork and cutting the acrylic sheets to size.
- Utility Knife:Used for cutting acrylic sheets to the desired dimensions.
- Acrylic Cutting Ruler:Provides a straight edge and guide for precise cuts.
- Sandpaper:Used to smooth out any rough edges created during cutting.
- Level:Ensures the frame is hung straight and even.
Design Considerations
Floating acrylic frames offer a unique opportunity to showcase your artwork or photographs in a modern and minimalist style. The design of your frame plays a crucial role in enhancing the overall aesthetic appeal of your piece.
Frame Thickness, Floating acrylic frame diy
The thickness of the acrylic frame significantly influences the visual impact and depth of your artwork. Thicker frames create a more substantial and dramatic look, emphasizing the floating effect and adding a sense of weight to the piece. Conversely, thinner frames offer a more delicate and minimalist aesthetic, allowing the artwork to take center stage.
Frame Color
The color of the acrylic frame is another important design consideration. Clear acrylic frames provide a clean and unobtrusive display, allowing the artwork to shine through without any distraction. Colored acrylic frames, on the other hand, can add a pop of color and personality to your display, complementing the artwork or creating a striking contrast.
Frame Shape
While rectangular frames are the most common, floating acrylic frames can be customized into various shapes, adding a unique touch to your display. Square frames offer a classic and balanced look, while circular frames provide a modern and eye-catching aesthetic.
Irregular shapes, such as ovals or triangles, can add a touch of whimsy and personality to your artwork.
Popular Floating Frame Designs
- Classic Floating Frame:This design features a simple rectangular frame with a thin acrylic border, creating a subtle floating effect. The frame is often made from clear acrylic, allowing the artwork to be the focal point.
- Gallery Floating Frame:This design features a thicker acrylic frame with a wider border, creating a more dramatic floating effect. The frame can be made from clear or colored acrylic, depending on the desired aesthetic.
- Shadow Box Floating Frame:This design incorporates a deeper frame with a back panel, creating a shadow box effect. This allows for the display of three-dimensional objects, such as pressed flowers, fabric swatches, or small sculptures.
Step-by-Step Guide: Floating Acrylic Frame Diy
Now that you have gathered your materials and designed your frame, let’s dive into the step-by-step process of creating your floating acrylic frame. This guide will walk you through each stage, ensuring a smooth and successful project.
Cutting the Acrylic
Before you begin cutting, make sure you have a clean, flat surface and a suitable cutting mat to protect your workspace. It is crucial to use a sharp utility knife and a straight edge to ensure precise cuts.
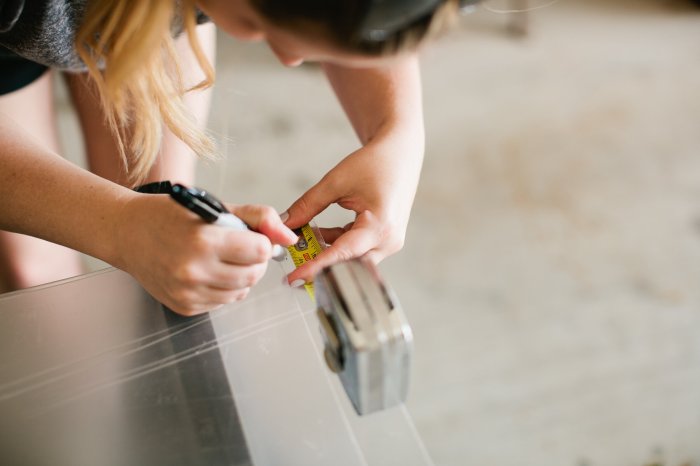
- Measure and Mark:Carefully measure the dimensions of your artwork and add the desired spacing for the floating effect. Mark the acrylic sheet with a permanent marker or pencil, ensuring the lines are straight and clear.
- Secure the Straight Edge:Position the straight edge along the marked line, ensuring it is firmly secured. Use clamps or heavy objects to keep it in place, preventing movement during cutting.
- Score the Acrylic:Use a sharp utility knife and apply firm, even pressure to score the acrylic along the marked line. Multiple passes might be required to cut through the acrylic completely.
- Snap the Acrylic:Once the score line is deep enough, gently snap the acrylic along the score line. If the acrylic doesn’t break easily, use a small piece of wood or a ruler to help apply pressure and encourage the break.
- Clean the Edges:Use fine-grit sandpaper to smooth out any rough edges and imperfections. This will give your frame a polished and professional look.
Assembling the Frame
Once you have cut the acrylic panels, you are ready to assemble your floating frame.
- Clean the Acrylic:Before assembly, thoroughly clean the acrylic panels with a microfiber cloth and a mild cleaning solution. This will remove any dust or fingerprints that could affect the final appearance.
- Position the Artwork:Carefully position your artwork on the back panel, ensuring it is centered and aligned. Use painter’s tape to secure it in place if necessary.
- Attach the Front Panel:Place the front panel over the artwork, leaving the desired spacing between the two panels. Secure the front panel to the back panel using spacers, standoffs, or small pieces of acrylic. These will create the floating effect and provide stability to the frame.
- Secure the Sides:If you are using side panels, attach them to the front and back panels using a strong adhesive or glue. Ensure the side panels are aligned and flush with the front and back panels.
Finishing Touches
With the frame assembled, you can add finishing touches to enhance its appearance.
- Mount the Frame:Use picture hanging hardware to mount the frame securely to the wall. Ensure the hardware is strong enough to support the weight of the frame and artwork.
- Clean the Frame:Once the frame is mounted, use a microfiber cloth and a mild cleaning solution to remove any dust or fingerprints. This will ensure your frame stays pristine.
Customization and Personalization

Floating acrylic frames offer a blank canvas for creativity, allowing you to express your unique style and transform them into personalized masterpieces. By exploring various customization techniques, you can elevate your floating acrylic frames from simple displays to eye-catching works of art.
Floating acrylic frames are a great way to showcase your favorite artwork or photos, and they’re surprisingly easy to make. You can even use them to display three-dimensional objects, like the adorable plush fox doll DIY you’ve been working on.
Once you’ve finished your floating acrylic frame, you can use it to display a variety of different things, adding a unique and modern touch to your home decor.
Engraving
Engraving adds a touch of elegance and sophistication to floating acrylic frames. Using a laser engraver, you can create intricate designs, personalized messages, or even your own signature. The laser cuts through the acrylic surface, leaving a permanent mark that adds depth and visual interest.
This technique is perfect for adding a personal touch to frames for special occasions like weddings, anniversaries, or birthdays.
Painting
Acrylic paint offers a versatile medium for personalizing floating acrylic frames. You can create bold patterns, delicate details, or even recreate your favorite artwork. The smooth acrylic surface provides an excellent base for painting, and the colors remain vibrant and long-lasting.
Decorative Elements
Adding decorative elements to floating acrylic frames can create a unique and eye-catching display. These elements can include:
- Dried Flowers:Pressing delicate flowers and incorporating them into the frame adds a natural and romantic touch.
- Fabric Scraps:Attaching small pieces of fabric, such as lace or velvet, adds texture and visual interest.
- Metallic Foil:Metallic foil sheets can be cut into shapes and applied to the frame for a glamorous effect.
- Beads and Sequins:Attaching beads and sequins adds a touch of sparkle and whimsy.
Displaying Artwork and Objects
Floating acrylic frames provide a modern and minimalist way to showcase your artwork and cherished objects. They create a sleek, almost invisible barrier, allowing the focus to remain on the piece itself.
Matting and Backing
Matting and backing play a crucial role in protecting your artwork and enhancing its visual appeal. Matting creates a visual separation between the artwork and the frame, adding depth and dimension. It also provides a buffer to prevent the artwork from touching the glass or acrylic, reducing the risk of damage.
Backing, usually a sturdy board, provides support for the artwork and helps to keep it flat.
Choosing the Right Frame Size and Configuration
Selecting the appropriate frame size and configuration is essential for showcasing your artwork effectively. Consider the following factors:
- Artwork Size and Aspect Ratio:The frame should be slightly larger than the artwork, allowing for a border or matting. The aspect ratio (the relationship between the width and height) of the frame should match the artwork. For example, a square artwork should be displayed in a square frame, while a rectangular artwork should be displayed in a rectangular frame.
- Display Space:The frame size should be appropriate for the space where it will be displayed. A large artwork may require a larger frame to fill the space effectively, while a smaller artwork may look lost in a large frame.
- Frame Style:Floating acrylic frames come in various styles, from simple and minimalist to more elaborate designs. Choose a style that complements the artwork and your personal taste.
Displaying Artwork
For displaying artwork, the floating acrylic frame acts as a minimalist window, showcasing the piece without any distracting elements.
Floating acrylic frames are such a fun way to showcase your favorite artwork, and they’re surprisingly easy to make. I just finished a batch for some of my watercolor prints, and now I’m craving something sweet. A little break to whip up a halfway homemade buttermilk honey pie sounds perfect before I get back to assembling those frames.
Maybe I’ll even add a little pie photo to the display for a whimsical touch!
- Placement:The artwork should be centered within the frame, with a consistent border around all sides. This creates a balanced and visually pleasing presentation.
- Lighting:Proper lighting is crucial for showcasing artwork. Natural light is ideal, but avoid direct sunlight, which can fade the artwork over time. Artificial lighting should be positioned to avoid glare on the glass or acrylic.
- Matting:Choose a matting color that complements the artwork and creates a harmonious visual effect. White or off-white matting is often used for traditional artwork, while darker matting can be used for more modern pieces.
Displaying Objects
Floating acrylic frames are versatile and can be used to display various objects, such as:
- Three-Dimensional Objects:Sculptures, figurines, and other three-dimensional objects can be displayed effectively in floating acrylic frames. The frame creates a protective barrier while allowing the object to be viewed from all angles.
- Pressed Flowers and Botanical Specimens:Pressed flowers and botanical specimens can be beautifully showcased in floating acrylic frames. The frame’s transparency highlights the delicate details of these natural treasures.
- Fabric Samples and Textiles:Fabric samples and textiles can be displayed in floating acrylic frames, creating a visually appealing and functional display. The frame can also be used to showcase vintage lace or embroidery.
Safety and Maintenance

Floating acrylic frames, while visually appealing, require careful handling and maintenance to preserve their beauty and longevity. This section will provide essential safety guidelines and tips for cleaning and maintaining your acrylic frames.
Working Safely with Acrylic
Acrylic is a durable material, but it can also be brittle. It’s essential to handle it with care to avoid scratches, cracks, or breakage.
- Always wear safety glasses when cutting or handling acrylic sheets. This protects your eyes from flying debris.
- Use a sharp utility knife or a specialized acrylic cutter for precise cuts. Avoid using dull blades that can cause the acrylic to chip or crack.
- When cutting, support the acrylic sheet firmly to prevent it from flexing or warping. This ensures a clean and accurate cut.
- Avoid dropping or bumping the acrylic sheets, as they can shatter easily. Handle them gently and store them in a safe place when not in use.
Cleaning and Maintaining Acrylic Frames
Acrylic frames are relatively easy to clean and maintain, but using the right methods is crucial to prevent damage.
- Avoid using harsh chemicals or abrasive cleaners, as they can scratch or dull the acrylic surface. Soft microfiber cloths are ideal for dusting and removing fingerprints.
- For stubborn stains, use a mild soap solution and a soft cloth. Gently wipe the surface, avoiding excessive pressure.
- Rinse the frame thoroughly with clean water after cleaning to remove any soap residue. Avoid using harsh cleaners on the acrylic, as they can leave streaks or damage the surface.
- Dry the acrylic frame with a soft, lint-free cloth. Avoid leaving any water droplets on the surface, as they can leave watermarks.
Potential Risks and Precautions
While acrylic is a safe material, there are some potential risks to consider:
- Acrylic can be brittle, especially at low temperatures. Avoid exposing your acrylic frames to extreme cold, as this can make them more prone to cracking.
- Direct sunlight can cause acrylic to yellow over time. Protect your frames from prolonged exposure to sunlight by displaying them in a shaded area.
- Acrylic can be scratched by sharp objects. Avoid placing sharp objects near your frames or using abrasive cleaners on the surface.
Project Ideas and Inspiration
Floating acrylic frames offer a versatile and stylish way to showcase your artwork, photographs, and other cherished objects. They provide a modern and minimalist aesthetic, allowing the focus to remain on the displayed item. But beyond traditional artwork, there are numerous creative ways to utilize these frames.
Creative Applications Beyond Traditional Artwork
This section explores diverse applications of floating acrylic frames, showcasing their potential for various projects. The possibilities are endless, encouraging you to think outside the box and personalize your spaces.
- Displaying Dried Flowers and Botanical Specimens:Encase delicate dried flowers or pressed botanicals within a floating acrylic frame to create a captivating and elegant display. The transparent frame allows for a clear view of the natural beauty, while protecting them from dust and damage. Consider arranging different flower types or creating themed collections, such as a summer meadow or a winter garden.
- Creating Wall-Mounted Shelves:Floating acrylic frames can be transformed into functional wall-mounted shelves. Use clear acrylic sheets as shelves, supported by the frame’s structure. These shelves are perfect for displaying small objects, decorative items, or even displaying books or plants.
- Displaying Fabric Samples and Textile Art:Showcasing fabric swatches or textile art is a great way to add texture and visual interest to your space. Floating acrylic frames can be used to create a gallery-style display of different fabrics, patterns, and textures, adding a touch of artistic flair to your walls.
- Creating Shadow Boxes:Turn a floating acrylic frame into a miniature shadow box by adding a backdrop, such as a piece of patterned paper or fabric, to the back of the frame. You can then arrange small objects, trinkets, or souvenirs within the frame, creating a captivating miniature scene.
- Creating a 3D Art Display:Floating acrylic frames can be used to create a 3D art display by adding depth and dimension to your artwork. Use a variety of materials, such as paper, cardboard, or even small objects, to create a layered effect within the frame.
- Creating a Geometric Art Installation:Combine multiple floating acrylic frames of different sizes and shapes to create a dynamic geometric art installation. Arrange the frames in a pattern or design to create a unique and eye-catching focal point in your space.
- Creating a Light Box:Floating acrylic frames can be used to create a light box by adding LED lights to the back of the frame. This can be used to display photographs, artwork, or even create a mood-setting ambiance in your space.