
DIY Fabric Tassel Bags: A Comprehensive Guide to Crafting Your Own Stylish Accessories
Creating your own fabric tassel bag is a rewarding DIY project that allows for immense personalization and can result in a truly unique accessory. These bags, characterized by their bohemian charm and the playful addition of fabric tassels, are versatile enough for various occasions, from casual outings to beach days. This comprehensive guide will walk you through the entire process, from selecting materials to finishing touches, ensuring you can craft a stylish and durable fabric tassel bag that reflects your personal aesthetic. We will delve into different bag styles, tassel construction techniques, and embellishment ideas, making this article a go-to resource for anyone looking to embark on this creative endeavor.
The foundational element of any DIY fabric tassel bag is, of course, the fabric itself. The choice of fabric significantly impacts the overall look, feel, and functionality of your bag. For a casual, everyday tote, consider sturdy yet pliable fabrics like cotton canvas, denim, or a medium-weight linen blend. These materials are durable, easy to work with, and hold their shape well. For a more bohemian or free-spirited vibe, opt for lighter weight fabrics like gauze, rayon, or even some softer knits. These fabrics will create a more fluid drape and a softer silhouette. If you’re aiming for a more structured bag, interfacings can be incorporated to add rigidity. Consider your intended use: a beach bag might benefit from water-resistant or quick-drying fabrics, while an evening clutch could be made from silk, velvet, or a metallic brocade.
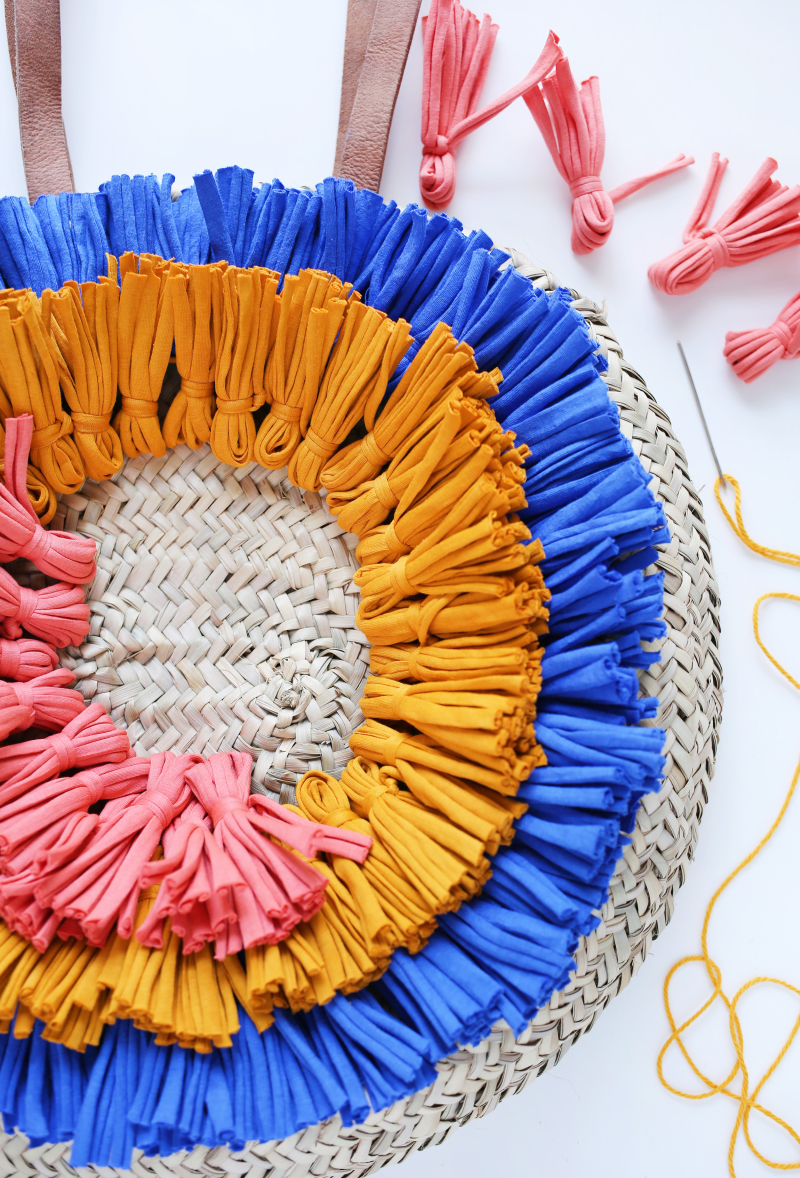
Beyond the main body fabric, you’ll need fabric for the tassels. This is where you can really inject personality and color. Scraps of contrasting fabrics, leftover ribbons, yarn, or even strips of old clothing can be repurposed. Silk, satin, cotton, and velvet all lend different textures and sheens to tassels. Consider the length and thickness of your tassel material. Thicker yarns will create fuller tassels, while thinner strips will result in a more delicate fringe. The color palette is also crucial. You can opt for a monochromatic look with tassels in varying shades of the same color, or go for a vibrant, eclectic mix of hues.
The construction of the bag itself can vary greatly, offering a wide range of design possibilities. A simple tote bag is often the easiest starting point for beginners. This typically involves cutting two identical rectangular pieces for the front and back, and two longer strips for the handles. For a more structured tote, consider adding a separate bottom panel. Another popular option is a drawstring bag, which is incredibly practical and easy to create. This usually involves a single rectangular piece of fabric folded in half and sewn up the sides, with a casing created at the top for the drawstring. A crossbody bag or a clutch presents more intricate design challenges but allows for greater customization in terms of shape and closure.
When cutting your fabric pieces, precision is key. Use a good quality fabric ruler and a rotary cutter or sharp fabric scissors for clean, straight lines. Always double-check your measurements before cutting, especially if working with a pattern. For most bag projects, you’ll want to add a seam allowance of approximately 1/2 inch (1.25 cm) to all edges that will be sewn. This ensures that your seams are strong and that the finished bag has the intended dimensions. If you’re new to sewing, it’s a good idea to practice on scrap fabric first to get a feel for your sewing machine and the different stitches.
The sewing process will depend on the chosen bag style. For a basic tote, you’ll sew the side seams and bottom seam of your fabric panels. The handles can be attached either before or after the main bag construction, depending on your preferred method. For a drawstring bag, after sewing the side and bottom seams, you’ll create a channel at the top by folding the fabric down twice and stitching to form a tube. A safety pin can be threaded through this channel to insert your drawstring. For more complex bags, follow specific pattern instructions, paying attention to details like zipper insertions or flap constructions.
Now, let’s talk about the star of the show: the fabric tassels. There are several ways to construct them, each yielding a slightly different aesthetic. The most common method involves cutting your chosen fabric into uniform strips. The width and length of these strips will determine the fullness and drape of your tassels. For a traditional tassel, aim for strips that are at least 6 inches (15 cm) long and about 1/2 inch (1.25 cm) wide. You can create a bunch of these strips and then secure them together at one end. This can be done by wrapping a separate strip of fabric tightly around the top of the bunch and sewing it in place, or by using a strong thread or embroidery floss to stitch around the top. Another method involves folding longer strips of fabric in half and then cutting fringe along the folded edge. This creates a more cohesive tassel that is attached at the fold.
For a yarn tassel, simply wrap yarn around your fingers or a piece of cardboard many times to create a thick bundle. Cut the loops at one end and tie the bundle securely at the other end with a piece of yarn. For a more sophisticated look, consider using ribbons or strips of delicate fabrics like silk or chiffon. These can be braided or twisted together before forming the tassel for added texture and visual interest. The key to beautiful tassels is uniformity in the fringe. Aim for consistent lengths and widths of your fabric strips.
Attaching the tassels to your bag is where the creative design truly comes to life. You can attach them singularly, in clusters, or all along the bottom hem of your bag. For a bohemian fringe effect, sew a row of tassels along the bottom edge of the bag, with the fringe hanging down. You can also group several tassels together to create a focal point, perhaps on a pocket or as a decorative element on the front of the bag. Consider attaching them to the ends of the handles for a playful touch. The method of attachment will depend on the type of tassel and the desired effect. For fabric strip tassels, you can sew them directly onto the bag by sandwiching the top securing point between two pieces of fabric during construction, or by hand-stitching them onto the finished bag. For yarn or ribbon tassels, you can create a loop at the top and stitch this loop securely to the bag.
Embellishments can elevate your DIY fabric tassel bag from simple to stunning. Beyond the tassels themselves, consider adding other decorative elements. Embroidery is a fantastic way to add intricate designs or your initials. Beads can be sewn onto the fabric or incorporated into the tassels for a touch of sparkle. Appliqué, using contrasting fabric shapes, can create bold patterns. Leather or faux leather details, such as straps or decorative patches, can add a more rugged or sophisticated feel. Fringe, in addition to tassels, can be added along the edges of the bag for an extra layer of texture. pom-poms, buttons, or even painted designs can also be incorporated to further personalize your creation.
When choosing embellishments, consider the overall style you’re aiming for. For a beach bag, shells, or brightly colored beads would be fitting. For a more elegant clutch, subtle beading or metallic accents might be more appropriate. The key is to ensure that your embellishments complement, rather than compete with, the fabric tassels.
The finishing touches are crucial for a professional-looking DIY bag. This includes ensuring all seams are neat and secure. Consider ironing your fabric pieces before and after sewing to achieve crisp lines. For the handles, you might want to fold and topstitch them for added durability and a cleaner appearance. If your bag has a lining, ensure it is neatly inserted and secured. For drawstring bags, make sure the channel for the drawstring is strong and well-constructed to prevent tearing.
If you’re using a sewing machine, practice different stitch types on scrap fabric to find what works best for your chosen materials. A straight stitch is standard for most seams, but a zigzag stitch can be useful for finishing raw edges to prevent fraying. When attaching tassels, use a strong thread and reinforce the stitching to ensure they don’t detach with regular use.
For SEO optimization, consider incorporating relevant keywords naturally throughout the article. Terms like "DIY fabric bag," "tassel bag tutorial," "how to make a tassel bag," "handmade accessory," "crafting ideas," "sewing projects," "bohemian bag," "tote bag DIY," and "drawstring bag tutorial" will help search engines understand the content. Use descriptive headings and subheadings to break up the text and improve readability for both users and search engines. For example, headings like "Choosing Your Fabric," "Tassel Construction Techniques," and "Attaching and Embellishing Your Bag" are clear and keyword-rich.
The process of creating a fabric tassel bag offers a fantastic opportunity for upcycling. Instead of buying new fabric, raid your closets for old clothes, scarves, or even linens that are no longer in use. Denim jeans can be transformed into durable bag bodies, while silk scarves can provide elegant fabric for tassels or embellishments. This not only makes your project more sustainable but also adds a unique backstory to your handmade accessory. Even small scraps of fabric can be used to create small, decorative tassels.
When planning your project, it’s helpful to sketch out your design first. This allows you to visualize the placement of tassels, handles, and any other decorative elements. Consider the proportions of your bag and the scale of your tassels. Too many large tassels on a small bag can look overwhelming, while a few tiny tassels on a large bag might get lost.
The type of closure you choose for your bag also influences its overall design and functionality. For a tote bag, open-top is common. For a drawstring bag, the drawstring itself serves as the closure. Other options include zippers, magnetic snaps, button and loop closures, or even simple flap closures secured with a buckle or tie. Each closure requires specific construction techniques, so research the best method for your chosen style.
The durability of your DIY fabric tassel bag will largely depend on the quality of your materials and the strength of your construction. Using good quality thread, reinforcing stress points like handle attachments, and employing strong stitching techniques are all crucial for longevity. Consider the weight your bag is likely to hold and adjust your construction methods accordingly. For heavier items, opting for sturdier fabrics and reinforced seams is essential.
Ultimately, the joy of a DIY fabric tassel bag lies in its individuality. Don’t be afraid to experiment with different fabric combinations, tassel styles, and embellishment techniques. The more you personalize your creation, the more you’ll cherish it. This guide provides a framework, but your own creativity is the most important ingredient in crafting a truly unique and stylish fabric tassel bag. The process can be as simple or as complex as you desire, making it an accessible project for crafters of all skill levels. Remember to enjoy the creative journey and the satisfaction of owning a handmade piece that is distinctly yours.
