Foodie face plates DIY project – imagine transforming ordinary plates into captivating works of art that elevate your food presentation. This project is a delightful fusion of creativity and culinary passion, allowing you to personalize your dining experience with unique, handmade face plates.
From playful designs to elegant motifs, the possibilities are endless, making every meal a feast for the eyes and the palate.
This project offers a fantastic opportunity to unleash your inner artist and express your culinary creativity. Whether you’re a seasoned chef or a casual home cook, crafting your own foodie face plates is a rewarding endeavor that adds a personal touch to your dining experience.
Let’s embark on this exciting journey together and discover the magic of creating beautiful and functional face plates that will enhance your culinary creations.
Foodie Face Plates
Foodie face plates are a fun and creative way to elevate your food presentation. These plates feature playful designs of faces, often with expressions that complement the dishes served on them. They are becoming increasingly popular as a way to add a touch of personality and whimsy to mealtimes.The appeal of foodie face plates lies in their ability to transform ordinary meals into engaging experiences.
They spark conversation, create laughter, and make dining more enjoyable for both adults and children.
Examples of Foodie Face Plate Designs
There is a wide range of foodie face plate designs available, catering to various tastes and themes. Here are a few examples:
- Animal Faces: Plates featuring animal faces, like cats, dogs, pandas, or owls, are popular choices for children’s meals. These plates can be whimsical and engaging, making mealtime more enjoyable for little ones.
- Cartoon Characters: Plates with beloved cartoon characters like Mickey Mouse, Hello Kitty, or SpongeBob SquarePants can add a touch of nostalgia and fun to meals. These plates are especially popular for birthday parties and themed events.
- Funny Faces: Plates with funny expressions, such as winking eyes, sticking out tongues, or surprised faces, can add a touch of humor to mealtimes. These plates are great for creating a lighthearted atmosphere.
- Seasonal Faces: Plates with designs reflecting different seasons, like pumpkins for fall or snowflakes for winter, can add a touch of seasonal charm to meals.
DIY Face Plate Materials and Tools: Foodie Face Plates Diy Project

Creating your own face plates is a fun and creative way to personalize your dining experience. Whether you’re a seasoned crafter or a beginner, the right materials and tools are essential for achieving your desired look.
Materials for DIY Face Plates
Choosing the right materials for your DIY face plates is crucial, as it influences both the aesthetic and the functionality of your creation.
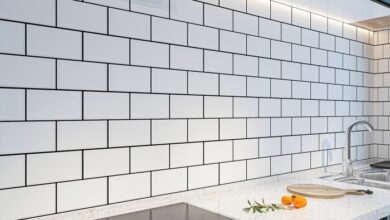
- Ceramic Tiles:Ceramic tiles are a popular choice for face plates due to their durability, heat resistance, and variety of colors and patterns. They are easy to clean and maintain, making them a practical option for everyday use. However, they can be brittle and may require careful handling during the crafting process.
- Wooden Boards:Wooden boards offer a natural and rustic appeal. They can be stained, painted, or left in their natural state to create a unique look. However, wood can be susceptible to moisture and scratches, requiring proper sealing and care.
- Metal Sheets:Metal sheets, such as aluminum or tin, are durable and can be easily cut and shaped. They offer a modern and industrial aesthetic and can be painted or left in their natural state. However, metal can be prone to rust if not properly protected.
- Acrylic Sheets:Acrylic sheets are lightweight, durable, and available in a wide range of colors. They are easy to cut and shape, making them a versatile option for creating intricate designs. However, acrylic can be prone to scratches and may require careful handling.
- Polymer Clay:Polymer clay is a versatile material that can be molded and shaped into various designs. It is available in a wide range of colors and can be baked to create a durable finish. However, polymer clay can be time-consuming to work with and requires careful baking to avoid warping or cracking.
Tools for DIY Face Plates
Having the right tools on hand is essential for creating professional-looking face plates.
- Measuring Tools:A ruler, tape measure, and protractor are essential for accurate measurements and ensuring that your face plate is the right size.
- Cutting Tools:Depending on the material you choose, you may need a variety of cutting tools, such as a saw, utility knife, or scissors.
- Sanding Tools:Sandpaper or a sanding block is essential for smoothing out rough edges and creating a polished finish.
- Drilling Tools:A drill and drill bits are needed for creating holes for mounting hardware or adding decorative elements.
- Adhesive:A strong adhesive, such as epoxy or construction adhesive, is needed for attaching the face plate to the wall.
- Finishing Tools:Depending on the material and desired look, you may need paint, stain, varnish, or other finishing materials.
Designing Your Foodie Face Plate

Now that you have your materials and tools ready, it’s time to unleash your creativity and design your own unique foodie face plate. The design process is a fun and personal journey, allowing you to express your love for food and create a piece that reflects your individual style.
I’ve been having so much fun creating personalized foodie face plates for my kitchen! I’m all about adding a touch of whimsy and personality to my home, and these plates are a great way to do just that. Speaking of personality, I recently revamped my dining room with a IKEA restyle modern Hollywood Regency credenza that perfectly complements my new plates.
It’s amazing how a few DIY projects can completely transform a space! I’m already brainstorming my next foodie face plate designs, and I can’t wait to share them with you all.
Considerations for Foodie Face Plate Design
Designing a foodie face plate involves several considerations to ensure both visual appeal and functionality. These considerations are essential for creating a design that not only looks great but also serves its purpose.
- Plate Shape and Size:The shape and size of the plate will influence the overall design and the amount of food it can hold. Consider the types of food you plan to serve and choose a shape and size that complements them. A square plate, for instance, might be suitable for serving sushi rolls or a charcuterie board, while a round plate might be ideal for a single serving of pasta or a dessert.
- Theme and Motifs:Choosing a theme and incorporating relevant motifs will add personality and cohesiveness to your design. Consider your favorite foods, cuisines, or culinary experiences. For example, a pizza-themed face plate could feature a pizza slice with pepperoni and cheese, while a dessert-themed face plate could feature a chocolate chip cookie with a melting scoop of ice cream.
I’ve been having so much fun creating personalized foodie face plates for my kitchen! It’s amazing how a little paint and some creativity can transform ordinary plates into fun conversation starters. And since I was already on a creative roll, I decided to tackle a bigger project: recoloring my kitchen appliances ! Now my entire kitchen has a cohesive, personalized look.
I can’t wait to show off my new plates and appliances at my next dinner party!
- Color Palette:The color palette you choose will play a crucial role in the overall aesthetic of your face plate. Consider using colors that complement your theme and motifs, creating a visually harmonious design. A plate with a vibrant color palette can be eye-catching and energetic, while a plate with a muted color palette can be more sophisticated and elegant.
- Functionality:While aesthetics are important, don’t forget about functionality. Ensure that the design allows for easy eating and doesn’t hinder the enjoyment of the food. Avoid overly intricate designs that might make it difficult to clean or make the plate feel crowded.
Tips for Creating Visually Appealing and Functional Designs
Creating a visually appealing and functional foodie face plate requires careful planning and execution. Here are some tips to help you achieve a design that is both aesthetically pleasing and practical.
- Start with a Sketch:Begin by sketching your ideas on paper. This allows you to experiment with different layouts, shapes, and motifs before committing to a final design. It’s a great way to visualize your ideas and make adjustments as needed.
- Use a Grid:Dividing your plate into a grid can help you create a balanced and organized design. It ensures that the elements are evenly spaced and proportioned, resulting in a visually appealing and harmonious composition.
- Embrace Negative Space:Negative space, the empty areas around the main elements of your design, is just as important as the elements themselves. It helps to create visual balance and prevents the design from feeling cluttered.
- Use a Variety of Textures:Incorporating different textures can add depth and visual interest to your design. You can achieve this by using various materials, such as clay, paint, or even food scraps, to create a unique tactile experience.
- Experiment with Color:Don’t be afraid to experiment with different colors and color combinations. Consider using contrasting colors to create a bold and eye-catching design or using complementary colors to create a more subtle and harmonious look.
Examples of Different Design Themes and Motifs
There are endless possibilities when it comes to designing foodie face plates. Here are some examples of different design themes and motifs to inspire your own creations.
I’ve been loving the idea of making foodie face plates for my kitchen, especially since I’ve been getting so much inspiration from Laura’s new home mood board here. Her eclectic mix of colors and textures really got me thinking about how I could personalize my own space.
I think a set of funky face plates would be a fun and unique way to add some personality to my kitchen, and maybe even inspire some culinary creativity!
- Breakfast Theme:A plate featuring a sunny-side-up egg with a slice of bacon, a cup of coffee, and a fluffy pancake would be a fun and whimsical breakfast-themed design.
- Sushi Theme:A plate depicting a colorful assortment of sushi rolls, like a California roll, a salmon roll, and a spicy tuna roll, would be a visually appealing and appetizing sushi-themed design.
- Pizza Theme:A plate showcasing a slice of pizza with pepperoni, cheese, and green peppers would be a classic and delicious pizza-themed design.
- Dessert Theme:A plate featuring a chocolate chip cookie with a melting scoop of ice cream, a slice of cake, and a strawberry would be a sweet and tempting dessert-themed design.
Step-by-Step DIY s
Let’s get our hands dirty and bring those foodie face plates to life! This step-by-step guide will walk you through the process, from prepping your materials to adding the finishing touches.
Preparing Your Plate
Before you start decorating, make sure your plate is clean and ready to go.
- Wash and Dry:Give your plate a good scrub with soap and water, ensuring it’s free of any grease or residue. Let it dry completely before moving on to the next step.
- Prime (Optional):Priming your plate helps the paint adhere better, especially if you’re using a smooth, non-porous surface. Use a primer specifically designed for ceramics or glass. Apply a thin, even coat and let it dry completely before proceeding.
Drawing Your Design
Now it’s time to bring your foodie vision to life!
- Sketch It Out:If you’re not confident in your freehand drawing skills, start by sketching your design on paper. This will help you visualize the arrangement and make any necessary adjustments before transferring it to the plate.
- Transfer Your Design:Use a pencil to lightly trace your design onto the plate. You can use a lightbox or a window to help with this process. Alternatively, you can use a transfer paper, which is a great option for more intricate designs.
- Use Templates:If you’re looking for a simpler approach, consider using stencils or cookie cutters. These can be used to create shapes like fruits, vegetables, or even your favorite meal.
Painting Your Plate
With your design in place, it’s time to add some color!
- Choose Your Paints:Opt for acrylic paints designed for ceramics or glass. These paints are durable and dishwasher-safe. A variety of colors will allow you to capture the vibrant hues of your chosen foods.
- Apply Paint:Start with thin, even coats of paint, letting each layer dry completely before applying the next. If you’re using multiple colors, wait for the previous layer to dry completely to avoid smudging.
- Details and Texture:Use fine-tipped brushes to add details and textures to your design. For example, you can use a stippling technique to create the texture of a juicy burger or a swirling effect for a creamy milkshake.
Adding Finishing Touches
Now it’s time to elevate your foodie face plate with some extra flair!
- Glaze (Optional):Applying a glaze adds a protective layer and can enhance the vibrancy of your colors. Use a clear glaze specifically formulated for ceramics or glass. Follow the manufacturer’s instructions for application and curing.
- Sealant:Even without a glaze, a sealant can help protect your paint from scratches and fading. Look for a sealant that is dishwasher-safe and suitable for ceramics or glass.
Troubleshooting
- Paint Smudging:If your paint smudges, allow the previous layer to dry completely before applying the next. You can also use a hairdryer on a low setting to speed up the drying process.
- Uneven Paint Application:Use thin, even coats of paint and let each layer dry completely before applying the next. This will help prevent streaks and unevenness.
- Cracking Paint:If your paint cracks, it may be due to insufficient drying time between coats. Make sure each layer is completely dry before applying the next. You can also try using a primer to improve adhesion.
Decorating and Personalizing Your Face Plate

Now that you’ve created your face plate, it’s time to make it truly your own! This is where your creativity comes in, and you can transform your plain plate into a work of art. There are endless possibilities for decorating and personalizing your foodie face plate.
Decorating Techniques
Decorating your face plate is all about expressing your unique style. There are several techniques you can use, each with its own advantages.
- Acrylic Paints:These are versatile and easy to use, allowing you to create intricate designs, bold patterns, or even a simple background color. Acrylic paints dry quickly and are available in a wide range of colors.
- Markers:For detailed work or fine lines, markers are a great option. They are also available in a variety of colors and finishes, including metallic and neon.
- Stencils:Stencils offer a simple way to create precise designs and patterns. They are especially helpful if you’re not confident in your freehand drawing skills. You can find stencils for a variety of themes, from food-related designs to abstract patterns.
- Decoupage:This technique involves applying adhesive paper or fabric to your face plate. You can use patterned napkins, magazine clippings, or even fabric scraps for a unique and textured look.
- Mod Podge:Mod Podge is a versatile adhesive that can be used for decoupage, sealing your designs, and even creating a glossy finish. It comes in both matte and gloss finishes, allowing you to choose the look that best suits your project.
Adding Personalized Touches, Foodie face plates diy project
Personalizing your face plate is all about making it unique to you. There are several ways to add your own special touch.
- Include Your Favorite Food:Perhaps you’re known for your amazing pizza or your signature chocolate chip cookies. Why not incorporate your favorite food into the design? You could paint a pizza slice, a cookie, or even a stylized version of your favorite dish.
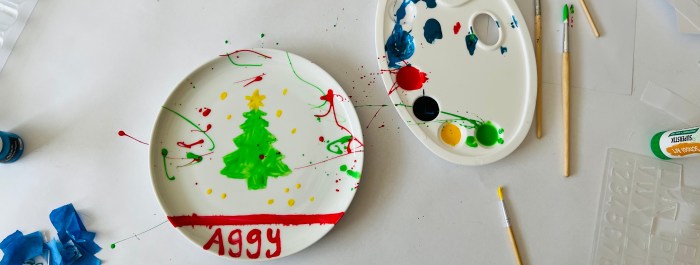
- Add Your Name or Initials:A simple but effective way to personalize your face plate is to add your name or initials. You can paint them on directly, use a stencil, or even create a monogram.
- Incorporate Your Hobbies:If you love gardening, include a flower or a butterfly. If you’re a music lover, add a musical note or a guitar. The possibilities are endless!
- Use Your Favorite Colors:Your favorite color palette can really make your face plate pop. Choose colors that reflect your personality and style.
Decorative Elements
In addition to paint and markers, you can use a variety of decorative elements to enhance your face plate.
- Glitter:Add a touch of sparkle to your face plate with glitter. You can use glue to adhere glitter to your design, or you can even mix glitter with your paint.
- Beads:Beads can add a unique texture and visual interest to your face plate. Use glue to attach beads to your design or create a border around the edge of your plate.
- Ribbons:Tie a ribbon around your face plate for a whimsical touch. You can use a ribbon to match your color scheme or to create a contrast.
- Buttons:Buttons can add a pop of color and texture to your face plate. You can glue buttons onto your design or create a cluster of buttons on the edge of your plate.