Mastering Soft Waves with Only a Hair Dryer: A Comprehensive Guide
Achieving effortless, touchable soft waves without resorting to curling irons or hot rollers is an attainable goal, and the humble hairdryer is your most powerful tool. This guide will demystify the process, breaking down techniques, product recommendations, and essential tips to transform your hair into a cascade of gentle waves using just your hairdryer. Understanding the mechanics behind heat styling and manipulating airflow is paramount. The goal is not to create tight curls but rather a looser, more undone texture that mimics natural movement. This involves strategic drying, sectioning, and employing specific nozzle attachments. The key is to encourage the hair’s natural bend and hold it in place as it cools, allowing the heat and air to set the desired shape. Mastering this technique requires patience and practice, but once you understand the principles, you’ll find it’s a versatile and time-efficient way to achieve a desirable hairstyle.
Understanding Your Hair Dryer’s Capabilities
Not all hairdryers are created equal, and understanding your tool’s features will significantly impact your ability to create soft waves. Look for a dryer with adjustable heat and speed settings. Lower heat and medium speed are generally preferred for wave creation to minimize heat damage and allow for more control over the styling process. High heat can be too intense, leading to frizz and potential damage, while very high speed can blow the hair around too much, preventing proper shaping. The presence of a cool shot button is also crucial. This feature allows you to lock in the wave shape by blasting the hair with cool air after it’s been heated, setting the style and adding shine. Many hairdryers also come with different nozzle attachments. For wave creation, a concentrator nozzle is invaluable. This directs airflow precisely, allowing you to manipulate sections of hair with greater control and intensity, encouraging the desired bend and shape. Without a concentrator, the air dispersion is too broad, making it difficult to focus heat and airflow on specific strands to sculpt waves. Therefore, familiarize yourself with your dryer’s settings and attachments before you begin.
The Foundation: Proper Hair Preparation
The success of any heat styling technique hinges on proper hair preparation. Before you even pick up your hairdryer, ensure your hair is clean and free of heavy product buildup, which can weigh hair down and prevent waves from forming. Towel-dry your hair gently, squeezing out excess water rather than rubbing vigorously, which can cause frizz. The aim is for your hair to be damp, not dripping wet. Overly wet hair will take too long to dry, increasing heat exposure and the risk of frizz. Applying a heat protectant spray is non-negotiable. This creates a barrier between your hair and the heat, minimizing damage and preventing dryness and breakage. Look for formulas that also offer moisturizing or smoothing properties, as these can further enhance the final wave result. For added hold and wave definition, consider a volumizing mousse or a styling spray applied evenly throughout your damp hair. These products provide a slight grip, helping the waves to form and last longer. Ensure these products are distributed evenly from roots to ends for consistent results across all sections of your hair. The amount of product needed will vary depending on your hair type and thickness, so experiment to find what works best for you.
Sectioning for Precision and Control
Effective sectioning is the backbone of creating uniform and well-defined soft waves with a hairdryer. This ensures that every strand receives the appropriate attention and heat. Begin by dividing your hair into at least four main sections: two in the front (from the ear forward) and two in the back. You can further subdivide these sections into smaller ones, especially if you have thick or long hair, for more manageable styling. Use clips to secure each section, keeping them separate and organized. The size of your sections will determine the tightness of your waves. Smaller sections will result in more defined, tighter waves, while larger sections will create looser, more relaxed waves. For soft waves, aim for sections that are roughly one to two inches wide. This allows for ample manipulation with the hairdryer and brush. Pay close attention to the nape of your neck and the area around your ears, as these can be trickier to reach. Properly isolating these areas ensures that you can work through them thoroughly, creating a cohesive wave pattern throughout your entire head. Good lighting is helpful when sectioning to ensure no strands are missed.
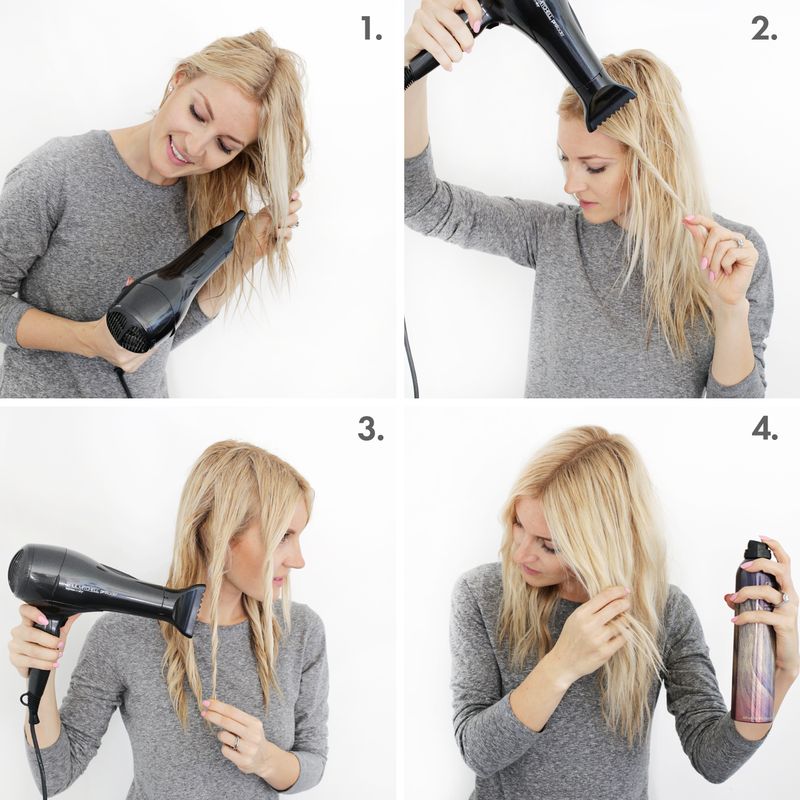
The Blow-Drying Technique for Waves: Embracing the Twist
This is where the magic happens. The primary technique for creating soft waves with a hairdryer involves a combination of twisting and directing airflow. Take a section of hair and begin twisting it from the mid-lengths downwards. As you twist, use your hairdryer with the concentrator nozzle attached, directing the hot air along the length of the twisted section. Hold the hairdryer a few inches away from your hair to avoid overheating. Move the hairdryer down the length of the twist, following the direction of the twist itself. The heat from the dryer will help to set the twist. Once you’ve heated the entire twisted section, immediately use the cool shot button on your hairdryer to blast the hair with cool air. This sets the wave and helps it to hold its shape. As the hair cools, you can gently release the twist to reveal a soft wave. Repeat this process for all sections of your hair, alternating the direction of the twists (some clockwise, some counter-clockwise) for a more natural and voluminous look. This alternating twist creates a more organic, less uniform appearance, which is characteristic of effortless waves. Experiment with the tightness of your twists; a looser twist will yield a softer wave, while a tighter twist will create a more pronounced bend.
The Brush and Blow-Dry Method: A Smoother Approach
For a softer, more diffused wave, the brush and blow-dry method offers an excellent alternative. This technique relies on using a round brush to shape the hair as you dry it. Again, begin with damp, prepped hair and work in sections. Take a section of hair and wrap it around a round brush, ensuring the hair is smooth against the barrel. Begin directing the hairdryer’s airflow from the roots downwards, following the brush. As you dry, roll the brush down the hair shaft, encouraging a bend or wave with the movement of the brush and the directed airflow. Once the section is dry, gently release it from the brush. For added hold, you can use the cool shot button on your hairdryer to blast the section as you hold it in its curved shape. The size of your round brush will influence the size of your waves; larger brushes create larger, looser waves, while smaller brushes create tighter waves. This method is particularly effective for achieving a more polished and "done" wave, as opposed to the more undone look of the twisting method. It also offers more control over the smoothness of the hair, reducing the likelihood of frizz. Ensure the hair is fully dry around the brush to set the wave.
Leveraging the Power of Your Fingers and Hands
Your hands are surprisingly effective tools for sculpting soft waves with a hairdryer, especially for adding a final touch and enhancing texture. After you’ve used either the twisting or brush method, your hair will likely have a wave-like shape, but it might appear a bit too "set." To achieve a softer, more natural look, gently rake your fingers through your waves. This breaks them up, creating a more undone and touchable texture. You can also use your hands to scrunch your hair upwards from the ends, further enhancing the wave pattern and adding volume. For a more lived-in look, you can gently twist individual strands of hair around your fingers, then blast them with cool air from the hairdryer to set them. This is a great way to add subtle bends and movement to areas that might appear too straight. Avoid over-brushing your waves once they are formed, as this can lead to frizz and a loss of definition. The goal is to embrace a slightly imperfect, tousled finish.
Essential Tools and Product Recommendations
To effectively create soft waves with just a hairdryer, consider investing in a few key tools and products. A good quality hairdryer with adjustable heat and speed settings, and a cool shot button, is essential. A concentrator nozzle attachment is also crucial for directing airflow. For the brush and blow-dry method, a medium-sized ceramic round brush is ideal. Ceramic brushes distribute heat evenly, reducing drying time and minimizing frizz. Heat protectant spray is non-negotiable for preventing damage. Styling mousse or a volumizing spray can provide hold and texture. A texturizing spray or dry shampoo can be used as a finishing product to add grit and enhance the lived-in look. Sea salt sprays are also excellent for mimicking beachy waves. For smoother waves, a smoothing serum or anti-frizz cream applied to damp hair before styling can be beneficial. Experiment with different product formulations to find what best suits your hair type and desired wave finish. The right combination of tools and products will significantly enhance your ability to achieve salon-quality waves at home.
Troubleshooting Common Wave-Creation Challenges
Even with the best intentions, you might encounter a few snags. If your waves are falling flat, ensure you’re using enough styling product for hold, and don’t be afraid to let the hair cool completely after applying the cool shot. Over-drying can also lead to a loss of wave. If frizz is your nemesis, double-check your heat protectant application and ensure your hairdryer’s concentrator nozzle is properly directing airflow downwards. Avoid rough towel-drying. If your waves are too tight, try larger sections or looser twists in the first place. Conversely, if they are too loose, try smaller sections or tighter twists. Patience is key; mastering this technique takes practice. Don’t be discouraged if your first attempt isn’t perfect. Pay attention to how your hair reacts to different heat levels and product combinations. Understanding your hair’s unique characteristics is paramount to consistently achieving your desired wave.
Maintaining Your Soft Waves
Once you’ve perfected your soft waves, extending their lifespan is the next step. Avoid touching your hair excessively throughout the day, as this can disrupt the wave pattern and cause frizz. If your waves start to fall by the second day, try refreshing them with a texturizing spray or dry shampoo at the roots to add volume and grit. A light mist of hairspray can help to set the waves, but opt for flexible hold formulas to avoid stiffness. Sleeping on a silk or satin pillowcase can also help to preserve your waves and reduce frizz overnight. Braiding your hair loosely before bed can help to maintain some of the wave structure. For a quick refresh, you can lightly mist your hair with water and gently scrunch it to reactivate the waves. The key is to be gentle and avoid over-manipulating.
The Versatility of Hairdryer-Created Waves
The beauty of creating soft waves with just a hairdryer lies in their versatility. These waves can be dressed up or down, transitioning seamlessly from a casual daytime look to an elegant evening style. They provide a softer alternative to rigid curls, offering a more relaxed and romantic aesthetic. You can further enhance the look by gently pulling apart the waves for a more undone finish or by smoothing over the top layers for a sleeker appearance. This technique allows for a high degree of customization, enabling you to achieve a spectrum of wave intensities and textures. Experiment with different section sizes, twisting techniques, and product combinations to discover your signature soft wave style. This method empowers you to achieve a polished yet effortless look without relying on multiple styling tools, making it an efficient and accessible option for everyday styling. The adaptability of this technique means you can achieve a different wave style for every occasion, simply by adjusting your approach.
