
The Ultimate Friendsgiving Turkey Brine Recipe for Unforgettable Flavor
Achieving a moist, tender, and deeply flavorful turkey for your Friendsgiving celebration is paramount. While many factors contribute to a successful bird, a well-executed brine is arguably the most impactful step. This comprehensive guide details an exceptional turkey brine recipe, focusing on the science behind brining, optimal ingredient ratios, preparation techniques, and troubleshooting tips to ensure your Friendsgiving centerpiece is a resounding success. We will delve into the fundamental principles of how brining transforms lean turkey meat, making it more receptive to moisture and seasonings, resulting in a succulent outcome that will impress your guests.
Understanding the Science of Brining: Why It Works
Brining is a process that leverages osmosis and diffusion to infuse turkey meat with moisture and flavor. When turkey is submerged in a salt solution, two primary mechanisms are at play. Firstly, osmosis drives water from the brine into the meat. The salt concentration within the brine creates an osmotic pressure gradient, forcing water molecules across the semi-permeable cell membranes of the turkey’s muscle tissue. This influx of water plumps up the cells, significantly increasing the overall moisture content of the meat. Secondly, diffusion allows salt ions to penetrate the muscle fibers. As salt dissolves, it breaks down some of the protein structures within the meat, a process called denaturation. This breakdown makes the proteins more soluble and better able to bind with water. Essentially, the salt rearranges the protein matrix, allowing it to retain more moisture during the cooking process. Without brining, the lean breast meat of a turkey is prone to drying out, as its natural water content is relatively low and it cooks faster than the darker leg and thigh meat. Brining combats this by pre-hydrating the meat and creating a more forgiving structure that can withstand the heat of the oven without becoming tough or desiccated. The added salt also contributes to flavor, seasoning the meat from within, which is far more effective than relying solely on external seasoning rubs or basting.
The Brine-to-Turkey Ratio: A Crucial Calculation
The success of any brine hinges on the correct ratio of brine solution to turkey weight. A general guideline is to use approximately one gallon of brine for every four to five pounds of turkey. For a standard 12-15 pound turkey, this translates to roughly three to four gallons of brine. This generous volume ensures the turkey is fully submerged, allowing for even brining. Insufficient brine will lead to uneven saturation, with parts of the turkey being over-brined and others under-brined. The liquid medium in the brine is essential for the osmotic and diffusion processes. Water acts as the carrier for salt and other flavorings, facilitating their penetration into the meat. When calculating your brine volume, it’s always better to err on the side of slightly more liquid than you think you’ll need. This accounts for potential evaporation during the heating of the brine and ensures complete submersion throughout the brining period. A large, food-grade container, such as a brining bag or a sturdy cooler, is indispensable for holding the turkey and the ample volume of brine.
The Essential Components of an Optimal Turkey Brine
A foundational turkey brine consists of three key components: water, salt, and sugar. Beyond these essentials, aromatics and herbs elevate the flavor profile to new heights.
- Water: This is the base of your brine, the solvent that carries all the other ingredients into the turkey. Filtered water is often preferred to avoid any potential off-flavors from tap water impurities, though standard tap water is usually acceptable. The volume of water is directly tied to the turkey’s weight as discussed previously.
- Salt: This is the workhorse of the brine. Kosher salt is highly recommended due to its larger, irregular crystals, which dissolve more slowly and are less prone to over-salting compared to table salt. For every gallon of water, a common starting point is 1 cup of kosher salt. This provides a sufficient salt concentration to initiate the brining process without rendering the turkey unpalatably salty. It’s crucial to use non-iodized salt, as iodine can impart a metallic or bitter taste to the meat.
- Sugar: Sugar plays a dual role in brining. It contributes a subtle sweetness that balances the saltiness, enhancing the overall flavor complexity of the turkey. More importantly, sugar aids in browning during the roasting process, contributing to a beautifully golden-brown skin. For every gallon of water, approximately 1/2 cup of sugar is a good starting point. Granulated sugar is standard, but brown sugar can add a deeper caramel note.
- Aromatics and Herbs: This is where you infuse your Friendsgiving turkey with personality. Common and highly effective aromatics include:
- Garlic: Whole cloves, smashed, add a pungent depth.
- Onions: Halved or quartered yellow or red onions contribute sweetness and savory notes.
- Peppercorns: Black peppercorns, lightly crushed, provide a mild warmth and spice.
- Bay Leaves: Dried bay leaves impart a subtle, almost medicinal aroma that complements poultry exceptionally well.
- Herbs: Fresh sprigs of rosemary, thyme, and sage are classic pairings for turkey, their herbaceous notes permeating the meat. You can also consider adding a few star anise or a cinnamon stick for a hint of autumnal spice, especially fitting for a Friendsgiving theme.
Crafting the Perfect Friendsgiving Turkey Brine: Step-by-Step
The preparation of the brine itself is straightforward, but attention to detail ensures optimal results.
-
Combine and Heat: In a large pot, combine your water, salt, and sugar. Add your chosen aromatics and herbs at this stage. Bring the mixture to a boil over medium-high heat, stirring to ensure the salt and sugar are fully dissolved. This initial heating step is crucial for several reasons. It helps to dissolve the salt and sugar completely, ensuring a uniform brine. It also helps to release the volatile oils and flavors from the aromatics and herbs, infusing them into the liquid. Boiling also sterilizes the brine, which is important for food safety, especially if you plan to refrigerate the brine for an extended period.
-
Cooling is Paramount: Once boiling, remove the pot from the heat and allow the brine to cool completely. This is arguably the most critical step after combining ingredients. Never add a hot or even warm brine to raw turkey. Introducing hot liquid to raw poultry creates a breeding ground for bacteria, posing a significant food safety risk. The brine must be chilled to refrigerator temperature (below 40°F or 4°C) before the turkey is submerged. This can take several hours. To speed up the cooling process, you can:
- Transfer the brine to a clean container and place it in an ice bath.
- Make the brine the day before and refrigerate it overnight.
- Add a few pounds of ice to the brine once it has cooled significantly. The ice will melt, further chilling the brine and diluting it slightly (which is acceptable as long as you’ve accounted for the initial water volume).
-
Prepare the Turkey: While the brine is cooling, prepare your turkey. Remove it from its packaging. Remove the giblets and neck from the cavities. Pat the turkey thoroughly dry, both inside and out, with paper towels. This step is important for achieving crispy skin later.
-
Submerge and Refrigerate: Once the brine is thoroughly chilled, place your prepared turkey in a clean, food-grade container. This could be a large brining bag (often sold specifically for turkeys), a clean cooler, or a large stockpot that fits in your refrigerator. Pour the chilled brine over the turkey, ensuring it is completely submerged. If the turkey floats, you can place a plate or a smaller bowl on top to keep it submerged. Cover the container tightly.
-
Brining Time: The duration of brining is dependent on the size of the turkey and the strength of your brine. A general guideline for a typical 12-15 pound turkey is to brine for 12 to 24 hours.
- Smaller Turkeys (under 10 lbs): 8-12 hours.
- Medium Turkeys (10-15 lbs): 12-24 hours.
- Larger Turkeys (over 15 lbs): 24-48 hours.
It’s important not to over-brine, as this can lead to a mushy texture and excessively salty meat. The salt will continue to penetrate the meat, and prolonged exposure can break down the proteins too much. Always err on the side of slightly less time if you are unsure. A good rule of thumb is to check the meat for firmness; it should feel slightly firmer than before brining.
-
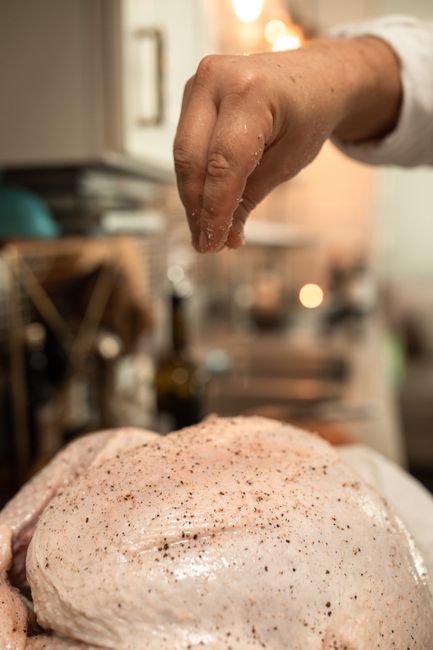
Post-Brining: After the brining period, carefully remove the turkey from the brine. Discard the brine; it is not safe for consumption or reuse. Rinse the turkey thoroughly under cool running water, both inside and out, to remove any excess salt from the surface. Pat the turkey completely dry with paper towels. This drying step is crucial for achieving crispy skin when roasting. You can then proceed with your preferred turkey roasting method, applying your external seasonings or rubs.
Troubleshooting Common Brining Issues
Even with careful preparation, occasional issues can arise. Here are some common problems and their solutions:
- Turkey is too Salty: This is the most common complaint with brining. It usually stems from over-brining or using too much salt in the brine. If your turkey is slightly too salty, you can try rinsing it exceptionally thoroughly after brining. You can also try to compensate for the saltiness in your stuffing or side dishes by reducing the salt in those recipes. For future brines, consider reducing the salt by 1-2 tablespoons per gallon of water or shortening the brining time.
- Turkey is Mushy or Waterlogged: This can occur if the turkey is over-brined. The prolonged exposure to the salt solution can break down the protein structure too much, leading to a mushy texture. Always adhere to recommended brining times, and when in doubt, err on the side of caution. Ensure the turkey is thoroughly patted dry after brining to remove surface moisture.
- Uneven Brining: This often happens if the turkey is not fully submerged in the brine. Ensure your container is large enough and that you have sufficient brine volume to cover the entire bird. Weighing the turkey down with a plate or a smaller bowl can help keep it submerged.
- Container Leaks: Using a sturdy, food-grade brining bag specifically designed for turkeys can prevent leaks. If using a cooler or pot, ensure the lid seals tightly or cover with plastic wrap securely.
Variations and Flavor Enhancements for Your Friendsgiving Turkey Brine
While the foundational brine is excellent on its own, don’t hesitate to experiment with flavor variations to suit your Friendsgiving theme and personal preferences.
- Citrus Infusion: Add citrus peels (orange, lemon, lime) to the brine for a bright, zesty note. The essential oils in the citrus peel will infuse the meat.
- Spicy Kick: Incorporate whole chilies (like jalapeños or serranos), red pepper flakes, or a dash of hot sauce into the brine for a subtle warmth.
- Umami Boost: A splash of soy sauce or Worcestershire sauce can add a deep, savory umami flavor. Be mindful of the salt content of these additions and adjust your primary salt accordingly.
- Sweet and Savory: For a more complex flavor profile, consider adding a cup of apple cider or white wine to the water when heating the brine.
- Herbaceous Delight: Beyond the classics, consider adding dill, tarragon, or even a few juniper berries for a unique aromatic experience.
The Art of Resting the Brined Turkey
After brining and rinsing, it’s beneficial to let the turkey rest uncovered in the refrigerator for a few hours, or even overnight, before roasting. This allows the surface of the skin to dry out further, promoting exceptional crispiness. This step, sometimes referred to as "air drying," is a critical component for achieving that coveted golden-brown, crackling skin that perfectly complements the juicy interior. The cool, dry air of the refrigerator helps to evaporate surface moisture, concentrating the natural oils in the skin and paving the way for a superior roasting outcome.
Conclusion: Elevating Your Friendsgiving Feast
A well-executed turkey brine is not merely a suggestion; it’s a foundational technique for achieving a truly exceptional Friendsgiving turkey. By understanding the science, adhering to precise ratios, and following these detailed instructions, you can transform a potentially dry and unremarkable bird into a succulent, flavorful masterpiece. This comprehensive Friendsgiving turkey brine recipe provides the framework for success, but also encourages creativity through variations. Prioritize proper cooling and food safety throughout the process. With a little planning and attention to detail, your brined turkey will undoubtedly be the highlight of your Friendsgiving celebration, eliciting gasps of delight and leaving your guests raving about your culinary prowess. The effort invested in brining directly translates to a superior tasting and more enjoyable dining experience for everyone gathered around your table.
