His Her Sharpie Mug DIY sets the stage for this enthralling narrative, offering readers a glimpse into a story that is rich in detail and brimming with originality from the outset. Have you ever wished you could add a personal touch to your morning coffee routine?
Well, with a little creativity and a Sharpie marker, you can transform ordinary mugs into unique and meaningful works of art. Whether you’re looking to create a special gift for a loved one or simply want to personalize your own mug collection, this DIY project is a fun and rewarding way to express yourself.
This blog post will guide you through the process of creating your own personalized Sharpie mugs, from choosing the right supplies to adding finishing touches. We’ll explore different design ideas, provide tips and tricks for achieving successful results, and even share ways to showcase your creations.
So, grab your Sharpie markers and get ready to unleash your inner artist!
The Appeal of Personalized Mugs
Personalized mugs are more than just vessels for our morning coffee or tea; they are tangible expressions of our individuality and connections. They are cherished gifts that evoke warm memories and feelings of appreciation, making them a popular choice for special occasions and everyday use.
My latest DIY project was transforming a plain white mug into a vibrant piece of art using Sharpies. The whole process was surprisingly therapeutic, and I was so happy with the result! I even had a moment of inspiration to pair it with a delicious peaches whiskey ice cream float – a perfect way to celebrate my creative success! Now, my personalized mug sits proudly on my desk, a constant reminder of the joy of DIY and the simple pleasures of a good, homemade treat.
The Emotional Connection to Personalized Items
Personalized items, like mugs, hold a unique emotional value that transcends their practical function. This emotional connection stems from the sense of ownership and personal significance they embody. The act of personalizing an item, whether it’s adding a name, a special message, or a unique design, imbues it with a sense of individuality and purpose.
This personal touch transforms an ordinary object into a treasured possession that reflects our identity, our relationships, and our experiences.
I’m having a blast with my Sharpie mug DIY project! It’s amazing how a little bit of paint and creativity can transform something ordinary into something unique. It reminds me of my recent adventure in upholstery, which I wrote about on my blog, learning new skills adventures in upholstery.
That experience really taught me the importance of patience and attention to detail, which are definitely coming in handy with this mug project! I can’t wait to see how it turns out.
Types of Personalized Mugs and Their Appeal
- Photo Mugs:These mugs feature personalized photographs, often showcasing loved ones, memorable moments, or favorite places. They serve as visual reminders of cherished connections and experiences, adding a sentimental touch to everyday routines.
- Name Mugs:These mugs bear the recipient’s name, making them a thoughtful and practical gift for birthdays, holidays, or special occasions. They create a sense of ownership and personalize the everyday act of enjoying a beverage.
- Quote Mugs:These mugs feature inspiring quotes, motivational messages, or humorous sayings that resonate with the recipient’s personality or interests. They offer a daily dose of inspiration, encouragement, or laughter, making them a unique and meaningful gift.
- Custom Design Mugs:These mugs allow for complete creative freedom, enabling individuals to express their unique style and preferences. They can feature original artwork, favorite characters, or personalized designs that reflect the recipient’s personality and interests.
Sharpie Mug DIY

The Sharpie mug DIY is a fun and easy way to personalize your mugs and create unique gifts. It’s a great way to express your creativity and add a personal touch to your daily routine. You can create anything from simple designs to intricate works of art, and the possibilities are endless.
Advantages and Disadvantages of Using Sharpie Markers for Mug Personalization
Sharpie markers offer several advantages when it comes to mug personalization. They are readily available, affordable, and come in a wide variety of colors. They also provide a permanent solution that is dishwasher-safe. However, there are also some disadvantages to consider.
The most significant disadvantage is that the design may fade over time, especially if the mug is frequently washed in the dishwasher.
Tips and Tricks for Achieving Successful Sharpie Mug Designs, His her sharpie mug diy
To ensure your Sharpie mug designs last longer and look their best, here are some tips and tricks:
- Clean the mug thoroughly before applying the design.This will help the Sharpie ink adhere better to the surface.
- Use a light hand when applying the design.Too much pressure can cause the ink to bleed or smudge.
- Let the design dry completely before using the mug.This will help prevent the ink from smudging or transferring to other surfaces.
- Bake the mug in the oven to set the ink.This is the most effective way to ensure the design is permanent and dishwasher-safe. Preheat the oven to 350 degrees Fahrenheit (175 degrees Celsius). Place the mug in the oven for 30 minutes, then let it cool completely before using.
- Use a sealant to protect the design.A clear acrylic sealant can help prevent the ink from fading or chipping. Apply the sealant in thin coats, allowing each coat to dry completely before applying the next.
- Practice your design on paper first.This will help you get a feel for the Sharpie marker and make sure you are happy with the design before applying it to the mug.
The Process of Personalizing Mugs with Sharpie Markers
The process of personalizing mugs with Sharpie markers is simple and straightforward. Here’s a step-by-step guide:
- Gather your materials.You will need a plain white mug, Sharpie markers, a pencil (optional), and a baking sheet.
- Clean the mug thoroughly.Wash the mug with soap and water and let it dry completely.
- Sketch your design (optional).If you are using a complex design, you may want to sketch it on the mug first with a pencil.
- Apply the Sharpie design.Use a light hand and let the ink dry completely between coats.
- Bake the mug in the oven.Preheat the oven to 350 degrees Fahrenheit (175 degrees Celsius). Place the mug on a baking sheet and bake for 30 minutes. Let the mug cool completely before using.
- Apply a sealant (optional).A clear acrylic sealant can help protect the design and prevent it from fading or chipping.
“With a little creativity and a Sharpie marker, you can transform a plain white mug into a unique and personal piece of art.”
Designing Your Sharpie Mug
Once you’ve chosen your mug and prepped it, the fun part begins: designing your masterpiece! This is where your creativity shines through. With endless possibilities, you can create a mug that reflects your personality, interests, or even a special occasion.
Design Ideas
The beauty of Sharpie mug DIY is its versatility. You can explore different design ideas, incorporating themes, colors, and patterns to create a unique and personal mug.
I was so excited to finally finish my Sharpie mug DIY project, but then I realized I needed a tasty side dish to go with the celebratory dinner I was making. That’s when I remembered a recipe I’d been wanting to try – mashed beets and potatoes ! It was the perfect complement to the savory flavors of the meal, and it made the whole experience even more enjoyable.
Now, back to my mug – I can’t wait to use it every day and show off my artistic skills!
- Themes: Think about your passions or interests. Are you a coffee enthusiast? A bookworm? A sports fan? A nature lover?
Your mug can showcase these passions. For example, a coffee lover might design a mug with coffee beans and a steaming cup, while a bookworm might create a mug with a stack of books and a quote about reading.
- Colors: Choose a color palette that reflects your style or the theme of your design. Bright, bold colors create a vibrant and eye-catching mug, while softer, pastel shades offer a more subtle and elegant look. You can even use a color gradient for a unique and artistic effect.
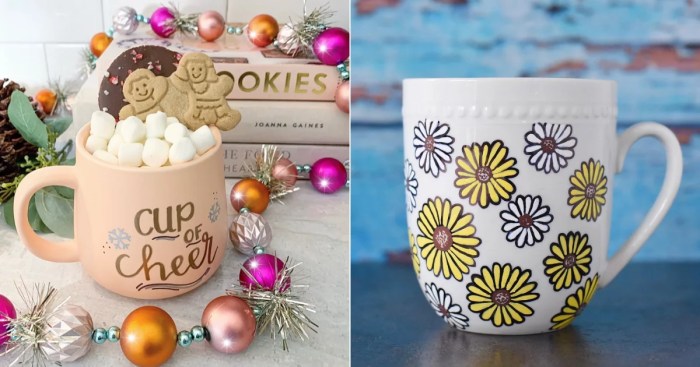
- Patterns: Patterns can add visual interest and personality to your mug. Geometric patterns like stripes, polka dots, or chevrons offer a modern and trendy feel. Floral patterns bring a touch of elegance and nature. You can also create abstract patterns using freehand drawing or stencils.
Creative and Unique Designs
- Quote Mugs: Inscribe your favorite quotes, lyrics, or motivational sayings on your mug. These can be a source of inspiration or a reminder of something important to you.
- Personalized Mugs: Add your name, initials, or a special date to make the mug even more personal. You can also include a nickname or a funny inside joke with someone special.
- Illustrated Mugs: Draw your own designs, such as animals, landscapes, or abstract patterns. You can also use stencils to create intricate designs.
- Photo Mugs: Transfer a favorite photograph onto the mug using a special transfer paper. This is a great way to showcase a special memory or a loved one’s face.
- Pop Culture Mugs: Embrace your fandom by creating a mug inspired by your favorite TV show, movie, book, or band.
Incorporating Personal Touches
The most memorable Sharpie mugs are those that reflect your unique personality. Here are some ways to add personal touches:
- Use your own handwriting: Write a message or a quote in your own handwriting to add a personal touch.
- Include inside jokes or special memories: Design a mug that only you and a close friend or family member would understand.
- Create a mug for a special occasion: Design a mug for a birthday, anniversary, graduation, or other milestone.
Creating a Table of Sharpie Mug DIY Supplies

Before diving into the creative process of designing your mug, let’s gather the essential supplies for your Sharpie mug DIY project. A well-organized list of supplies ensures a smooth and enjoyable experience, allowing you to focus on unleashing your artistic side.
Table of Sharpie Mug DIY Supplies
This table Artikels the essential supplies needed for your Sharpie mug DIY project, along with descriptions and suggested brands or alternatives.
| Supply Name | Description | Suggested Brand or Alternative |
|---|---|---|
| Ceramic Mugs | Choose mugs made from ceramic or porcelain for best results. Opt for plain white mugs for a clean canvas. |
|
| Sharpie Oil-Based Paint Pens | These pens are specifically designed for ceramic surfaces and provide vibrant, permanent colors. |
|
| Isopropyl Alcohol | Used for cleaning the mug surface before applying the design and removing any smudges or mistakes. |
|
| Paper Towels | For cleaning the mug surface and drying it after applying alcohol. |
|
| Baking Sheet | Provides a stable platform for the mug during the baking process. |
|
| Oven | Essential for curing the Sharpie design and making it permanent. |
|
Step-by-Step Guide to Sharpie Mug DIY
This guide will walk you through the process of creating a personalized mug using Sharpie markers. You’ll learn how to prepare your mug, design your artwork, and bake it to make it permanent.
Preparing Your Mug
Before you start designing your mug, you need to prepare it for the Sharpie application. This involves cleaning the mug and applying a heat-resistant sealant.
- Clean the mug thoroughly:Wash your mug with dish soap and warm water, ensuring it’s free of any residue or grease. Rinse it well and let it dry completely.
- Apply a heat-resistant sealant (optional):Applying a sealant like a clear acrylic glaze or oven-safe spray paint can help the Sharpie ink adhere better and prevent it from fading or chipping over time. This step is optional but highly recommended for longevity. Make sure the sealant is compatible with high temperatures, as you’ll be baking the mug later.
Designing Your Sharpie Mug
Now it’s time to get creative! You can sketch your design directly on the mug, use stencils, or even transfer a design from paper.
- Sketch directly on the mug:If you’re confident in your drawing skills, you can directly sketch your design on the mug using a Sharpie marker. Start with a light sketch and then go over it with a darker marker for a bolder design.
- Use stencils:For more intricate designs, you can use stencils. Cut out your design from a piece of paper or cardstock and tape it securely to the mug. Then, trace the design with a Sharpie marker.
- Transfer a design from paper:If you’re not comfortable drawing freehand, you can transfer a design from paper. Use a pencil to lightly sketch your design on a piece of paper. Then, flip the paper over and trace the design with a Sharpie marker on the back.
Place the paper on the mug and trace over the design again. The ink will transfer to the mug.
Baking Your Sharpie Mug
Once you’ve completed your design, it’s time to bake it to make it permanent. Baking the mug sets the ink, preventing it from smudging or fading.
- Preheat your oven to 350°F (175°C):Ensure your oven is preheated to the correct temperature for optimal baking results.
- Place your mug in the oven:Carefully place the mug on a baking sheet in the middle rack of your oven. Avoid placing it directly on the oven rack to prevent it from sticking.
- Bake for 30 minutes:Let the mug bake for 30 minutes, allowing the ink to set properly.
- Let the mug cool completely:Once the 30 minutes are up, carefully remove the mug from the oven and let it cool completely on the baking sheet. Do not handle the mug while it’s still hot, as it can be fragile.
Tips for Sharpie Mug DIY
Here are some tips to help you achieve the best results with your Sharpie mug DIY project:
- Use Sharpie markers specifically designed for ceramics:These markers are formulated to withstand high temperatures and will create a more durable design. Avoid using regular Sharpie markers as they may fade or smudge after baking.
- Don’t overload the design:Keep your design simple and avoid too much detail. This will help the ink bake evenly and prevent smudging.
- Let the ink dry completely before baking:Allow the ink to dry completely before baking to prevent smudging. This usually takes about 24 hours.
- Use a heat-resistant glove to handle the mug:After baking, the mug will be very hot. Use a heat-resistant glove to protect your hands when handling the mug.
Adding Finishing Touches to Your Sharpie Mug

Your Sharpie mug is almost ready to become a unique piece of art, but adding finishing touches can elevate it from good to great. Think of these embellishments as the final layer of polish that truly makes your design stand out.Adding glitter, stencils, or other decorative elements can create a more personalized and visually appealing mug.
These additions can enhance the design’s overall effect, adding texture, sparkle, or a touch of whimsy.
Adding Glitter
Glitter can instantly add a touch of sparkle and festivity to your Sharpie mug. To apply glitter, you can use a few methods. One way is to apply a thin layer of glue or mod podge to the areas where you want the glitter to adhere.
Then, sprinkle glitter over the glue, ensuring it covers the area evenly. Once the glue dries, gently tap off any excess glitter. You can also use a glitter glue pen for precise application and intricate designs.
Using Stencils
Stencils offer a great way to create intricate designs and patterns on your Sharpie mug. You can find stencils online or at craft stores in a variety of shapes and sizes. To use a stencil, place it over the mug’s surface and secure it with painter’s tape.
Then, apply a thin layer of paint, glitter glue, or other decorative medium over the stencil. Once the paint dries, carefully remove the stencil to reveal the design.
Other Embellishments
Beyond glitter and stencils, there are many other creative ways to embellish your Sharpie mug. You can:
- Add rhinestones or gems for a touch of glamour.
- Use fabric scraps or ribbon to create unique patterns or accents.
- Incorporate dried flowers or other natural elements for a rustic or vintage look.
- Experiment with different types of paint, like acrylics or metallics, to add texture and depth.
Protecting Your Design
Once you’ve added your finishing touches, it’s essential to protect your design. This will ensure your Sharpie mug lasts for years to come. The most effective way to protect your design is to bake the mug in the oven.
Baking the mug in a preheated oven at 350 degrees Fahrenheit for 30 minutes will permanently seal the Sharpie ink and any added embellishments.
Before baking, make sure to preheat the oven and place the mug on a baking sheet lined with parchment paper. After baking, let the mug cool completely before handling.
Sharing Your Sharpie Mug Creations: His Her Sharpie Mug Diy
You’ve poured your heart and soul into designing and crafting your personalized Sharpie mugs, and now it’s time to share them with the world! Whether you’re looking to inspire others, showcase your creativity, or even turn your passion into a side hustle, there are several ways to share your Sharpie mug creations.
Here are some ideas to get you started:
Sharing Your Sharpie Mug Creations on Social Media
Social media platforms are a fantastic way to connect with others and share your creative endeavors. Here’s how you can leverage these platforms to showcase your Sharpie mug designs:* Create a dedicated account:Consider creating a separate social media account specifically for your Sharpie mug designs.
This will allow you to curate your content and attract a targeted audience.
Use relevant hashtags
Hashtags are essential for increasing the visibility of your posts. Use a combination of general and specific hashtags related to Sharpie mugs, DIY projects, and your personal style. For example, #sharpiemug, #diyprojects, #personalizedgifts, #mugart.
Engage with your audience
Respond to comments, answer questions, and participate in relevant discussions. This will help you build a community around your creations.
Run contests and giveaways
Engaging contests and giveaways can attract new followers and generate excitement around your Sharpie mug designs.
Capturing High-Quality Photos of Your Sharpie Mugs
High-quality photos are crucial for showcasing your Sharpie mug designs effectively. Here are some tips for capturing stunning images:* Use natural light:Natural light is generally the best lighting for photography. Try shooting near a window for soft, diffused light.
Find a simple background
A plain background will allow your mugs to be the focal point of the image. Consider using a white or light-colored backdrop.
Experiment with angles
Try different angles and perspectives to find the most flattering shot of your mug.
Use props
Add props like flowers, books, or coffee beans to create a visually appealing and thematic scene.
Edit your photos
Use photo editing software to enhance your images by adjusting brightness, contrast, and color balance.
Selling or Gifting Your Sharpie Mug Creations
If you’re interested in turning your Sharpie mug designs into a source of income or simply want to share your creations with loved ones, consider these options:* Online marketplaces:Platforms like Etsy, Amazon Handmade, and Shopify allow you to sell your handcrafted items to a wider audience.
Local craft fairs and markets
Participating in local craft fairs and markets is a great way to connect with potential customers and showcase your unique designs.
Gifting your creations
Personalized Sharpie mugs make thoughtful and unique gifts for friends, family, and colleagues.