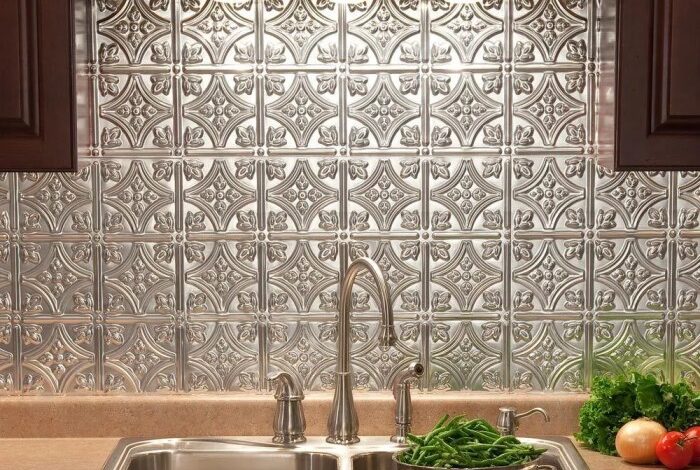
How to make an inexpensive plank backsplash – Want to give your kitchen or bathroom a stylish upgrade without breaking the bank? A plank backsplash is a fantastic way to add character and dimension to your space, and it’s surprisingly easy to DIY. Let’s dive into how you can create a stunning plank backsplash that fits your budget and style.
Plank backsplashes offer a unique blend of practicality and visual appeal. They’re durable, moisture-resistant, and can be customized with various materials like wood, tile, or even composite panels. Plus, you’ll be amazed at how much personality they can add to your kitchen or bathroom.
Choosing the Right Plank Material
Selecting the right plank material for your backsplash is crucial, as it directly impacts the look, durability, and maintenance of your kitchen. You’ll want to consider factors like moisture resistance, cost, and ease of installation.
Wood
Wood planks offer a natural and rustic appeal, adding warmth and character to your kitchen. They are available in various wood types, each with unique grain patterns and color variations.
Pros
- Aesthetically pleasing:Wood provides a natural and warm look, enhancing the overall ambiance of your kitchen.
- Versatile:Wood planks come in various species, finishes, and sizes, allowing for customization to match your kitchen’s style.
- Easy to install:Installing wood planks is relatively straightforward, making it a DIY-friendly option.
Cons
- Susceptibility to moisture:Wood is prone to warping, swelling, and rotting when exposed to excessive moisture. It requires proper sealing and maintenance to prevent damage.
- Requires regular maintenance:Wood planks need regular cleaning and sealing to maintain their appearance and protect them from stains and scratches.
- Costly:Depending on the wood species and finish, wood planks can be more expensive than other materials.
Tile
Tile planks are a popular choice for backsplashes due to their durability, moisture resistance, and wide range of styles. They come in various materials, including ceramic, porcelain, and natural stone.
Creating a stylish backsplash doesn’t have to break the bank. You can easily achieve a rustic and charming look with reclaimed wood planks, giving your kitchen a warm and inviting feel. And while you’re working on your DIY project, why not whip up a batch of key lime pie jello shots to enjoy while the paint dries?
The sweet and tangy treat will provide a refreshing break and add a touch of fun to your kitchen renovation. Once your backsplash is complete, you’ll have a beautiful and functional space to enjoy your delicious jello shots.
Pros
- Durable:Tile planks are resistant to scratches, stains, and heat, making them ideal for high-traffic areas.
- Moisture-resistant:Tile is impervious to water, making it a suitable option for areas prone to splashes and spills.
- Easy to clean:Tile surfaces are non-porous, allowing for easy cleaning with mild detergents.
- Wide range of styles:Tile planks are available in various colors, patterns, and textures, offering endless design possibilities.
Cons
- Installation complexity:Installing tile planks requires more skill and time compared to other materials. It may involve cutting and grouting, which can be challenging for beginners.
- Costly:Tile planks can be more expensive than some other materials, especially for high-end options like natural stone.
Composite
Composite planks are a newer option that combines the benefits of wood and tile. They are typically made from a blend of wood fibers, resins, and other materials, offering a durable and moisture-resistant solution.
Pros
- Durable:Composite planks are resistant to scratches, stains, and heat, making them a practical choice for kitchens.
- Moisture-resistant:Composite planks are designed to withstand moisture and humidity, making them suitable for backsplash applications.
- Easy to install:Composite planks are typically easier to install than tile planks, as they often come with pre-attached adhesive strips.
- Wide range of styles:Composite planks are available in various colors, patterns, and textures, offering design flexibility.
Cons
- Less natural look:Composite planks may not have the same natural appeal as wood planks.
- Costly:Composite planks can be more expensive than some other materials, but they offer a balance of durability and aesthetics.
Preparing the Wall for Installation

A smooth and even wall surface is crucial for a successful plank backsplash installation. Any imperfections will show through the planks, creating an uneven and unprofessional look. Therefore, before you start installing the planks, take the time to properly prepare the wall surface.
Cleaning the Wall, How to make an inexpensive plank backsplash
Cleaning the wall removes dirt, grease, and any other debris that could interfere with the adhesive. A clean surface ensures that the planks adhere properly and prevent future problems like peeling or lifting.
Making an inexpensive plank backsplash is a fun and easy DIY project, and you can even personalize it with a unique touch! For example, you could create a custom design by using a easy magnetic photo puzzle tutorial to arrange family photos or favorite artwork on the planks before sealing them.
This would give your backsplash a personal touch that truly reflects your style.
- Use a damp cloth and a mild detergent to wipe down the wall surface.
- Rinse the wall thoroughly with clean water and allow it to dry completely before proceeding.
Patching and Smoothing the Wall
Patching and smoothing the wall eliminates any cracks, holes, or uneven areas. This ensures a smooth surface for the planks to adhere to.
- Use spackling paste or joint compound to fill in any cracks or holes.
- Allow the patching compound to dry completely, then sand it smooth with fine-grit sandpaper.
- For larger imperfections, consider using drywall mud and a drywall taping knife for a more durable repair.
Ensuring a Straight and Even Installation
Using a level is essential for a straight and even installation. A level ensures that the planks are installed consistently, preventing any unevenness or tilting.
It’s best to use a level for every plank, especially if you’re using multiple planks horizontally or vertically.
I’m all about finding creative ways to spruce up my kitchen on a budget, and a plank backsplash is a fantastic way to add a touch of rustic charm without breaking the bank. While I’m busy planning my DIY project, I’m also taking inspiration from Sarah Lockhart’s amazing hair tutorials, like her tricks treats cascade braid.
The intricate braiding techniques remind me of the precision needed to create a flawless backsplash – maybe I’ll even try incorporating some braid-inspired patterns into my design!
- Start by marking a horizontal line along the wall using a level.
- This line will serve as a reference point for the first row of planks.
- Use a pencil to mark the location of each plank along the line.
- Use the level to ensure that each plank is installed at the same height and aligned with the previous plank.
Installation Techniques for Plank Backsplashes

Installing a plank backsplash is a relatively straightforward DIY project that can be completed in a weekend. You will need a few basic tools and supplies, and with a little patience and care, you can achieve a beautiful and functional backsplash for your kitchen or bathroom.
Cutting and Securing Plank Backsplashes
Before starting the installation, you’ll need to cut the planks to the desired size. A miter saw is ideal for precise cuts, but a circular saw or even a hand saw can also be used. For securing the planks to the wall, you have several options:* Adhesive:Construction adhesive is a popular choice for installing plank backsplashes.
It offers a strong bond and is relatively easy to apply.
Nails or Screws
For a more secure installation, you can use nails or screws. Choose nails or screws that are appropriate for the type of plank material you’re using.
Liquid Nails
Liquid nails are a strong adhesive that is often used for attaching heavy objects to walls. They are also a good option for securing plank backsplashes.
Steps for Installing Plank Backsplashes
- Prepare the Wall:Ensure the wall is clean, dry, and smooth. Fill any cracks or holes with spackle or patching compound.
- Measure and Cut:Measure the area where you will be installing the backsplash and cut the planks to size. Remember to account for any outlets or switches that may be located within the backsplash area.
- Apply Adhesive:If using adhesive, apply a thin layer to the back of the plank and press it firmly against the wall. Use a level to ensure the plank is straight.
- Secure with Nails or Screws:If using nails or screws, predrill holes to prevent the plank from splitting. Use a level to ensure the planks are straight.
- Finish the Edges:After installing the planks, use a caulking gun to apply caulk to the edges of the backsplash where it meets the countertop and wall. This will help to create a smooth and watertight seal.
Adding Finishing Touches: How To Make An Inexpensive Plank Backsplash

Your plank backsplash is almost complete, but adding some finishing touches can elevate it from good to great. These final steps will not only enhance its aesthetics but also ensure its longevity.
Adding Decorative Elements
Adding decorative elements can personalize your plank backsplash and make it truly unique.
- Grout: Grouting between the planks can create a polished and finished look. The grout color can significantly impact the overall design. White grout creates a classic and clean look, while darker grout can add a bolder statement.
- Paint: Painting the planks can add a pop of color or create a distressed, vintage look. Consider using a chalk paint for a rustic feel or a high-gloss paint for a modern look.
- Trim: Adding trim around the perimeter of the backsplash can create a more finished look and visually separate it from the surrounding walls. You can use simple molding or decorative trim pieces depending on your style.
Sealing and Protecting
Sealing your plank backsplash is essential for protecting it from moisture, stains, and everyday wear and tear.
- Water-Based Polyurethane: A water-based polyurethane sealant is a popular choice for backsplashes. It dries quickly and is easy to apply. This sealant will create a protective barrier against spills and moisture.
- Oil-Based Polyurethane: An oil-based polyurethane sealant provides a more durable and long-lasting finish. It is also more resistant to scratches and abrasions. However, it takes longer to dry and can emit strong fumes.