DIY Knit Cat Bed: A Cozy Haven for Your Feline Friend
Creating a knit cat bed is a rewarding project for any crafter looking to provide their beloved feline with a personalized and comfortable resting place. This comprehensive guide will walk you through every step, from choosing the right yarn and needles to selecting the perfect design and finishing touches, ensuring a high-quality, SEO-friendly article that resonates with crafters and cat owners alike. We’ll cover various techniques, offer design inspiration, and provide tips for making the bed durable and washable.
Why Knit a Cat Bed?
Knitting a cat bed offers numerous advantages. Firstly, it allows for complete customization. You can select the yarn color, texture, and thickness to perfectly match your cat’s preferences and your home décor. Many cats are drawn to soft, plush textures, and knitting enables you to achieve this. Secondly, it’s a cost-effective alternative to purchasing expensive designer pet beds. High-quality yarn, while an initial investment, can yield multiple beds, making it an economical choice in the long run. Thirdly, it’s a fantastic way to practice and hone your knitting skills on a project that has a tangible and useful outcome. For experienced knitters, it’s an opportunity to experiment with more intricate stitch patterns or complex designs. Finally, and perhaps most importantly, a handmade item carries a special sentimental value, infused with your love and care for your pet. The act of creation itself can be incredibly therapeutic and satisfying.
Choosing the Right Yarn for Your Knit Cat Bed
The yarn selection is paramount for a successful knit cat bed. Consider durability, washability, and your cat’s potential chewing or scratching habits.
- Yarn Fiber:
- Acrylic: This is a popular choice due to its affordability, durability, and washability. It’s also hypoallergenic and comes in a vast array of colors. Look for soft, worsted-weight or bulky acrylic yarns for good stitch definition and a cozy feel.
- Wool: Natural wool offers excellent warmth and breathability. However, some cats can be sensitive to wool’s texture, and it can be more prone to felting if not cared for properly. Superwash wool is a good option if you opt for wool, as it’s machine washable.
- Cotton: Cotton is breathable and hypoallergenic, making it a good choice for cats with allergies. However, it can be less elastic than acrylic or wool, potentially leading to a less structured bed. It also takes longer to dry.
- Blends: Blends of acrylic and wool, or acrylic and cotton, can offer the best of both worlds, combining durability, softness, and washability.
- Yarn Weight:
- Worsted Weight: A good all-around choice, offering a balance of speed and stitch definition.
- Bulky or Super Bulky: These weights will allow you to knit a bed much faster and create a plush, thick fabric that cats adore. Think chunky yarns for ultimate coziness.
- Yarn Texture:
- Smooth: Easier to work with and less likely to snag.
- Textured (e.g., chenille, bouclé): Can be very appealing to cats due to their softness, but can be more challenging to knit with and may snag more easily.
- Washability: This is a non-negotiable factor. Cats are prone to accidents, and a washable bed is essential for hygiene. Always check the yarn label for washing instructions. Machine-washable and dryable yarns are ideal.
- Safety: Avoid yarns with loose strands or embellishments that your cat could ingest. If your cat is a chewer, opt for very sturdy yarns.
Essential Knitting Tools
Beyond yarn, you’ll need a few basic knitting tools:
- Knitting Needles: The size will depend on your yarn weight and the desired fabric density. Most bulky yarns will require US size 10-13 (6.0-9.0 mm) needles. Consider using circular needles, even for flat knitting, as they can hold more stitches comfortably and provide a more even tension.
- Stitch Marker: Useful for marking the beginning of a round or specific points in your pattern.
- Tapestry Needle: For weaving in ends and assembling parts of the bed.
- Scissors: For cutting yarn.
- Measuring Tape: To ensure your bed is the correct size.
Basic Knit Cat Bed Designs & Techniques
Here are a few popular and straightforward designs for knit cat beds, ranging from beginner-friendly to slightly more advanced.
-
The Simple Round Pillow Bed:
- Concept: This is the easiest design, essentially a knitted cushion.
- Technique:
- Knitting Flat: Cast on a certain number of stitches (depending on desired diameter and yarn weight). Knit in garter stitch (knitting every row) or stockinette stitch (knitting one row, purling the next) until the piece is square or rectangular. Bind off. Knit a second identical piece. Place the two pieces right sides together and seam them along three sides, leaving one side open for stuffing. Stuff firmly with fiberfill or an old cushion insert. Bind off the final opening.
- Knitting in the Round (using Circular Needles): Cast on stitches to form a ring. Join to work in the round. Knit in garter stitch or stockinette stitch for the desired diameter. Bind off. This creates one flat circle. To create the pillow effect, you’ll either need to knit a second identical circle and seam them together as described above, or you can knit the base and then knit up stitches around the edge to create sides, forming a bowl shape.
- SEO Keywords: simple knit cat bed, beginner cat bed knitting, round cat bed pattern, DIY cushion cat bed.
-
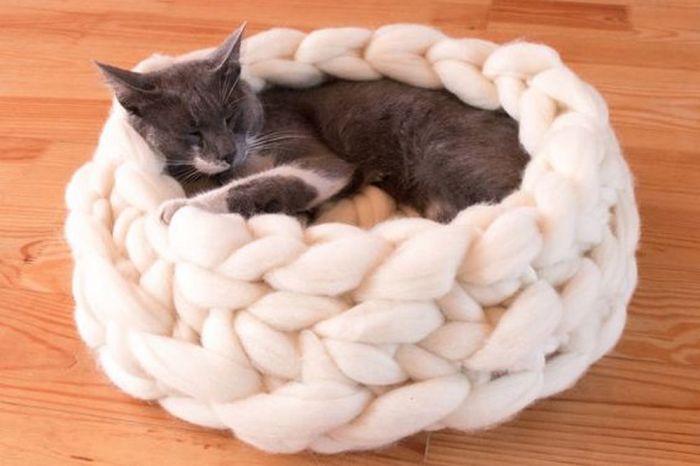
The Seamless Bowl/Basket Bed:
- Concept: This design creates a self-contained bed with raised sides, perfect for cats who like to feel secure.
- Technique:
- Knitting in the Round: Cast on stitches and join to work in the round. Knit the base in garter stitch or stockinette stitch until it reaches the desired diameter.
- Creating the Sides: To create the sides, you will work a few rounds of knitting and purling, or a simple ribbed pattern, or even a textured stitch pattern to give the sides structure. Alternatively, you can gradually decrease stitches at the edge of the base and then increase them to form the sides. A common method is to knit a few rounds straight up for the base, then start decreasing evenly spaced stitches around the edge, followed by a few more rounds of knitting in the center, and then increasing stitches around the outer edge to create the rim. Another method involves knitting a base and then picking up stitches around the edge to knit the sides upwards.
- Finishing: Bind off all stitches. Weave in ends securely.
- SEO Keywords: bowl knit cat bed, basket knit cat bed, seamless cat bed knitting, raised sides cat bed, secure cat bed DIY.
-
The Cabled or Textured Bed:
- Concept: Elevate a basic design with the addition of cables, bobbles, or other appealing textures.
- Technique:
- Base and Sides: This can be applied to either the flat pillow design or the bowl/basket design.
- Cable Techniques: Learn basic cable stitches, such as the 2/2 LC (2 stitches left cross) and 2/2 RC (2 stitches right cross). Incorporate these cables into the body of the bed for visual interest and a more substantial fabric.
- Bobbles and Clusters: Add bobble stitches or cluster stitches for a touch of softness and visual texture that cats often enjoy.
- Pattern Integration: You can create a solid cable pattern or intersperse textured sections with plain knitting.
- SEO Keywords: cabled knit cat bed, textured knit cat bed, chunky knit cat bed, luxury cat bed DIY, intricate cat bed pattern.
-
The Modular or Patchwork Bed:
- Concept: For those who enjoy smaller knitting projects, this involves knitting individual squares or motifs and then joining them together.
- Technique:
- Knitting Motifs: Knit multiple identical squares in your chosen stitch pattern and yarn. You can vary colors for a playful look.
- Joining: Once all motifs are complete, arrange them into your desired bed shape. Use a tapestry needle and matching yarn to seam the motifs together securely.
- Adding a Base/Lining: You might want to add a solid fabric backing or a knitted base for added stability and to prevent stuffing from escaping.
- SEO Keywords: patchwork knit cat bed, modular cat bed knitting, knit squares cat bed, colorful cat bed DIY.
Choosing the Right Size for Your Cat Bed
A comfortable cat bed should be just large enough for your cat to curl up comfortably.
- Measure Your Cat: Observe your cat while it’s sleeping. Measure its length from nose to tail when curled up. Add a few inches for extra room.
- Consider Sleeping Style: Does your cat prefer to sprawl out or curl into a tight ball?
- General Guideline: For most adult cats, a diameter of 18-24 inches for a round bed or a similar surface area for other shapes is usually sufficient. Kittens will need smaller beds, but remember they grow quickly!
Step-by-Step Knitting Guide: A Basic Round Pillow Bed (Example)
This example assumes you’re knitting flat and then seaming.
Materials:
- 2 skeins of bulky weight, washable acrylic yarn (e.g., Lion Brand Wool-Ease Thick & Quick or similar)
- US size 11 (8.0 mm) knitting needles (or size needed to obtain gauge)
- Tapestry needle
- Scissors
- Stuffing (fiberfill or an old pillow)
Gauge: Approximately 12 stitches and 16 rows = 4 inches in garter stitch. Always check your gauge before starting to ensure your bed will be the correct size.
Instructions:
- Cast On: Cast on 60 stitches.
- Knit the First Piece: Knit every row in garter stitch (knit one row, purl the next row – oops, mistake, garter stitch is knitting every row) until the piece measures approximately 20 inches in length.
- Bind Off: Bind off all stitches loosely.
- Knit the Second Piece: Repeat steps 1-3 to create a second identical piece.
- Assemble: Lay the two knitted pieces on top of each other, with right sides facing outwards. Using your tapestry needle and a length of yarn, seam three sides together. Leave one side open for stuffing.
- Stuff: Fill the bed firmly with your chosen stuffing material. Ensure it’s evenly distributed for maximum comfort.
- Close the Opening: Fold in the raw edges of the unsewn side and seam it closed securely.
- Weave in Ends: Use your tapestry needle to weave in any remaining yarn tails for a clean finish.
Advanced Techniques and Customization
- Adding a Non-Slip Bottom: For beds placed on smooth floors, consider sewing a piece of non-slip rug gripper fabric to the bottom.
- Lining: For extra coziness and to prevent stuffing from poking through, you can sew a fabric lining inside the knitted cover.
- Catnip Infusion: Some crafters subtly weave a small amount of dried catnip into the stuffing or a small pocket within the bed for added feline attraction.
- Colorwork: Experiment with stripes, color blocking, or even simple Fair Isle patterns for a visually dynamic bed.
- Pom-Pom or Tassel Accents: Add playful pom-poms or tassels to the corners or edges of the bed, ensuring they are securely attached and not a choking hazard.
Caring for Your Knit Cat Bed
Proper care ensures your creation lasts and remains hygienic.
- Washing: Always follow the yarn manufacturer’s washing instructions. Most acrylic and superwash wool yarns can be machine washed on a gentle cycle with cool water and a mild detergent.
- Drying: It’s generally best to air dry your knit cat bed to prevent shrinkage and maintain its shape. Lay it flat on a clean towel, reshaping as needed. If the yarn is dryer-safe, you can use a low heat setting.
- Spot Cleaning: For minor spills or accidents, spot clean with a damp cloth and mild soap.
- Regular Inspection: Periodically check the bed for any loose threads or signs of wear and tear, especially if your cat is a vigorous scratcher or chewer.
SEO Optimization for Your Article
Throughout the article, strategically incorporate relevant keywords that cat owners and crafters would search for.
- Primary Keywords: DIY knit cat bed, knit cat bed, handmade cat bed, cat bed knitting pattern, crochet cat bed (though this article focuses on knitting, some users might search broadly).
- Secondary Keywords: cozy cat bed, soft cat bed, washable cat bed, easy knit cat bed, beginner knitting project, pet bed DIY, cat furniture, custom cat bed, quick knit cat bed, chunky knit cat bed, cabled cat bed, bowl cat bed, round cat bed, basket cat bed.
- Long-Tail Keywords: How to knit a cat bed for beginners, best yarn for knitting a cat bed, simple knitting pattern for a cat bed, making a durable knit cat bed, where to find free knit cat bed patterns.
- Internal Linking: If you have other knitting or pet-related articles on your site, link to them to improve navigation and user engagement.
- Image Optimization: Use descriptive alt text for all images, incorporating keywords (e.g., "DIY chunky knit cat bed with pom-poms").
- Readability: Use headings, subheadings, bullet points, and short paragraphs to break up text and make it easy to scan.
- Meta Description: Craft a compelling meta description that includes primary keywords and entices users to click (e.g., "Create the ultimate cozy haven for your feline friend with this comprehensive guide to knitting your own DIY cat bed. Learn patterns, yarn choices, and tips for a purrfectly soft and washable creation.").
By following these guidelines, you can create a comprehensive, SEO-friendly article that will attract a wide audience and provide valuable information for anyone looking to knit a cat bed. The satisfaction of seeing your cat curl up in a bed you’ve lovingly crafted is unparalleled.
