DIY Metal Edge Marquee Sign: A Comprehensive Guide to Crafting Your Own Illuminated Masterpiece
This guide details the complete process of building a personalized metal edge marquee sign, a striking illuminated feature perfect for homes, businesses, or events. We will cover material selection, tool requirements, cutting and assembly techniques for both the metal edging and the marquee box, wiring the LED lights, and finishing touches to ensure a professional and durable result. This project offers a rewarding DIY experience, allowing for complete customization in size, shape, font, and color.
Materials Breakdown and Selection
The foundation of your metal edge marquee sign lies in careful material selection. For the main structure, typically referred to as the marquee box, plywood is the most common and cost-effective choice. ¾-inch plywood offers excellent structural integrity and is readily available. Consider cabinet-grade plywood if you desire a smoother finish without extensive filling and sanding, especially for the visible faces. The dimensions of your marquee will dictate the quantity of plywood needed. For the iconic metal edging, aluminum or steel sheeting are the primary options. Aluminum is lighter, easier to cut and bend, and more resistant to rust, making it a popular choice for DIYers. Steel, while heavier and requiring more effort to work with, offers superior durability and a distinct aesthetic. For a typical letter-sized marquee (e.g., 2-3 feet tall), consider 20-gauge to 24-gauge sheeting for the metal edging. This gauge provides a good balance of formability and rigidity. The width of the metal strip will determine the depth of your sign’s edge profile; 1-inch to 3-inch wide strips are common. For illumination, LED strip lights are the industry standard. Opt for high-density, 120-LED-per-meter (or higher) strips for a consistent and bright glow. Choose a color temperature (warm white, cool white, or colored LEDs) that complements your desired aesthetic. A reliable 12V DC power supply with sufficient amperage to power all your LED strips is crucial. Consult the specifications of your chosen LED strips; a general rule of thumb is to add up the total wattage and divide by 12 to determine the required amperage. Wire connectors, such as Wago connectors or solder and heat shrink tubing, are needed for joining LED strips and connecting to the power supply. For mounting the lights inside the box, consider silicone adhesive or small zip ties. Finally, for the front face of the marquee, clear acrylic or polycarbonate sheeting is required. Acrylic is more common for its clarity and ease of cutting, while polycarbonate offers superior impact resistance. The thickness of the acrylic should be at least 1/8-inch to provide adequate rigidity.
Essential Tools for Construction
To bring your metal edge marquee sign to life, a specific set of tools is indispensable. For cutting plywood, a circular saw or a miter saw will provide clean, straight cuts. A jigsaw is essential for cutting out letter shapes or intricate designs from the plywood base. For precise metal work, a metal cutting shear or a reciprocating saw with a metal cutting blade is necessary for trimming and shaping the aluminum or steel sheeting. A metal brake or a sturdy workbench with a vise and hammer can be used for bending the metal edging to match the contours of your plywood letters. For drilling precise holes for wiring and mounting, a power drill with various drill bit sizes, including a spade bit or hole saw for larger openings, is required. A countersink bit will create flush screw heads. For assembling the plywood structure, wood screws of appropriate lengths and a screwdriver or drill driver are needed. Wood glue will enhance the structural integrity of the box joints. To prepare surfaces for painting or finishing, sandpaper of various grits (80, 120, 220) and a sanding block or orbital sander are vital. For working with electrical components, wire strippers, a multimeter for testing connections, and potentially a soldering iron are essential. Safety equipment, including safety glasses or goggles, work gloves, and hearing protection, should be worn at all times during operation.
Designing and Cutting the Plywood Base
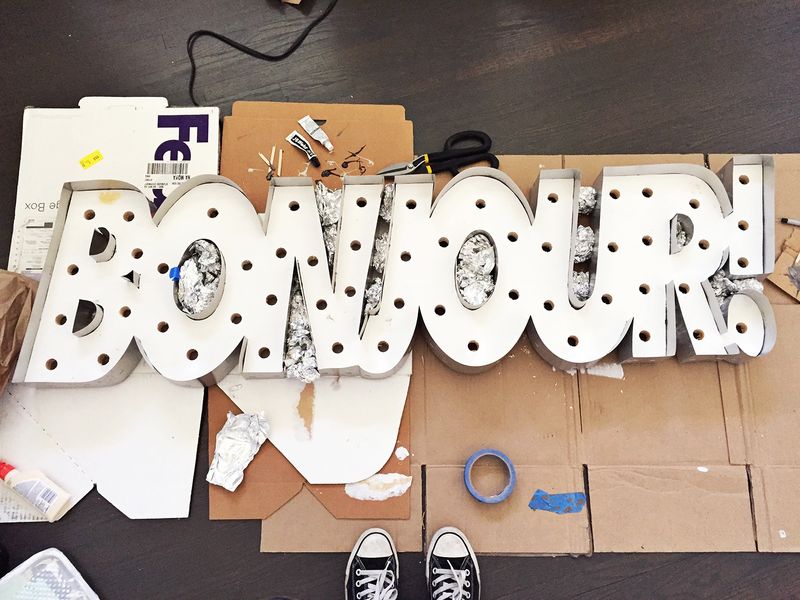
The design phase is paramount to a successful DIY metal edge marquee. Sketch your desired letter(s) or shape on paper or using design software, paying close attention to stroke width and overall proportions. Consider the scale of your project and the available space for the sign. Once your design is finalized, transfer it onto the plywood sheet. For letters, it’s often easiest to print out large templates and trace them onto the wood. Carefully use your jigsaw to cut out the plywood shapes. Take your time to achieve smooth, clean edges. If you are creating multiple letters, ensure consistency in their dimensions and curves. After cutting, thoroughly sand all edges to remove splinters and create a smooth surface for the metal edging and paint. Pay special attention to the inner curves and corners. For internal support and to create a recessed area for the LED lights, you will need to cut a second, slightly smaller layer of plywood for each letter. This inner layer will be glued and screwed onto the back of the main plywood shape, leaving a recess of approximately 1-2 inches. This recess will house the LED strips and wiring. Ensure the inner layer is cut precisely to fit within the outer letter shape, leaving a consistent border for the metal to attach to.
Forming and Attaching the Metal Edging
This is arguably the most visually defining step of your DIY metal edge marquee. Carefully measure the perimeter of your plywood letters, including any curves. This measurement will dictate the length of metal sheeting you need to cut for each letter’s edge. Using your metal cutting shear or reciprocating saw, cut the aluminum or steel sheeting to the required lengths. Precision is key here, as any inaccuracies will be visible. For straight sections, a clean cut is sufficient. For curves, you will need to gently bend the metal. A metal brake is ideal for this, allowing for controlled and consistent bends. If you don’t have a metal brake, you can carefully use a vise and a hammer to gradually shape the metal around a curved form, such as a piece of pipe or a thick dowel, ensuring not to kink or crease the material. Test fit the metal edging against the plywood letter frequently. Once you have the metal formed to match the contour of your plywood letter, you can begin attaching it. The most common and visually appealing method is to countersink small wood screws through the metal and into the edge of the plywood. Predrill pilot holes through the metal to prevent cracking and to ensure the screws go in straight. Space the screws evenly, about every 2-3 inches, for a secure and seamless attachment. For intricate curves, you may need to make small relief cuts in the metal to allow it to conform tightly to the plywood. Ensure the metal sits flush with the outer edge of the plywood.
Wiring the LED Lights for Illumination
The heart of your marquee sign is its illumination. Plan your LED strip layout within the recessed area of your plywood letters. For consistent brightness, aim to cover the entire surface of the recess. You can run continuous strips or cut them into sections. Most LED strips have designated cut points, usually marked by a small scissor icon. Ensure you cut only at these points. To connect sections or to run wires, use appropriate wire connectors. Wago connectors offer a solder-free and reliable solution. Alternatively, you can solder the wires and secure them with heat shrink tubing. Plan the direction of your wiring to minimize visibility from the front of the sign. Consider running the wires towards a central point or along the bottom edge of the recess for easier access to the power supply. Attach the LED strips to the plywood recess using a strong adhesive, such as silicone sealant or a heavy-duty double-sided tape specifically designed for LEDs. Press the strips firmly into place to ensure good contact. Once all strips are laid out and secured, connect them to your 12V DC power supply. Pay close attention to the polarity (+ and -) of the LED strips and the power supply. Incorrect wiring can damage the LEDs. It’s advisable to test each section of wiring with a multimeter before making permanent connections to the power supply. Ensure all connections are secure and insulated to prevent short circuits.
Cutting and Attaching the Front Face
The front face of your marquee sign will be the transparent layer that protects the LEDs and diffuses the light. Measure the outer dimensions of your plywood letters, including the attached metal edging. Carefully transfer these measurements to your acrylic or polycarbonate sheet. Use a fine-tooth blade on your circular saw or a specialized acrylic scoring tool and straight edge for a clean, crack-free cut. If using a saw, run it at a slower speed to avoid melting the acrylic. After cutting, lightly sand the edges of the acrylic to remove any sharp burrs. You will then attach this front face to the plywood structure. The easiest method is to use clear silicone adhesive or a strong, clear-drying craft glue. Apply a bead of adhesive around the outer edge of the metal edging. Carefully align the acrylic sheet with the plywood letter and press it firmly into the adhesive. You can use painter’s tape to hold the acrylic in place while the adhesive dries. Ensure there are no gaps between the acrylic and the metal edging, as this will prevent light leakage and dust ingress. For larger signs or if you desire extra security, you can also countersink small screws through the acrylic and into the plywood frame. However, this will be more visually intrusive.
Finishing and Mounting Your Marquee Sign
The final stage involves refining the appearance and preparing your sign for display. If you plan to paint your plywood structure, now is the time. Use a primer specifically designed for wood, followed by your chosen paint color. Spray paint can achieve a smooth, even finish, especially on the metal edging. For a more durable finish on the metal, consider using a spray paint formulated for metal or a powder coating process if you have access to it. If you opt for a natural metal look, a clear coat can be applied to prevent tarnishing and oxidation. Ensure all painted surfaces are completely dry before proceeding. For mounting, consider the weight of your sign. If it’s lightweight, strong command strips or heavy-duty adhesive hooks might suffice. For heavier signs, mounting brackets, D-rings, or French cleat systems will provide a more secure attachment. Ensure your mounting hardware is rated for the weight of your sign. If your sign will be displayed outdoors, ensure all materials are weather-resistant and that your electrical connections are properly sealed and protected from moisture. When connecting to the power source, ensure it is done safely and in accordance with local electrical codes. Consider adding a dimmer switch for adjustable brightness, or even a flasher unit for dynamic effects if using RGB LEDs. Regular maintenance, such as dusting and occasional cleaning of the acrylic face, will keep your DIY metal edge marquee sign looking its best for years to come.
