
Mastering the Art of Northern Lights Photography: A Comprehensive Guide
Capturing the ethereal dance of the Aurora Borealis requires a blend of technical understanding, patience, and strategic planning. This guide delves deep into the essential elements of successful Northern Lights photography, from equipment selection and camera settings to the nuances of composition and post-processing. Understanding the interplay of light, landscape, and celestial spectacle is paramount for producing images that truly convey the awe-inspiring nature of this phenomenon.
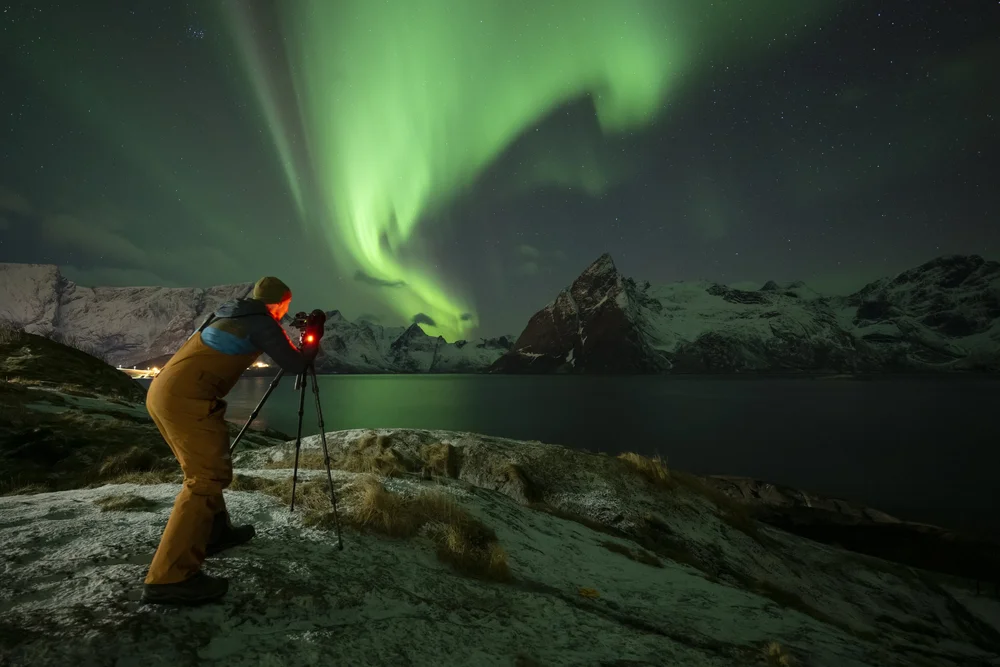
The fundamental equipment for aurora photography revolves around a camera capable of manual control, a sturdy tripod, and a wide-angle lens. DSLR or mirrorless cameras offering manual aperture, shutter speed, and ISO control are ideal. A full-frame sensor will generally perform better in low light conditions due to its larger pixel size and superior signal-to-noise ratio, but APS-C sensors can also yield excellent results. The tripod is non-negotiable; long exposures are necessary, and any camera shake will result in blurry, unusable images. Opt for a robust tripod that can withstand wind, a common companion in aurora viewing locations. Lenses should prioritize a wide focal length, typically between 14mm and 35mm, to capture the expansive sweep of the aurora across the sky. A fast aperture (f/2.8 or wider) is highly beneficial, allowing more light to reach the sensor, thereby reducing the need for excessively high ISO settings which can introduce noise. While specialized aurora lenses exist, a good quality wide-angle lens that is sharp at its widest aperture will suffice. Remote shutter release or a self-timer is also crucial to avoid camera shake when initiating the exposure. This can be a wired or wireless remote, or simply using the camera’s built-in two-second or ten-second timer.
Camera settings are the cornerstone of aurora photography. The goal is to maximize light capture while minimizing noise and preserving detail. A starting point for manual mode (M) is an aperture of f/2.8 or the widest your lens allows. Shutter speed will vary depending on the intensity and speed of the aurora; begin with a 10-second exposure and adjust as needed. Faster-moving, more vibrant auroras might require shorter exposures (5-15 seconds) to freeze the motion and prevent star trailing, while slower, more diffuse displays might benefit from longer exposures (20-30 seconds) to gather more light. ISO settings are a delicate balance. Start with ISO 800 or 1600 and be prepared to increase it. Modern cameras can handle ISO 3200 or even 6400 with acceptable noise levels, especially when noise reduction is applied in post-processing. However, pushing the ISO too high will introduce significant digital noise, degrading image quality. White balance is another critical setting. Auto white balance can often misinterpret the colors of the aurora. Setting it to Kelvin (K) is recommended. A range of 3000K to 4000K often produces pleasing results, bringing out the greens and purples effectively. Experimentation is key, and bracketing exposures for white balance can provide options. It’s also advisable to shoot in RAW format. RAW files contain more image data than JPEGs, offering greater flexibility in post-processing for adjusting exposure, white balance, and recovering highlights and shadows without significant loss of quality.
Focusing in the dark is a common challenge. Autofocus systems struggle in low light. The most reliable method is manual focus. Switch your lens to manual focus (MF) and aim for infinity. However, infinity marks on lenses are not always perfectly accurate, especially with modern lenses. A more precise technique is to use live view, zoom in on the brightest star or the moon (if visible), and manually adjust the focus ring until the star appears as a sharp point of light. Once focused, be careful not to bump the focus ring. Some photographers use gaffer tape to secure the focus ring in place. Alternatively, pre-focusing during twilight when there’s still some light can be effective, though you’ll need to reconfirm focus as darkness deepens.
Composition is what elevates a technically sound aurora photograph to an artistic masterpiece. The aurora itself is a dynamic and often unpredictable subject, but incorporating foreground elements provides context, scale, and visual interest. Mountains, trees, lakes, rivers, or even abandoned structures can serve as powerful foreground elements. Consider the rule of thirds, placing the aurora or key foreground features off-center to create a more balanced and engaging image. Leading lines, such as a winding road or a river, can guide the viewer’s eye into the scene and towards the aurora. Reflections in water can double the impact of the aurora, creating a symmetrical and captivating image. When scouting locations, consider the direction of the aurora’s anticipated movement and how it will interact with your chosen foreground. Patience is a virtue in aurora photography. The lights can be fleeting and their intensity can fluctuate dramatically. Be prepared to wait for periods of intense activity, and don’t be discouraged by periods of calm. Often, the most spectacular displays are preceded by subtle hints of green or faint arcs.
Location scouting is paramount for maximizing your chances of seeing and photographing the aurora. Aurora activity is most prevalent in the auroral oval, a ring-shaped zone around the geomagnetic poles. Countries like Iceland, Norway, Sweden, Finland, Canada, and Alaska are prime destinations. However, it’s not just about latitude; darkness, clear skies, and minimal light pollution are essential. Seek out remote areas away from city lights. Websites and apps that track aurora forecasts are invaluable tools. These forecasts predict the intensity (Kp index) and the likelihood of seeing the aurora. Understand that even with a high Kp index, clear skies are necessary. Weather plays a significant role; clouds will obscure the aurora. Therefore, monitoring weather forecasts in conjunction with aurora forecasts is crucial. Consider the time of year. The auroral season typically runs from late August to early April, when the nights are longest and darkest. During the summer months, the midnight sun in many northern regions prevents the aurora from being visible.
Beyond the core settings and composition, several advanced techniques and considerations can enhance your aurora photography. Capturing star trails alongside the aurora can create dynamic and visually complex images. This involves much longer exposures (minutes to hours) or stacking multiple shorter exposures. However, balancing the exposure for stars with the often rapidly changing aurora can be challenging. Another technique is to use light painting to illuminate foreground elements. This involves using a flashlight or other light source to strategically add light to your foreground during a long exposure, adding detail and dimension. Be mindful of over-lighting, which can detract from the natural beauty of the scene. For capturing detail within the aurora, particularly its structure and color gradients, understanding the subtle shifts in its intensity and movement is key. Sometimes, a slightly shorter exposure can capture finer details, while a longer exposure can reveal broader sweeps of light. Experiment with different shutter speeds even within a single aurora display to see how it affects the captured image.
Post-processing is an indispensable part of aurora photography. RAW files provide the raw material, and software like Adobe Lightroom or Photoshop allows you to refine and enhance the captured image. The first step is usually adjusting the white balance to achieve the desired color rendition. Then, carefully expose the image. Recovering blown-out highlights in the aurora can be tricky, but some detail can often be salvaged in RAW files. Conversely, lifting shadows can reveal details in the foreground. Noise reduction is essential, especially if you’ve pushed your ISO settings. Most editing software has robust noise reduction tools that can effectively minimize digital grain without sacrificing too much detail. Sharpening can bring out the finer details of the aurora and the landscape. However, over-sharpening can introduce artifacts. Careful application of sharpening, often with masking, is recommended. Color correction and enhancement can further refine the image, bringing out the subtle hues of the aurora. However, avoid over-saturation, which can make the aurora appear unnatural. The goal is to enhance the existing beauty, not to create something artificial. Learning to use adjustment brushes and gradients allows for targeted edits, such as selectively enhancing the aurora or darkening the foreground to make the lights pop.
Protecting your equipment from the elements is crucial. Northern aurora locations often experience extreme cold, snow, and wind. Batteries drain significantly faster in cold temperatures, so bring spares and keep them warm in an inner pocket. Condensation can form when bringing cold equipment into a warm environment. Allow your gear to acclimatize gradually to prevent this. Lens warmers can prevent fogging on your lens, especially in humid or snowy conditions. A waterproof camera bag and rain cover are essential for protecting your equipment from precipitation.
Understanding aurora photography goes beyond just technical settings; it involves appreciating the science behind the phenomenon. The aurora is caused by charged particles from the sun colliding with atoms in Earth’s atmosphere. These collisions excite the atoms, causing them to emit light. The color of the aurora depends on the type of gas molecule and the altitude at which the collision occurs. Oxygen typically produces green and red light, while nitrogen produces blue and purple light. Knowing this can help you anticipate and appreciate the different colors you might witness.
In conclusion, mastering Northern Lights photography is a rewarding journey that combines technical proficiency, artistic vision, and an understanding of natural phenomena. By meticulously preparing your equipment, mastering camera settings, composing thoughtful shots, and skillfully post-processing your images, you can capture the breathtaking beauty of the aurora borealis and share its magic with the world. Each aurora display is unique, offering new opportunities for learning and creative expression. Embrace the challenges, be patient, and allow the celestial spectacle to inspire your photographic endeavors.
