Plush fox doll DIY is a fantastic way to create a unique and heartwarming gift for yourself or someone special. Whether you’re a seasoned crafter or a beginner, making your own plush fox doll can be a rewarding and enjoyable experience.
The process of bringing a cute fox to life, from sketching the pattern to adding the finishing touches, is a journey of creativity and satisfaction.
This guide will walk you through every step of the plush fox doll creation process, from choosing the right materials to adding those charming details that make your fox truly special. Let’s embark on this fun and fulfilling crafting adventure together!
Introduction
Plush fox dolls are a popular type of soft toy that comes in various sizes, colors, and designs. They are often made from soft, cuddly materials such as fleece or plush fabric, and they typically feature a fox’s distinctive characteristics, such as a bushy tail, pointed ears, and a charming face.The appeal of DIY projects related to plush fox dolls lies in the opportunity to create a personalized and unique toy that reflects your individual creativity and style.
You can choose the materials, colors, and design elements that you like best, and you can even add special features such as embroidered details, buttons, or beads.
The Benefits of Making Your Own Plush Fox Doll
Making your own plush fox doll offers a number of benefits, including:
- Creativity and Self-Expression:DIY projects allow you to express your creativity and personal style through the design and customization of your plush fox doll.
- Personalization:You can create a doll that is unique and special to you by choosing the colors, materials, and design elements that you love.
- Cost-Effectiveness:Making your own plush fox doll can be more cost-effective than buying a pre-made one, especially if you use recycled or upcycled materials.
- Sense of Achievement:Completing a DIY project like making a plush fox doll can provide a sense of accomplishment and satisfaction.
- Bonding Experience:Making a plush fox doll can be a fun and rewarding activity to do with friends or family members, fostering bonding and shared creativity.
Materials and Tools
Crafting a plush fox doll requires gathering the right materials and tools to ensure a smooth and enjoyable process. This section provides a comprehensive list of materials and tools needed for each step, from sketching the design to stitching the final product.
Materials
- Fabric:Choose a soft, plush fabric for the fox’s body, such as fleece, faux fur, or velvet. Consider the color and texture you desire for your fox. For example, a warm orange fleece for a classic fox look or a soft, white faux fur for a snowy fox.
- Felt:Use felt for the fox’s facial features, like ears, nose, and mouth. Felt is a versatile material that comes in various colors, allowing you to create realistic or whimsical expressions.
- Embroidery floss:For stitching details like the fox’s eyes, nose, and whiskers. Choose colors that complement the fabric and felt you selected.
- Stuffing:Polyester fiberfill or cotton stuffing is ideal for filling the fox’s body. Ensure the stuffing is soft and fluffy to create a cuddly texture.
- Sewing needles:Use sharp sewing needles suitable for your chosen fabric. You may need needles of different sizes depending on the thickness of the fabric.
- Scissors:Sharp scissors are essential for cutting fabric, felt, and stuffing. Use fabric scissors for precise cuts on fabric and regular scissors for other materials.
- Safety pin:A safety pin is helpful for turning the fox’s body right side out after sewing.
- Optional:
- Beads:Add a touch of sparkle to your fox’s eyes by using small black beads.
- Buttons:Decorate your fox with buttons for extra charm. You can use buttons to create a unique design on the fox’s belly or chest.
- Yarn:Create a tail for your fox using yarn. You can use a simple knot or create a more intricate design.
- Embroidery hoop:An embroidery hoop can be helpful for stabilizing the fabric while embroidering details.
Tools
- Sewing machine:A sewing machine is recommended for sewing the fox’s body, as it provides a faster and more consistent stitch. If you don’t have a sewing machine, you can sew by hand, but it may take longer.
- Measuring tape:A measuring tape is essential for accurately measuring the fabric and creating the right size for your fox.
- Pencil or fabric marker:Use a pencil or fabric marker to draw the pattern onto the fabric before cutting.
- Pins:Use pins to hold the fabric in place while sewing.
- Iron:An iron can be helpful for pressing the fabric before sewing, ensuring a smooth finish.
Cutting and Sewing
Now that you have all the materials ready, it’s time to get creative and start cutting and sewing! The pattern will guide you through each step, ensuring you have all the pieces needed for your plush fox doll.
Making a plush fox doll is such a fun DIY project, and I love how they turn out! I’m always looking for inspiration for my creations, and recently I stumbled upon the Lisa Tan x Coast dresses at Debenhams collection.
The vibrant colors and playful patterns reminded me of the fox’s fiery spirit, and I think I’ll try to incorporate some of those details into my next plush fox design. Maybe a little bit of fox-like flair would add some extra charm to my DIY creations!
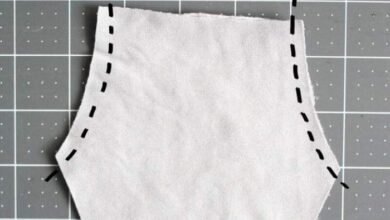
Cutting the Fabric
The pattern will include Artikels for each part of the doll, such as the body, head, ears, and tail. You’ll need to cut two pieces of fabric for each part, except for the tail, which needs only one. Before cutting, make sure you have a sharp pair of fabric scissors.
Using blunt scissors can lead to frayed edges and uneven cuts. It’s best to cut on a flat, sturdy surface like a cutting mat.
Making a plush fox doll is a fun and rewarding project, especially if you’re a crafty type! You’ll need a good pattern, some soft fabric, and a bit of patience, but the results are truly adorable. While I’m busy sewing, I find myself thinking about other creative endeavors, like perfecting my cat-eye eyeliner.
There are some really great tips and tricks out there, like the ones on this website: perfect cat eye eyeliner tricks. Once I’m done with my fox, I’ll definitely be trying out those techniques. Maybe I’ll even make a little fox-shaped eyeliner brush holder to complete the look!
- Lay the fabric flat and place the pattern pieces on top.
- Pin the pattern pieces in place to prevent them from shifting while you cut.
- Carefully cut around the pattern pieces, leaving a seam allowance of about 1/4 inch (0.6 cm).
Sewing the Body
Now, it’s time to bring your plush fox to life by sewing the pieces together. You can use a sewing machine or sew by hand.
Making a plush fox doll is a fun project that can be personalized with different fabrics and embellishments. If you’re looking for a little extra sparkle, you can even add a handmade bauble necklace to your fox! There are tons of tutorials online, like this one for handmade bauble necklace how to , that can help you create a beautiful necklace to complement your fox’s charming personality.
- Start by sewing the body pieces together. Place the two body pieces right sides together and pin along the edges.
- Sew along the pinned edges, leaving an opening for stuffing.
- Turn the body right side out through the opening and press the seams flat.
Sewing the Head
Sewing the head is similar to sewing the body.
- Place the two head pieces right sides together and pin along the edges.
- Sew along the pinned edges, leaving an opening for stuffing.
- Turn the head right side out through the opening and press the seams flat.
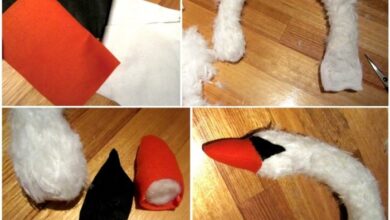
Sewing the Ears
The ears require a slightly different approach:
- Place the two ear pieces right sides together and pin along the edges.
- Sew along the pinned edges, leaving the bottom open.
- Turn the ears right side out and press the seams flat.
Sewing the Tail
The tail is the simplest piece to sew:
- Fold the tail piece in half lengthwise, right sides together, and pin along the edges.
- Sew along the pinned edges, leaving the bottom open.
- Turn the tail right side out and press the seams flat.
Sewing Tips, Plush fox doll diy
To ensure clean and professional seams, consider these tips:
“Always use a new needle for your sewing machine.”
“Use a matching thread color to blend in with the fabric.”
“Press the seams flat after sewing to create a smooth finish.”
Stuffing and Finishing
Now that you’ve sewn your fox doll, it’s time to bring it to life with stuffing and finishing touches. This step allows you to give your plush friend its unique personality and shape.
Stuffing the Fox Doll
The right stuffing material is key to achieving a soft and cuddly fox doll. Here are some popular options:
- Polyester Fiberfill:This is the most common stuffing material for plush toys. It’s affordable, readily available, and provides a soft and fluffy texture.
- Wool:Wool is a natural and hypoallergenic option, offering a luxurious feel. However, it can be more expensive than polyester fiberfill.
- Cotton Balls:While not as commonly used, cotton balls can provide a unique texture and feel. However, they can be more difficult to work with and may clump together.
- Recycled Materials:Consider using recycled materials like old t-shirts or socks to create a more eco-friendly stuffed animal.
To stuff your fox doll evenly, follow these steps:
- Start with the legs and tail:Use a tool like a chopstick or knitting needle to push the stuffing into the legs and tail, ensuring they are filled to the desired firmness.
- Move to the body:Carefully stuff the body, making sure to distribute the stuffing evenly. Avoid overstuffing, as this can make the doll too firm.
- Finish with the head:Use a small amount of stuffing to fill the head, leaving some space for the eyes, nose, and mouth.
Adding Details
Once your fox doll is stuffed, it’s time to add the finishing touches. This is where you can truly personalize your creation.
- Eyes:You can use safety eyes, buttons, or even embroidery to create the eyes. Safety eyes are the most secure option, especially for young children.
- Nose:Use a small button, a felt triangle, or embroidery to create the nose.
- Mouth:A simple embroidered smile or a stitched line can create a cute mouth for your fox doll.
Remember to secure all embellishments firmly to prevent them from coming loose.
Conclusion: Plush Fox Doll Diy

You’ve now learned the essential steps involved in creating your own plush fox doll. By following the instructions, you’ve gained the skills to design and sew a cuddly companion. Remember, this is just a starting point. The beauty of this project lies in its adaptability.
You can customize your fox doll in countless ways.
Embracing Creativity
- Experiment with Fabrics:Explore different textures, patterns, and colors. Try using faux fur, felt, or even recycled materials to create unique looks.
- Add Personal Touches:Incorporate embellishments like buttons, ribbons, or embroidery to give your fox doll a distinct personality.
- Design Variations:Create different fox expressions by altering the shape of the ears, eyes, or nose. You can even make a family of foxes with varying sizes and colors.