Project restyle bedside lamps is a fantastic way to add a personal touch to your bedroom décor and create a unique space that reflects your style. Whether you’re looking to refresh a tired old lamp or give a new one a personalized twist, this project offers a fun and rewarding way to express your creativity.
From choosing the right materials and tools to exploring various restyling techniques, this guide will walk you through every step of the process. We’ll cover everything from transforming the lamp base to refinishing or painting the lampshade, ensuring you have the knowledge and confidence to create a stunning result.
Understanding the Project
Restyling bedside lamps is a project that aims to breathe new life into these everyday objects, transforming them from functional necessities into stylish accents that enhance the ambiance of a bedroom. This project explores the potential of reimagining bedside lamps, embracing creativity and design to elevate their aesthetic appeal and functionality.
Target Audience
The target audience for this project is individuals who appreciate the importance of personal style and seek to create a unique and inviting atmosphere in their bedrooms. This includes homeowners, renters, and anyone who desires to enhance the aesthetic appeal and functionality of their bedside lamps.
This project caters to a diverse audience with varying design preferences and budgets, offering inspiration and practical guidance for restyling bedside lamps to suit individual tastes and needs.
Key Design Elements
The project focuses on key design elements that influence the overall aesthetic and functionality of bedside lamps. These elements include:
- Shape and Form:The shape and form of the lamp base and shade play a crucial role in defining its visual appeal. Classic designs often feature rounded bases and conical shades, while contemporary styles might incorporate geometric shapes or abstract forms.
- Materials:The materials used in the construction of the lamp, such as metal, wood, glass, or fabric, influence its overall aesthetic and durability. Metal lamps often convey a modern and sleek look, while wood lamps exude warmth and rustic charm.
- Color and Finish:The color and finish of the lamp can dramatically impact its visual impact and integration into the surrounding décor. Neutral colors like black, white, and gray offer versatility, while bolder hues can create a statement piece.
- Light Source:The type of light source used, whether it’s an incandescent bulb, LED, or fluorescent, affects the quality and intensity of the light emitted. LED bulbs are becoming increasingly popular due to their energy efficiency and long lifespan.
- Functionality:The functionality of the lamp is also a key consideration. Some lamps feature adjustable arms or swivel heads, allowing for greater control over light direction. Others might incorporate built-in charging ports or USB outlets, adding practicality to the design.
Research and Inspiration

Restyling bedside lamps is a fantastic way to inject personality and style into your bedroom. It’s a project that allows you to unleash your creativity and transform an ordinary lamp into a statement piece. To get started, it’s helpful to explore existing projects and understand current design trends.
Examples of Successful Bedside Lamp Restyling Projects
Successful bedside lamp restyling projects often involve a combination of creativity, resourcefulness, and attention to detail. They showcase how simple modifications can drastically alter the look and feel of a lamp. Here are some examples:
- A vintage lampshade was given a modern twist by replacing its fabric with a bold geometric pattern. This created a striking contrast against the lamp’s classic base, making it a focal point in the room.
- A plain metal lamp base was transformed with a layer of metallic paint, adding a touch of glamour and sophistication. The new finish complemented the existing lampshade, creating a cohesive and elegant look.
- An old lampshade was covered with a layer of natural fabric, such as burlap or linen, to achieve a rustic and cozy aesthetic. The earthy texture added warmth and character to the lamp, making it a perfect fit for a farmhouse-style bedroom.
Design Trends and Popular Styles
Understanding current design trends can help you create a bedside lamp that complements your bedroom’s overall style. Popular styles include:
- Mid-Century Modern:This style is characterized by clean lines, geometric shapes, and warm wood tones. Consider using a simple, sculptural lamp base and a fabric lampshade with a geometric pattern.
- Industrial Chic:This style features exposed metal, reclaimed wood, and a touch of vintage charm. Choose a lamp base with a metallic finish and a lampshade made from natural materials, such as burlap or leather.
- Bohemian:This style is known for its eclectic mix of patterns, textures, and colors. Consider using a lamp base with a unique shape or a lampshade with a vibrant floral print.
- Scandinavian:This style emphasizes simplicity, functionality, and natural materials. Choose a lamp base with a minimalist design and a lampshade made from linen or cotton.
Impact of Materials and Finishes, Project restyle bedside lamps
The materials and finishes used for your bedside lamp can significantly impact its overall aesthetic. Here’s a breakdown:
- Metal:Metal lamp bases can range from sleek and modern to rustic and vintage. Consider finishes like chrome, brass, copper, or black metal to create different looks.
- Wood:Wooden lamp bases offer a natural and warm aesthetic. Consider using reclaimed wood for a rustic look or polished wood for a more sophisticated feel.
- Glass:Glass lamp bases can add a touch of elegance and sophistication. Consider clear glass for a minimalist look or colored glass for a bolder statement.
- Fabric:The fabric used for your lampshade can dramatically change the overall look of your lamp. Consider patterns, textures, and colors to create the desired effect.
Design Considerations
Restyling a bedside lamp can be a fun and rewarding project, allowing you to transform a tired old fixture into a stylish focal point for your bedroom. There are various approaches you can take, each with its own set of advantages and considerations.
This section delves into different restyling methods, outlining a step-by-step guide for a specific project, and breaking down the process into distinct phases.
Types of Restyling Approaches
There are several ways to restyle a bedside lamp, each offering unique opportunities to enhance its appearance and functionality. Here are some common approaches:
- Paint:This is a simple and cost-effective way to give your lamp a fresh look. You can choose a solid color, use a patterned stencil, or even create a distressed effect for a vintage feel.
- Fabric:Covering the lampshade with fabric is another popular option. This allows for endless creative possibilities, as you can use a wide range of materials, textures, and patterns.
- Hardware:Replacing the lamp’s hardware, such as the base, finial, or switch, can instantly change its style. You can find a variety of replacement parts in antique shops, online retailers, or home improvement stores.
- Decoupage:This technique involves adhering paper, fabric, or other materials to the lamp using glue and varnish. It’s a great way to add unique textures and patterns to your lamp.
- Upcycling:This involves transforming an existing object into something new and useful. For example, you could use an old teapot or a vintage vase as the base for your lamp.
Step-by-Step Guide: Restyling a Lamp with Fabric
Let’s delve into a specific restyling project: covering a lampshade with fabric. This step-by-step guide will provide you with a clear roadmap for transforming your lamp.
Phase 1: Preparation
- Gather Materials:You’ll need fabric, a lampshade, a glue stick, scissors, a ruler, and a pencil. Choose a fabric that complements your bedroom decor and is easy to work with.
- Measure and Cut:Measure the lampshade’s circumference and height. Add a few inches to each measurement for seam allowance. Cut the fabric to these dimensions.
- Clean the Lampshade:Wipe down the lampshade with a damp cloth to remove dust and debris.
Phase 2: Covering the Lampshade
- Apply Glue:Apply a thin layer of glue to the lampshade, working in sections. Avoid getting glue on the inside of the lampshade.
- Attach the Fabric:Carefully smooth the fabric onto the lampshade, starting at the bottom and working your way up. Make sure the fabric is taut and wrinkle-free.
- Trim and Secure:Trim any excess fabric at the top and bottom of the lampshade. Use a glue stick to secure the fabric edges to the lampshade.
Phase 3: Finishing Touches
- Let it Dry:Allow the glue to dry completely before using the lamp.
- Decorate:If desired, add embellishments to the lampshade, such as ribbons, beads, or buttons.
Materials and Tools
The materials you choose for restyling your bedside lamps will significantly impact the final look and feel of your project. Selecting the right materials and tools can help you achieve the desired aesthetic while ensuring a successful and long-lasting transformation.
Revamping my bedside lamps has become a fun weekend project. I’m adding a touch of vintage charm by covering the lampshades with leather. It’s a bit trickier than sewing fabric, but I’ve found some great tips for sewing leather online.
Now, with the right needles and thread, I’m ready to tackle those curves and create a unique look for my lamps.
Materials
The materials you choose will be determined by the style you want to achieve and your budget.
My bedside lamps were looking a little tired, so I decided to tackle a project to restyle them. I was inspired by the eclectic mix of vintage and modern pieces featured in a beautiful mess zooey magazine , and I wanted to create a similar vibe for my own lamps.
I’m thinking about adding some fun patterned lampshades and maybe even a touch of metallic paint. It’s going to be a fun and creative project!
- Paint:Spray paint is a popular choice for restyling lamps due to its ease of application and even coverage. Acrylic paint offers a wide range of colors and finishes, while chalk paint provides a vintage, distressed look. Consider the type of finish you want (matte, satin, gloss) and the durability required.
Giving my bedside lamps a makeover is a fun project, especially since I’m using leftover paint from a recent DIY. It’s always a good idea to have a plan, like following elsies guide to painting with kiddos for some inspiration, before you start painting.
I’m thinking of adding some whimsical details to the lamps, maybe some stenciled stars or stripes. It’s all about adding a personal touch and making my bedroom feel more cozy.
- Fabric:If you’re covering the lampshade, fabric plays a key role in defining the lamp’s style. Cotton, linen, silk, and velvet are popular choices, each offering different textures and levels of formality.
- Hardware:New lampshades, finials, and cords can dramatically change the look of a lamp. You can find these items in a variety of styles and materials, including metal, glass, and ceramic.
- Adhesive:Depending on the materials you’re working with, you’ll need a strong adhesive to secure fabric to lampshades, attach hardware, or create decorative accents. Fabric glue, hot glue, and epoxy are common choices.
- Decorative Elements:These can include anything from beads and sequins to ribbons and lace. Choose elements that complement the overall style of your lamp.
Tools
The tools you need will depend on the specific steps involved in your restyling project. However, some basic tools are essential.
- Screwdriver:You’ll need a screwdriver to disassemble the lamp and replace any hardware.
- Pliers:Pliers are useful for removing and installing lampshades, as well as for bending and cutting wires.
- Scissors:You’ll need scissors for cutting fabric, ribbon, and other decorative materials.
- Paintbrushes:If you’re using paint, you’ll need brushes to apply it evenly and create a smooth finish.
- Sandpaper:Sandpaper is essential for preparing surfaces for painting, smoothing out rough edges, and creating a distressed look.
- Measuring Tape:You’ll need a measuring tape to determine the size of the lampshade and to cut fabric accurately.
- Masking Tape:Masking tape is helpful for protecting areas you don’t want to paint, such as the base of the lamp.
- Work Gloves:Work gloves are essential for protecting your hands from paint, adhesives, and sharp edges.
- Safety Glasses:Safety glasses are important for protecting your eyes from flying debris when working with tools or sanding.
Restyling Techniques
This section dives into the practical side of lamp restyling, exploring different techniques for transforming the lamp base and refinishing or painting the lampshade. We’ll cover a variety of approaches, from simple to more advanced, to help you create a unique and stylish lamp that complements your décor.
Transforming the Lamp Base
The lamp base is the foundation of your restyling project. It’s the first thing people see, and it sets the tone for the overall design. There are numerous ways to transform a lamp base, depending on the original material and your desired aesthetic.
Here are some common techniques:
- Painting:This is a versatile and affordable technique for changing the color and finish of a lamp base. You can use acrylic paint, spray paint, or even chalk paint for a distressed look.
- Decoupage:This technique involves applying decorative paper, such as patterned paper, fabric, or even magazine clippings, to the lamp base. It’s a great way to add a touch of whimsy or vintage charm.
- Mosaic:Mosaic tiles, glass beads, or even broken china can be used to create a unique and eye-catching mosaic design on the lamp base. This technique requires a bit more patience and skill, but the results are truly stunning.
- Sandblasting:This technique uses a high-pressure stream of abrasive material to etch designs or patterns onto the lamp base. It’s a great option for creating a unique and personalized look.
- Metalworking:If the lamp base is made of metal, you can explore techniques like hammering, embossing, or even welding to create a custom design.
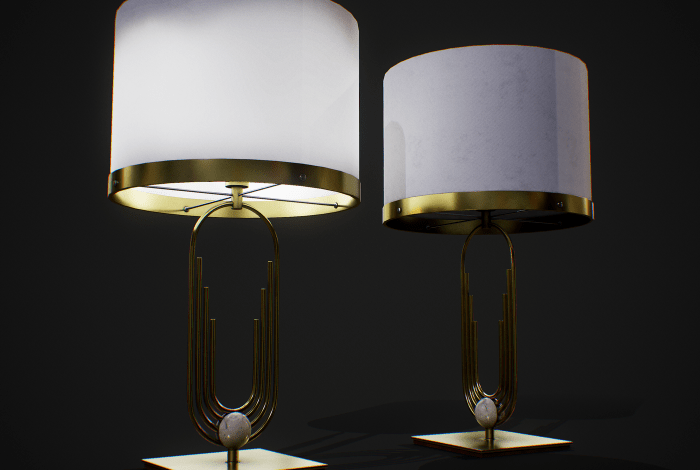
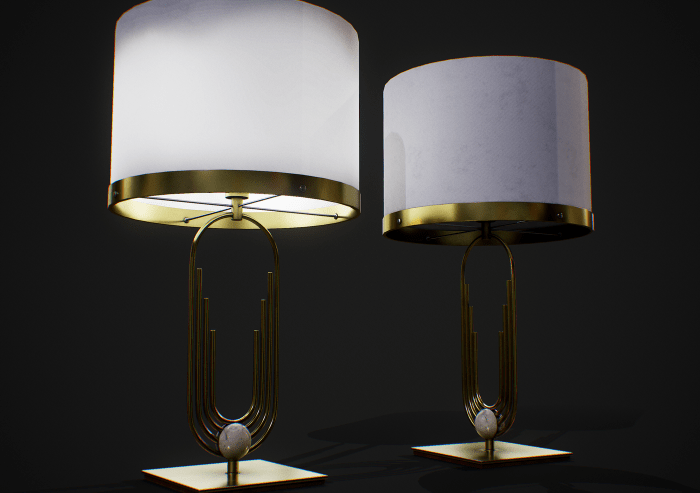
Refinishing or Painting the Lampshade
The lampshade plays a crucial role in determining the overall ambiance of the lamp. A well-chosen lampshade can add warmth, drama, or a touch of elegance. Refinishing or painting the lampshade allows you to create a custom look that complements the restyled lamp base.
Refinishing Techniques
- Sanding:Sanding the lampshade removes any imperfections or old finishes, preparing it for a new coat of paint or fabric. Use a fine-grit sandpaper to avoid scratching the surface.
- Fabric Covering:This technique involves covering the existing lampshade with a new fabric. It’s a great way to refresh the look of an old lampshade or to create a custom design.
- Decoupage:Similar to the lamp base, you can use decoupage techniques to add decorative paper or fabric to the lampshade.
Painting Techniques
- Spray Painting:Spray paint provides a smooth and even finish, making it ideal for painting lampshades. Choose a spray paint specifically designed for fabric or paper.
- Brush Painting:You can also use a brush to apply paint to the lampshade, but it requires more precision and care to avoid streaks or uneven coverage.
- Chalk Paint:Chalk paint provides a matte finish and is easy to apply. It’s a great option for creating a distressed or vintage look.
Tips for a Professional Finish
- Prepare the Surface:Before applying any paint or finish, clean the lamp base and lampshade thoroughly with soap and water. If there are any imperfections, sand them down with fine-grit sandpaper.
- Use Primer:Primer helps the paint adhere better and provides a smooth, even surface for painting. Choose a primer that is compatible with the type of paint you are using.
- Apply Thin Coats:It’s better to apply multiple thin coats of paint than one thick coat. This helps prevent the paint from cracking or peeling.
- Let Each Coat Dry Completely:Allow each coat of paint to dry completely before applying the next. This ensures a smooth and even finish.
- Use a Protective Finish:Once the paint is dry, apply a protective finish, such as a sealant or varnish, to protect the paint from scratches and wear.
Lighting Considerations
The light bulb you choose for your bedside lamp plays a crucial role in creating the right ambiance and functionality for your bedroom. Selecting the right bulb can transform your space from a dull and uninviting room to a cozy and inviting retreat.
Bulb Types and Their Impact on Ambiance
The type of light bulb you choose can significantly impact the overall atmosphere of your bedroom. Here’s a breakdown of different bulb types and their effects on ambiance:
- Incandescent Bulbs:These traditional bulbs emit a warm, yellowish light that creates a cozy and relaxing atmosphere. However, they are energy-inefficient and produce a lot of heat.
- Halogen Bulbs:Similar to incandescent bulbs, halogen bulbs emit a warm, yellowish light. They are more energy-efficient and produce less heat than incandescent bulbs, but they are still less efficient than LED bulbs.
- Fluorescent Bulbs:These bulbs emit a bright, cool white light that is often used for task lighting. They are energy-efficient and have a long lifespan, but they can sometimes emit a flickering light that can be distracting.
- LED Bulbs:LED bulbs are the most energy-efficient option and have a very long lifespan. They are available in various color temperatures, from warm white to cool white, allowing you to customize the ambiance of your bedroom.
Creating a Comfortable and Functional Lighting Experience
To create a comfortable and functional lighting experience in your bedroom, consider the following factors:
- Color Temperature:Warm white (2700-3000 Kelvin) bulbs create a cozy and relaxing atmosphere, while cool white (4000-4500 Kelvin) bulbs are better for task lighting.
- Brightness:The brightness of your bedside lamp should be sufficient for reading or other activities but not too bright to disturb your sleep.
- Dimmability:A dimmable bedside lamp allows you to adjust the brightness to suit your needs, creating a more versatile lighting experience.
- Multiple Light Sources:Consider incorporating multiple light sources in your bedroom, such as a bedside lamp, an overhead fixture, and a reading lamp, to provide different levels of illumination for various activities.
Safety and Maintenance: Project Restyle Bedside Lamps
Restyling your bedside lamp is a fun and creative project, but safety and maintenance are essential to ensure your lamp remains functional and safe for years to come. This section will Artikel safety precautions to take during the restyling process and provide guidelines for maintaining your restored lamp.
Safety Precautions During Restyling
It’s crucial to prioritize safety when working with electrical components. Here are some essential precautions to follow:
- Always unplug the lamp before working on it.
- Avoid using water or any liquid to clean the lamp, as this can cause electrical hazards.
- Use appropriate tools for the task at hand, and be careful not to damage the lamp’s wiring or electrical components.
- Inspect the lamp’s wiring for any damage or wear before using it. Replace any damaged wiring immediately.
- Be cautious when using sharp tools or adhesives, as they can cause injury or damage to the lamp.
- If you are unsure about any aspect of the restyling process, consult a qualified electrician.
Maintaining the Restored Lamp
Regular cleaning and care are essential for maintaining the functionality and appearance of your restored lamp. Here are some guidelines:
- Dust the lamp regularly with a soft cloth to prevent dust accumulation.
- Clean the lampshade with a damp cloth, avoiding excessive moisture. If the lampshade is fabric, you can use a mild soap solution.
- Inspect the lamp’s wiring and electrical components for any signs of damage or wear. Replace any damaged components immediately.
- If the lamp is equipped with a bulb, ensure that the bulb wattage does not exceed the lamp’s recommended wattage.
- Store the lamp in a cool, dry place when not in use.
Importance of Regular Cleaning and Care
Regular cleaning and maintenance not only enhance the appearance of your lamp but also contribute to its longevity and safety. By following these guidelines, you can ensure your restored lamp remains a beautiful and functional part of your home for years to come.