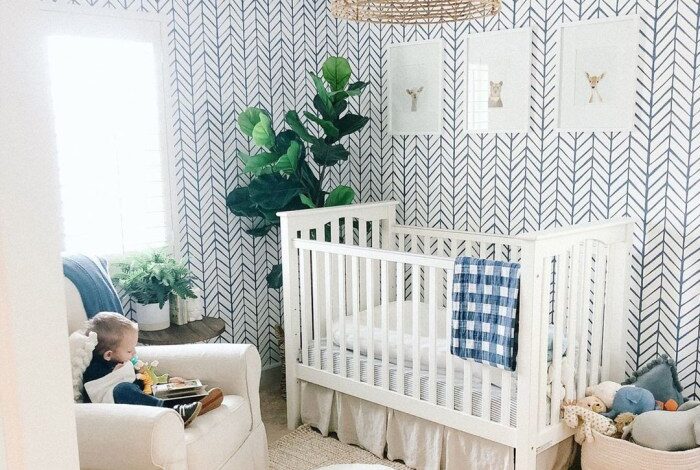
Painted nursery wallpaper DIY sets the stage for this enthralling narrative, offering readers a glimpse into a story that is rich in detail with personal blog style and brimming with originality from the outset. Imagine transforming your baby’s nursery into a whimsical wonderland, a haven of personalized charm, all with the magic of paint and your own creativity.
Painted nursery wallpaper DIY isn’t just about saving money; it’s about crafting a unique and cherished space that reflects your baby’s personality and your design vision.
This guide will take you through every step of the process, from preparing the walls to adding those finishing touches that make your painted wallpaper truly stand out. We’ll explore design techniques, share tips for choosing the right paint and tools, and inspire you with a gallery of stunning designs that will spark your imagination.
Get ready to unleash your inner artist and create a nursery that’s as beautiful as it is personal.
Painted Nursery Wallpaper DIY

Creating a beautiful and unique nursery for your little one is a dream for many parents. Painted nursery wallpaper offers a fantastic alternative to traditional pre-made wallpaper, allowing you to personalize the space with your own creativity and style. This DIY project not only saves you money but also allows you to customize the design to perfectly match your nursery’s theme and color palette.
I’m all about creating a cozy and unique nursery for my little one, and painted nursery wallpaper DIY is definitely on my radar. I love the idea of creating a custom design that reflects my style, and it’s a much more affordable option than buying pre-made wallpaper.
Plus, I can always change it up later! I’m inspired by the “sister style nothing fancy” aesthetic, which embraces simplicity and functionality , and I think that translates beautifully into a nursery space. My goal is to create a room that is both playful and calming, and I think a hand-painted wallpaper will be the perfect way to achieve that.
Benefits of DIY Painted Nursery Wallpaper
Painted nursery wallpaper provides several advantages over pre-made options.
Painting nursery wallpaper is a fun and affordable way to personalize your little one’s space, but sometimes you need a little inspiration. Check out how Weir Sons collaborated with Banjoman to produce a nostalgic advert – weir sons collaborate banjoman produce nostalgic advert – for some creative ideas.
The vintage feel might just spark the perfect theme for your DIY nursery wallpaper project!
- Cost-Effective:Painting your own wallpaper is significantly cheaper than purchasing pre-made options, especially for larger spaces.
- Customization:You have complete control over the design, colors, and patterns, allowing you to create a truly unique and personalized space for your baby.
- Easy to Remove:Unlike traditional wallpaper, painted wallpaper can be easily removed without damaging the walls, making it a great option for renters or those who may want to change the look of their nursery in the future.
- Unique Designs:You can create intricate patterns, geometric designs, or even incorporate your baby’s name or initials into the wallpaper.
Choosing a Paint Color Palette
Selecting the right color palette is crucial for creating a harmonious and inviting nursery.
- Consider the Theme:Choose colors that complement the overall theme of the nursery. For example, a nautical theme might use blues, greens, and whites, while a woodland theme could incorporate browns, greens, and creams.
- Light and Space:Lighter colors can make a small room feel larger and brighter. If you have a large nursery, you can use darker colors to create a cozy and intimate atmosphere.
- Mood:Consider the mood you want to create. Calming colors like blues and greens are often used in nurseries, while warmer colors like yellows and oranges can be more stimulating.
- Personal Preferences:Ultimately, choose colors that you and your partner love and that you feel will create a welcoming space for your baby.
Preparing the Walls
A smooth and clean surface is crucial for a successful painted wallpaper effect. Preparing your walls properly ensures the paint adheres well and creates a seamless, professional-looking finish.
Cleaning the Walls
Thoroughly cleaning your walls removes dust, dirt, grease, and other debris that can interfere with paint adhesion. This step is essential for a smooth and even surface.
- Use a damp cloth and mild detergent to wipe down the entire surface. Avoid harsh chemicals that could damage the wall.
- Pay special attention to areas prone to dirt and grime, such as around light switches, door frames, and baseboards.
- Rinse the walls with clean water and allow them to dry completely before proceeding to the next step.
Patching Imperfections
Before painting, it’s essential to address any imperfections on the walls, such as cracks, holes, or dents. Patching these areas ensures a smooth surface and prevents paint from highlighting these flaws.
- Use spackling paste or joint compound to fill in cracks and holes. Apply the compound with a putty knife, ensuring it’s level with the surrounding wall surface.
- Let the compound dry completely according to the manufacturer’s instructions. Sand the patched areas with fine-grit sandpaper to create a smooth, seamless transition with the rest of the wall.
- For larger holes or dents, you may need to use a drywall patch or mesh tape to reinforce the area before applying spackling paste.
Sanding the Walls
Sanding the walls creates a smooth surface that promotes better paint adhesion. This step is especially important if your walls have a textured finish or if you’ve recently patched any imperfections.
- Use fine-grit sandpaper (120-grit or higher) to lightly sand the entire wall surface. This removes any bumps, imperfections, or loose paint.
- Sand in a circular motion, applying light pressure to avoid damaging the wall.
- After sanding, wipe the walls with a damp cloth to remove dust and debris.
Priming the Walls
Priming is an essential step in preparing your walls for painting. Primer acts as a bonding agent between the wall surface and the paint, enhancing adhesion and creating a uniform base for the paint to adhere to.
“Primer helps the paint to adhere better and provides a smoother finish, which is especially important when using lighter paint colors.”
- Choose a primer specifically designed for the type of paint you’ll be using. For example, if you’re using latex paint, use a latex primer.
- Apply the primer with a roller or brush, ensuring even coverage. Allow the primer to dry completely before applying the paint.
Designing the Wallpaper Pattern
The fun part of this DIY project is designing your unique nursery wallpaper pattern. There are many approaches you can take, each offering a different level of complexity and creativity.
Freehand Drawing
Freehand drawing allows for a more organic and personalized look. You can use pencils, crayons, or even markers to sketch your design directly onto the wall. This method is perfect for those who are comfortable with drawing and enjoy a less structured approach.
Painting nursery wallpaper is a great way to add personality and whimsy to a little one’s room, and it’s a project that can be done on a budget. If you’re looking for inspiration, check out the amazing transformation of Mandi’s dining room mandis dining room before after , which shows how a little paint can make a big difference.
Just like Mandi’s dining room, you can create a truly unique space for your little one with a little creativity and some DIY spirit!
- Consider using a light pencil for initial sketches, which can be easily erased if needed.
- Practice your design on paper first to get a feel for the scale and proportions.
- Use painter’s tape to create straight lines or borders for your design if needed.
Stencils
Stencils provide a precise and consistent way to create repeating patterns. They are available in various shapes and sizes, and you can even create your own using cardstock or acetate sheets. Simply place the stencil on the wall, apply paint through the cutouts, and then remove the stencil.
- Stencils are ideal for intricate designs or those requiring precise repetition.
- They come in a wide range of materials, from plastic to metal, offering varying levels of durability and price.
- Consider using a stencil brush for applying paint through the stencil to avoid bleeding or smudging.
Masking Tape
Masking tape is a versatile tool for creating geometric patterns and borders. Simply stick the tape onto the wall in the desired shape, paint over it, and then remove the tape to reveal your design.
- Masking tape is easy to use and allows for clean lines and precise shapes.
- It’s perfect for creating simple geometric patterns like stripes, squares, and triangles.
- Use a sharp utility knife to cut the tape into desired shapes or patterns.
Choosing Shapes and Patterns
The choice of shapes and patterns for your nursery wallpaper is entirely up to your personal preference. You can go for classic geometric shapes like circles, squares, and triangles, or explore more whimsical patterns like clouds, stars, and animals.
- Consider the overall theme of the nursery and choose patterns that complement the decor.
- Use different sizes and scales of shapes to create visual interest and depth.
- Experiment with color combinations to create a unique and engaging look.
Designing a Simple Geometric Pattern
Here’s a step-by-step guide to designing a simple geometric pattern using masking tape:
- Choose a basic shape like a square, triangle, or circle.
- Decide on the size and spacing of your pattern.
- Use a pencil to lightly sketch the Artikel of your pattern on the wall.
- Apply masking tape along the sketched lines, ensuring the tape is securely attached.
- Paint over the taped areas with your chosen color.
- Carefully remove the masking tape once the paint is dry.
Painting the Wallpaper

Now that your wallpaper design is ready, it’s time to bring it to life with paint! This step requires patience and precision, but with the right tools and techniques, you can achieve stunning results.
Choosing the Right Paint Brushes and Rollers
Selecting the right paint brushes and rollers is crucial for a smooth and even application.
- For intricate details and small spaces, use a high-quality, angled brush with a soft bristle. These brushes are ideal for applying paint to tight corners and around stencils.
- For larger areas, a roller with a nap length suitable for your paint and surface is essential. A short-nap roller (1/4 inch) is generally recommended for smooth surfaces, while a longer nap (3/8 inch) works well for textured walls.
- Consider purchasing a brush and roller set specifically designed for painting wallpaper. These sets typically include a brush for detail work and a roller for covering larger areas.
Applying Paint Evenly and Thinly, Painted nursery wallpaper diy
- Use even strokes and apply thin coats of paint. Too much paint can lead to drips and uneven coverage.
- Work in small sections, reloading your brush or roller frequently to ensure consistent paint application.
- Allow each coat to dry completely before applying the next. This helps prevent paint from smudging and ensures a smooth finish.
Creating Clean Lines and Crisp Edges
- For crisp edges and sharp lines, use painter’s tape to mask off areas you don’t want to paint.
- Press the tape firmly against the surface to ensure a good seal.
- Apply paint carefully along the edge of the tape, using a light touch.
- Remove the tape immediately after painting, before the paint dries completely. This will prevent the paint from peeling or tearing.
Finishing Touches
Now that your painted nursery wallpaper is complete, it’s time to add the finishing touches that will truly make it shine! Think of these finishing touches as the cherry on top, adding personality and charm to your creation.
There are endless possibilities for embellishing your painted wallpaper, ranging from simple accents to elaborate details. The key is to choose elements that complement your chosen design and reflect the overall theme of the nursery. These finishing touches will add a touch of whimsy and make your wallpaper truly unique.
Adding Accents
Adding accents to your painted nursery wallpaper is a great way to add personality and visual interest. You can use a variety of materials, such as stencils, stickers, or even fabric scraps, to create unique and eye-catching accents.
- Stencils: Stencils are a great way to add intricate patterns or designs to your wallpaper. You can find stencils in a variety of shapes and sizes, or you can even create your own. Simply place the stencil over your painted wallpaper and use a paintbrush or sponge to apply paint through the cut-out areas.
You can choose to use the same color as your wallpaper for a subtle effect, or you can use contrasting colors to create a bold statement.
- Stickers: Stickers are a quick and easy way to add accents to your wallpaper. You can find stickers in a variety of themes, such as animals, stars, or clouds. Simply peel and stick the stickers to your wallpaper. For a more personalized touch, you can even create your own stickers using a cutting machine or by hand.
- Fabric Scraps: Fabric scraps can be used to add a touch of texture and color to your wallpaper. You can sew fabric scraps together to create a unique pattern or you can simply glue them onto your wallpaper. For a more whimsical touch, you can use fabric scraps to create 3D elements, such as flowers or butterflies.
Embellishments
Embellishments can add a touch of sparkle and texture to your painted nursery wallpaper. You can use a variety of materials, such as glitter, beads, or even fabric flowers, to create unique and eye-catching embellishments.
- Glitter: Glitter is a great way to add a touch of sparkle to your wallpaper. You can use a brush to apply glitter directly to your wallpaper, or you can mix glitter with glue to create a more textured effect.
For a more subtle effect, you can use fine glitter. For a bolder look, you can use chunky glitter.
- Beads: Beads can be used to add a touch of color and texture to your wallpaper. You can use a variety of beads, such as wooden beads, glass beads, or plastic beads. You can glue the beads directly onto your wallpaper or you can use a needle and thread to sew them on.
For a more whimsical touch, you can use beads to create a border or a pattern.
- Fabric Flowers: Fabric flowers are a great way to add a touch of softness and color to your wallpaper. You can find fabric flowers in a variety of colors and sizes, or you can even make your own. Simply glue the fabric flowers onto your wallpaper.
For a more whimsical touch, you can use fabric flowers to create a border or a garland.
Protecting Your Painted Wallpaper
Once your painted nursery wallpaper is complete, it’s important to protect it from wear and tear. Here are a few tips for protecting your painted wallpaper:
- Apply a sealant: A sealant will help to protect your painted wallpaper from scratches, stains, and fading. You can find sealants specifically designed for painted surfaces. Apply the sealant according to the manufacturer’s instructions.
- Avoid using harsh cleaners: When cleaning your painted wallpaper, avoid using harsh cleaners or abrasive scrubbers. These can damage the paint and the wallpaper. Use a mild soap and water solution and wipe gently with a soft cloth.
- Keep furniture away from the walls: Furniture can rub against the walls and cause scratches or scuffs. Keep furniture away from the walls to minimize the risk of damage.