DIY Modern Metallic Candle Holders: Elevate Your Home Decor with Effortless Elegance
Crafting your own home decor is a rewarding way to infuse your living space with personality and style. Among the most versatile and impactful DIY projects are modern metallic candle holders. These aren’t just functional pieces to illuminate your rooms; they are statement decor elements that can dramatically transform the ambiance, adding a touch of sophistication and contemporary flair. The allure of metallic finishes, from brushed brass and polished chrome to antique gold and rose gold, lies in their ability to reflect light, create a sense of luxury, and complement a wide range of interior design aesthetics. This comprehensive guide will walk you through various DIY modern metallic candle holder projects, catering to different skill levels and available materials, ensuring you can achieve stunning results without breaking the bank or requiring professional expertise.
The appeal of DIY projects, particularly those involving home decor, stems from a desire for originality and cost-effectiveness. Store-bought modern metallic candle holders, while beautiful, can often come with a hefty price tag. By engaging in DIY, you gain complete control over the design, size, and finish, allowing you to create pieces that perfectly match your existing decor or serve as unique focal points. Furthermore, the process itself can be a relaxing and creative outlet, providing a sense of accomplishment as you bring your vision to life. Metallic finishes, in particular, are experiencing a resurgence in popularity, appearing in everything from furniture and lighting to small decorative accents. Their inherent reflectivity makes them ideal for enhancing the play of light from candles, creating dynamic shadows and a warm, inviting glow.
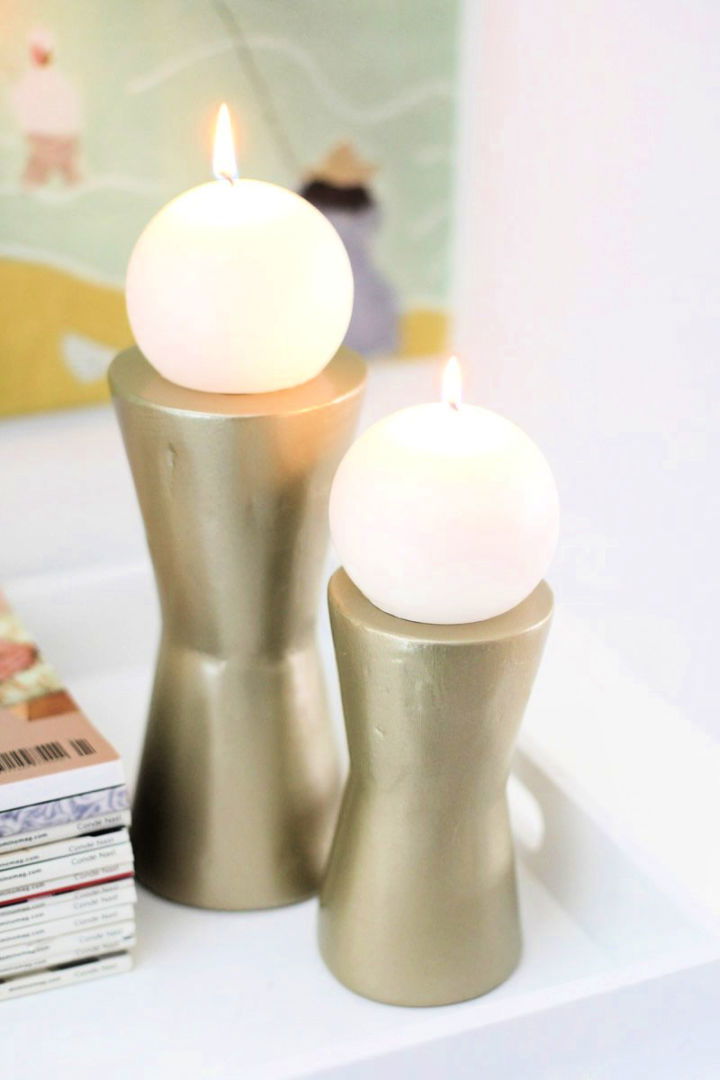
One of the most accessible and versatile methods for creating DIY modern metallic candle holders involves the use of readily available materials and spray paint. This technique allows for experimentation with various metallic hues and textures, making it an excellent starting point for beginners. Consider repurposing everyday objects that have interesting shapes or forms. Old glass jars, tin cans, ceramic vases, or even cardboard tubes can be transformed into chic candle holders with a simple application of metallic spray paint. The key to achieving a professional and sophisticated finish lies in proper preparation. Thoroughly clean your chosen base item, ensuring it is free of any grease, dust, or debris. For glass or ceramic surfaces, a light sanding with fine-grit sandpaper can help the paint adhere better. Apply primer if necessary, especially for porous materials, to ensure even coverage and durability. When spray painting, work in a well-ventilated area and apply multiple thin, even coats rather than one thick layer. This will prevent drips and create a smoother, more uniform metallic sheen. Experiment with different metallic shades: brushed nickel for a cool, contemporary feel; antique brass for a touch of vintage glamour; or rose gold for a trendy and feminine touch. For added visual interest, consider distressing the finish after the paint has dried. Lightly sanding certain areas can reveal the underlying material, creating a more authentic, aged look.
Another popular and surprisingly easy DIY approach for modern metallic candle holders utilizes metallic contact paper or adhesive foils. This method is perfect for projects where you want to achieve a seamless metallic finish without the mess of spray paint, or for adding metallic accents to existing candle holders. Look for high-quality metallic contact papers in finishes like brushed aluminum, stainless steel, or even patterned metallics like hammered copper. The application process is similar to applying a large sticker. Ensure the surface of your candle holder is clean and dry. Carefully peel back the backing of the contact paper and slowly apply it to the surface, smoothing out any air bubbles with a credit card or a squeegee as you go. For curved surfaces, gently stretch the material to conform to the shape. This technique is particularly effective for covering cylindrical objects like tin cans, large glass jars, or even plain wooden blocks. You can also cut the contact paper into strips to wrap around the base of existing candle holders, adding a subtle metallic band for a touch of modern flair. For a more intricate design, use craft punches or stencils to create metallic patterns on the contact paper before applying it.
For those seeking a more substantial and textured metallic look, exploring projects that involve metallic clay or even metallic putty can yield impressive results. Polymer clay, when baked, becomes durable and can be easily manipulated into various shapes. Many brands now offer metallic polymer clays in a range of finishes, allowing you to sculpt unique candle holder bases from scratch. This method offers the most creative freedom, enabling you to design geometric shapes, abstract forms, or even more intricate structures. Once sculpted and baked according to the manufacturer’s instructions, you can further enhance the metallic finish by buffing the baked clay with a soft cloth to bring out its natural sheen, or by applying a metallic wax or glaze for a more polished look. Metallic putty or filler, often used for patching holes in walls, can also be a surprisingly effective medium for creating textured metallic surfaces. Apply it to a sturdy base, such as a wooden block or a repurposed ceramic container, and then sculpt or texture the putty while it’s still wet. Once dried and hardened, you can paint over it with metallic spray paint or apply metallic waxes for a rugged, industrial-inspired aesthetic.
Investing in metallic paint mediums, such as metallic acrylic paints or metallic waxes, opens up a world of possibilities for transforming ordinary objects into elegant candle holders. Unlike spray paints, these mediums offer greater control and allow for layering and subtle color blending. Metallic acrylic paints can be applied with brushes to create a smooth, opaque metallic finish or used in thin washes to create a translucent shimmer. Experiment with layering different metallic shades – for instance, a base of antique gold followed by a delicate wash of copper – to achieve depth and complexity. Metallic waxes, on the other hand, are ideal for adding a luminous, high-shine finish to a variety of surfaces. They can be applied with a soft cloth or a brush and then buffed to a brilliant gleam. This is an excellent technique for highlighting embossed patterns or creating a subtle metallic patina on distressed surfaces. Consider using these metallic paints and waxes on a variety of bases: old wine bottles can be transformed into tall, elegant candle holders; plain wooden planks can be painted and embellished for a rustic-modern look; and even concrete blocks can be given a sophisticated metallic makeover.
When designing and creating your DIY modern metallic candle holders, consider the type of candles you intend to use. Tealights require shallow holders with sufficient surface area to support the small flame, while pillar candles need sturdier, deeper bases to prevent tipping. Taper candles, with their slender profile, often benefit from holders with a well or a narrow opening to secure them upright. Safety should always be a paramount consideration. Ensure that your candle holders are stable and made from materials that are heat-resistant. Avoid highly flammable materials for the base of the holder, especially if the candle flame will be in close proximity. Always leave adequate space between the flame and any flammable decorative elements. If you are using materials like wood, consider sealing them with a fire-retardant sealant or ensuring that the candle is elevated or contained within a non-flammable element like a glass insert. When repurposing items like tin cans, ensure there are no sharp edges, and if necessary, file them down or cover them with a protective material.
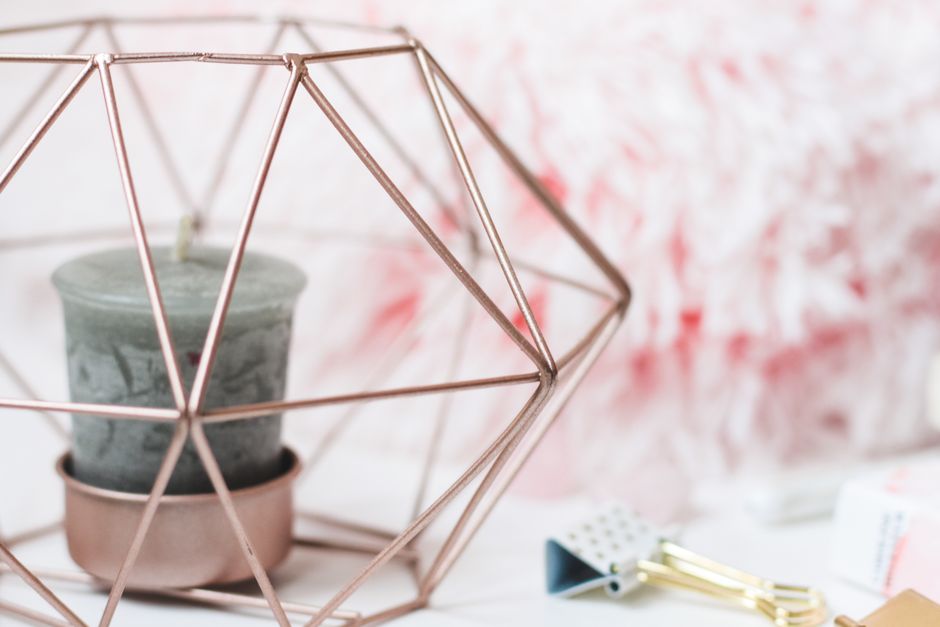
Beyond simple paint and foil applications, more advanced DIYers can explore incorporating metallic elements through soldering or metalworking techniques. For those with access to basic soldering equipment, copper or brass sheeting can be cut, shaped, and soldered to create truly bespoke metallic candle holders. This allows for intricate geometric designs, hammered textures, or even articulated structures. Working with sheet metal requires precision and safety precautions, including the use of heat-resistant gloves and eye protection. Alternatively, for those interested in a more industrial aesthetic, welding can be employed to fuse metal components into unique candle holder designs. This method is best suited for experienced metalworkers and typically involves using steel or iron, which can then be treated with metallic paints or patinas for the desired finish. Even without advanced metalworking skills, simple techniques like using metallic wire to wrap around glass or ceramic bases, or to create decorative cages for candles, can add a sophisticated metallic touch.
To enhance the overall aesthetic and functionality of your DIY modern metallic candle holders, consider incorporating additional decorative elements. For example, when using glass jars as a base, you can etch designs into the glass before or after applying a metallic finish. This can be achieved using etching cream or a Dremel tool. Another idea is to wrap the metallic candle holders with natural elements like jute twine or leather cord for a textural contrast. Small metallic beads, charms, or even faux gems can be adhered to the surface using strong adhesive for added sparkle and visual interest. For a truly unique touch, consider incorporating found objects with metallic finishes, such as old clock gears, vintage keys, or small decorative metal figurines. These elements can be incorporated into the design of your candle holder, adding a narrative and personalized feel.
When it comes to styling your DIY modern metallic candle holders, think about how they will integrate into your existing decor. Grouping candle holders of varying heights and metallic finishes can create a striking centerpiece on a dining table or a console. Placing them on bookshelves, mantelpieces, or side tables can add a warm and inviting glow to these often-overlooked areas. Consider the interplay of light and shadow. Metallic surfaces are excellent at reflecting light, so position your candle holders in areas where they can catch the natural light during the day and amplify the candlelight in the evening. For a minimalist aesthetic, opt for clean lines and simple shapes in your metallic candle holder designs. For a more eclectic look, mix and match different metallic finishes and styles. Remember that the beauty of DIY is its adaptability; you can create pieces that perfectly complement your individual style and the unique character of your home.
The SEO optimization for this article hinges on incorporating relevant keywords naturally throughout the text. Keywords such as "DIY modern metallic candle holders," "DIY candle holder ideas," "metallic home decor," "easy DIY crafts," "budget-friendly decor," "spray painted candle holders," "metallic contact paper crafts," "DIY home accents," "elegant candle holders," and "metallic decor projects" are strategically integrated. The article’s structure, with a clear title and direct dive into content, is designed to immediately engage readers searching for specific DIY projects. The comprehensive nature of the guide, covering various techniques, materials, and styling tips, ensures it caters to a broad audience with differing skill levels and interests, thereby increasing its reach and potential for organic search visibility. The detailed explanations and practical advice provided within each section aim to establish the article as a valuable resource for anyone looking to create their own modern metallic candle holders.
