
Lavendar vanilla body butter diy – Lavender vanilla body butter DIY is a delightful way to create a luxurious and aromatic skincare treat right in your own home. This simple recipe combines the calming properties of lavender with the sweet and comforting aroma of vanilla, resulting in a body butter that nourishes, soothes, and leaves your skin feeling soft and supple.
Lavender, known for its calming and relaxing scent, has been used for centuries in aromatherapy and skincare. It’s believed to promote relaxation, reduce stress, and even improve sleep quality. Vanilla, with its warm and comforting aroma, is known for its antioxidant and anti-inflammatory properties.
Together, these ingredients create a truly indulgent experience for your senses and skin.
Introduction to Lavender Vanilla Body Butter
Lavender vanilla body butter is a popular and luxurious skincare product known for its soothing, moisturizing, and aromatic properties. It is a rich, creamy blend of natural ingredients that leaves the skin feeling soft, supple, and delicately scented.This delightful body butter is a testament to the enduring power of nature’s ingredients.
The calming aroma of lavender and the sweet, warm scent of vanilla have been cherished for centuries, not only for their fragrance but also for their therapeutic benefits.
Lavender and Vanilla in Skincare
The use of lavender and vanilla in skincare dates back centuries. Lavender, with its calming and antiseptic properties, has been used for centuries to soothe irritated skin and promote relaxation. Its essential oil is known to reduce inflammation and redness, making it an ideal ingredient for sensitive skin.Vanilla, known for its antioxidant and anti-inflammatory properties, has also been used in skincare for its ability to nourish and protect the skin.
Its extract is rich in vitamins and minerals that help to improve skin elasticity and promote a youthful appearance.
Key Ingredients and Their Properties
Lavender vanilla body butter typically contains a blend of natural ingredients, each contributing to its unique properties. Here are some of the key ingredients and their benefits:
- Shea butter: A rich source of vitamins and fatty acids, shea butter deeply moisturizes and nourishes the skin, leaving it soft and supple. It also has anti-inflammatory properties that can help to soothe irritated skin.
- Cocoa butter: Known for its rich, creamy texture and moisturizing properties, cocoa butter helps to protect the skin from dryness and environmental damage. It also has antioxidant properties that help to protect the skin from free radicals.
- Coconut oil: A natural moisturizer that absorbs easily into the skin, coconut oil provides deep hydration and helps to lock in moisture. It also has antibacterial and antifungal properties that can help to protect the skin from infections.
- Lavender essential oil: Known for its calming and soothing properties, lavender essential oil helps to reduce inflammation and redness. It also has a relaxing aroma that can help to promote sleep and reduce stress.
- Vanilla extract: Rich in antioxidants, vanilla extract helps to protect the skin from free radical damage. It also has a sweet, warm scent that adds a touch of luxury to the body butter.
Benefits of Lavender Vanilla Body Butter

This luxurious body butter is more than just a treat for your skin. It’s a blend of nature’s finest ingredients, each with its own unique benefits.
Making lavender vanilla body butter is such a soothing and relaxing experience. It’s a great way to unwind after a long day and treat yourself to some self-care. The only thing that might be more relaxing is knowing you’re on top of your finances.
If you’re dealing with debt, you might want to check out some resources on units for debt settlement. Once you’ve got your finances in order, you can really focus on indulging in that lavender vanilla body butter!
Benefits of Lavender for Skin and Overall Well-Being
Lavender is known for its calming and soothing properties. It has been used for centuries in aromatherapy and traditional medicine. For your skin, lavender oil can help reduce inflammation, soothe irritation, and promote healing.
Making my own lavender vanilla body butter is a relaxing ritual – I love the scent and the feeling of smooth, hydrated skin. Sometimes, though, I need a little pick-me-up in the morning, so I’ll whip up a cup of coffee.
If you’re a Nespresso fan, check out this article on nespresso receive e10 account credit to see if you can snag a little extra cash for your next coffee fix. Then, I’ll head back to my body butter – it’s the perfect way to start my day feeling pampered and ready for anything.
- Anti-inflammatory properties:Lavender oil contains compounds that can reduce inflammation, making it beneficial for conditions like eczema, psoriasis, and acne.
- Antibacterial properties:Lavender oil has been shown to inhibit the growth of certain bacteria, which can help prevent infections and promote wound healing.
- Calming and relaxing effects:The scent of lavender is known for its calming and relaxing effects, which can help reduce stress and anxiety. This can indirectly benefit your skin by promoting sleep and reducing cortisol levels, which can contribute to skin problems.
Benefits of Vanilla for Skin
Vanilla is a natural moisturizer and antioxidant. Its sweet aroma adds a touch of luxury to your skincare routine.
- Moisturizing properties:Vanilla extract contains natural humectants, which attract and retain moisture in the skin. This helps keep your skin hydrated and supple.
- Antioxidant properties:Vanilla extract contains antioxidants that help protect the skin from damage caused by free radicals. This can help prevent premature aging and maintain a youthful appearance.
- Soothing properties:Vanilla extract has soothing properties that can help calm irritated skin. It can be beneficial for conditions like eczema, psoriasis, and sunburn.
Comparison with Other Body Butters
While other body butters offer their own benefits, lavender vanilla body butter stands out for its unique combination of properties.
- Shea butter:Shea butter is known for its deep moisturizing properties, but it can be heavy and greasy for some skin types. Lavender vanilla body butter offers a lighter and more refreshing alternative.
- Cocoa butter:Cocoa butter is rich in antioxidants and has a slightly firmer texture. Lavender vanilla body butter offers a more delicate scent and a smoother application.
- Coconut butter:Coconut butter is a good source of fatty acids and can be beneficial for dry skin. Lavender vanilla body butter offers a more versatile option that can be used for all skin types.
DIY Lavender Vanilla Body Butter Recipe
This recipe is simple and straightforward, using easily accessible ingredients and equipment. You can easily adjust the quantities to suit your needs.
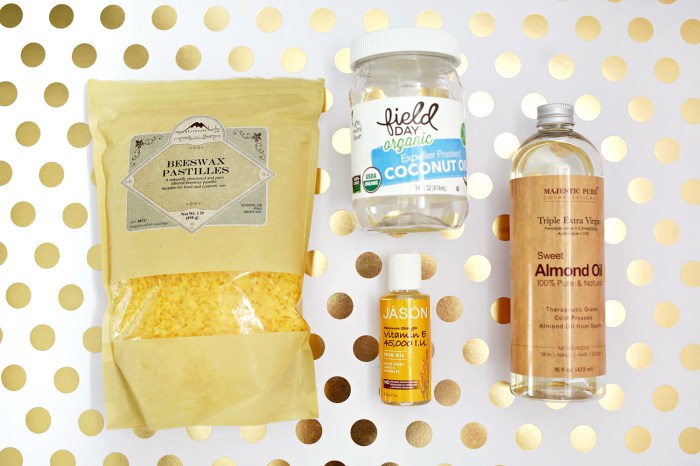
Ingredients and Their Functions
This table provides a comprehensive overview of the ingredients, their quantities, and their functions in the body butter recipe.
| Ingredient | Quantity | Function |
|---|---|---|
| Shea Butter | 1 cup | Provides deep hydration and moisture, softens and nourishes the skin. |
| Coconut Oil | 1/2 cup | Adds a silky texture, provides additional moisture, and helps the butter absorb easily. |
| Mango Butter | 1/4 cup | Adds a rich, creamy texture and provides antioxidant benefits. |
| Sweet Almond Oil | 1/4 cup | Helps to smooth and soften the skin, promotes a healthy complexion. |
| Lavender Essential Oil | 10 drops | Provides a calming and relaxing scent, may also help soothe inflammation. |
| Vanilla Extract | 1 teaspoon | Adds a sweet and warm fragrance, creates a luxurious scent experience. |
Steps for Making Lavender Vanilla Body Butter
This recipe is easy to follow and can be made in about 30 minutes.
- Melt the butters and oils:In a heatproof bowl, combine the shea butter, coconut oil, mango butter, and sweet almond oil. Place the bowl over a pot of simmering water (double boiler method) and stir until all the ingredients are melted and smooth.
- Cool and whip:Remove the bowl from the heat and let it cool to room temperature. Once it’s cooled, use an electric mixer or whisk to whip the mixture until it becomes light and fluffy.
- Add essential oils:Once the mixture is whipped, add the lavender essential oil and vanilla extract. Continue whipping until the oils are evenly distributed.
- Store and enjoy:Transfer the body butter to a clean, airtight container. Store it in a cool, dry place. The body butter should last for several months.
Tips for Making Lavender Vanilla Body Butter

Making your own lavender vanilla body butter is a rewarding experience, allowing you to control the ingredients and create a product tailored to your preferences. However, achieving the desired texture and ensuring the longevity of your creation requires careful attention to detail.
This section provides tips for making a high-quality body butter that you can enjoy for weeks to come.
Choosing High-Quality Ingredients
The quality of your ingredients directly impacts the final product. Opting for high-quality ingredients ensures a luxurious and effective body butter.
- Shea Butter:Choose unrefined shea butter, which retains its natural properties and provides a rich, creamy texture. Look for shea butter that is certified organic or fair trade, ensuring ethical sourcing and high quality.
- Coconut Oil:Coconut oil adds a silky smoothness and contributes to the body butter’s melting point. Opt for extra virgin coconut oil for a richer flavor and greater benefits.
- Mango Butter:Mango butter adds a delightful fragrance and contributes to the body butter’s rich texture. Choose unrefined mango butter for its natural properties and moisturizing benefits.
- Sweet Almond Oil:Sweet almond oil adds a light, non-greasy feel to the body butter and is known for its nourishing properties. Look for cold-pressed sweet almond oil for the highest quality and benefits.
- Essential Oils:Lavender and vanilla essential oils contribute to the calming and fragrant properties of the body butter. Choose high-quality essential oils from reputable brands.
Using Essential Oils Safely and Effectively
Essential oils are potent substances, and it’s crucial to use them safely and effectively.
- Dilution:Always dilute essential oils in a carrier oil, such as sweet almond oil or jojoba oil. A general guideline is to use 1-2% dilution for body butter.
- Patch Test:Before applying the body butter to your entire body, perform a patch test on a small area of skin to check for any allergic reactions.
- Pregnancy and Sensitivity:If you are pregnant, breastfeeding, or have sensitive skin, consult with a healthcare professional before using essential oils.
Storage and Shelf Life of Homemade Body Butter, Lavendar vanilla body butter diy
Proper storage is crucial for extending the shelf life of your homemade body butter.
I’m all about making my own body butters, and I’m always on the lookout for new ingredients and inspiration. Lately, I’ve been loving the combination of lavender and vanilla – it’s so calming and luxurious! I even checked out the new new from Leigh Tucker Willow at Dunnes Stores to see if they had anything that could add a little extra to my homemade body butter, but I think I’ll stick to my tried-and-true recipe for now.
It’s just so perfect for those cozy nights in!
- Airtight Container:Store the body butter in an airtight container to prevent oxidation and preserve its quality.
- Cool, Dark Place:Store the body butter in a cool, dark place, away from direct sunlight and heat.
- Shelf Life:Properly stored, homemade body butter can last for several months. However, it’s best to use it within 6 months for optimal quality.
Variations and Customizations: Lavendar Vanilla Body Butter Diy
Once you’ve mastered the basic Lavender Vanilla Body Butter recipe, you can experiment with different variations to create your own unique blend. This section will explore exciting ways to add your personal touch and tailor the recipe to your specific preferences.
Adding Other Essential Oils
Essential oils offer a wide range of therapeutic and aromatic benefits. Incorporating different essential oils into your body butter allows you to create a blend that aligns with your desired effects.
- For relaxation and stress relief:Consider adding chamomile, ylang ylang, or bergamot essential oil. These oils have calming and soothing properties that can help promote relaxation and reduce stress.
- For energy and focus:Try incorporating rosemary, peppermint, or lemon essential oil. These oils are known for their invigorating and stimulating effects, which can enhance alertness and focus.
- For skin health:Tea tree oil, lavender oil, or frankincense oil can be beneficial for skin health. Tea tree oil has antibacterial properties, while lavender oil can soothe irritation and promote healing. Frankincense oil is known for its anti-inflammatory properties.
Adding Botanicals
Infusing your body butter with botanicals can enhance its therapeutic properties and add a unique touch.
- Calendula:Known for its soothing and anti-inflammatory properties, calendula can help reduce redness and irritation.
- Chamomile:Chamomile is a calming and soothing herb that can help reduce stress and promote relaxation.
- Rose petals:Rose petals are known for their delicate fragrance and moisturizing properties. They can add a touch of luxury and elegance to your body butter.
Customizing Consistency
The consistency of your body butter can be adjusted to your preference. Here’s how to create a body butter that meets your needs:
- For a thicker consistency:Increase the amount of shea butter or cocoa butter in the recipe.
- For a lighter consistency:Reduce the amount of shea butter or cocoa butter and increase the amount of coconut oil or almond oil.
- For a whipped texture:After the body butter has cooled, use an electric mixer to whip it until it reaches your desired consistency.
Variations and Benefits
Here’s a table showcasing different variations of Lavender Vanilla Body Butter and their potential benefits:
| Variation | Benefits |
|---|---|
| Lavender Vanilla Body Butter with Chamomile Essential Oil | Calming, soothing, and relaxing |
| Lavender Vanilla Body Butter with Tea Tree Oil | Antibacterial, anti-inflammatory, and helps to clear acne |
| Lavender Vanilla Body Butter with Rose Petals | Moisturizing, fragrant, and luxurious |
| Lavender Vanilla Body Butter with Calendula | Soothing, anti-inflammatory, and helps to reduce redness and irritation |
| Whipped Lavender Vanilla Body Butter | Light, airy, and easily absorbed |
Application and Usage

Applying your homemade lavender vanilla body butter is a luxurious experience that will leave your skin feeling soft, smooth, and delicately scented. Here’s a step-by-step guide to ensure you get the most out of your creation.
Application Technique
To apply the body butter effectively, start with clean, dry skin. Scoop a small amount of body butter into your palm and rub your hands together to warm it slightly. This will help the butter melt and absorb more easily.
Begin by applying the butter to your legs, working your way up to your arms, torso, and finally, your hands and neck. Use gentle, circular motions to massage the butter into your skin. Focus on dry areas, such as elbows, knees, and ankles, for extra hydration.
Optimal Application Time
The best time to apply your lavender vanilla body butter is after a shower or bath when your skin is still slightly damp. This allows the butter to lock in moisture and prevent dryness. Applying it before bed allows the butter to work its magic overnight, leaving you with soft, supple skin in the morning.
Using Body Butter for Specific Skin Concerns
- Dry Skin:For those with dry skin, applying the body butter twice daily can provide intense hydration and help restore the skin’s natural moisture barrier.
- Eczema:Lavender is known for its soothing and anti-inflammatory properties, which can be beneficial for eczema. Apply the body butter to affected areas to help alleviate itching and redness.
- Cracked Skin:The rich emollients in the body butter can help heal cracked skin on the hands, feet, or other areas. Apply a generous amount and massage it in gently.
Safety and Precautions
While lavender and vanilla are generally considered safe for topical use, it’s important to be aware of potential allergens and sensitivities, and to take necessary precautions to ensure a safe and enjoyable experience.
Potential Allergens and Sensitivities
- Lavender:Some individuals may experience allergic reactions to lavender, such as skin irritation, redness, or itching. This is typically due to an allergy to the essential oil, but can also be caused by the plant itself.
- Vanilla:Vanilla is generally considered safe for topical use, but some individuals may experience allergic reactions, particularly if they are sensitive to other members of the orchid family.
It’s crucial to be mindful of any pre-existing allergies or sensitivities to lavender, vanilla, or other ingredients in your body butter recipe.
Patch Testing
Before applying the body butter to a larger area of skin, it’s highly recommended to perform a patch test. This involves applying a small amount of the body butter to a discreet area of skin, such as the inside of your elbow or behind your ear, and waiting 24-48 hours to observe any reactions.
If you experience any redness, itching, burning, or other signs of irritation, discontinue use and consult with a dermatologist or allergist.
General Safety Precautions
- Use high-quality ingredients:Opt for natural and organic ingredients whenever possible. Avoid using ingredients that are known to be irritating or sensitizing.
- Store properly:Store your homemade body butter in a cool, dark place, and avoid exposing it to extreme temperatures.
- Don’t use on broken skin:Avoid applying the body butter to cuts, scrapes, or any other open wounds.
- Discontinue use if irritation occurs:If you experience any irritation or allergic reactions, discontinue use immediately and consult with a healthcare professional.
- Keep out of reach of children:Store your body butter in a safe place, out of reach of children, as it may contain ingredients that could be harmful if ingested.
Conclusion
The lavender vanilla body butter offers a delightful combination of calming lavender and sweet vanilla, creating a luxurious and pampering experience. This DIY recipe allows you to customize the ingredients and fragrance to suit your preferences, making it a truly personal skincare solution.
This homemade body butter is a wonderful way to nourish and protect your skin, leaving it feeling soft, smooth, and beautifully scented. It’s a fantastic alternative to store-bought products, giving you control over the ingredients and ensuring a natural and gentle experience for your skin.
Additional Resources
For those interested in exploring the world of natural skincare further, there are numerous resources available to deepen your knowledge and expand your DIY repertoire.
- Online Communities:Participate in online forums and communities dedicated to natural skincare. These platforms offer a wealth of information, tips, and inspiration from fellow enthusiasts.
- Books and Articles:Numerous books and articles delve into the world of natural skincare, providing detailed information on ingredients, techniques, and recipes.
- Workshops and Classes:Consider attending workshops or classes led by experienced natural skincare practitioners to gain hands-on experience and learn from experts.