DIY Tiled Countertops: A Saw-Free Revolution for Your Kitchen
Transforming your kitchen with stylish and durable tiled countertops is an achievable DIY project, even without a power saw. This comprehensive guide focuses on a no-saw approach, leveraging pre-cut tiles, scoring techniques, and strategic material selection to create a professional-looking finish. The appeal of tiled countertops lies in their affordability, immense design versatility, and resilience against heat, scratches, and stains. For the DIY enthusiast seeking to elevate their kitchen’s aesthetic without the expense of professional installation or the complexity of power tools, this method offers a rewarding and accessible solution. We will delve into every stage, from planning and material acquisition to precise installation and finishing, ensuring you can confidently undertake this impactful renovation.
The foundational step for any successful DIY tiled countertop project is meticulous planning. Before purchasing a single tile or drop of adhesive, a detailed assessment of your existing countertops and a clear vision for the new design are paramount. Measure the exact dimensions of your countertop surface, including any overhangs, the depth of the edges, and the placement and size of your sink cutout. Sketching a diagram of your kitchen layout, noting these measurements, will be invaluable for calculating the quantity of materials needed. Consider the type of tile you wish to use. For a no-saw project, opt for tiles that are readily available in sizes that can accommodate your countertop dimensions without extensive cutting. Ceramic and porcelain tiles are excellent choices, offering a vast array of colors, patterns, and finishes. Subway tiles, mosaics, and even larger format tiles can be incorporated, provided you select them wisely to minimize the need for intricate cuts. Another crucial consideration is the edge treatment. Do you envision a bullnose edge, a simple square edge, or a decorative mosaic border? This decision will influence your tile selection and potentially the need for specialized edge trim. The substrate beneath your current countertop is also vital. Most DIY tiled countertops are installed over existing laminate or wood surfaces. Ensure these are sound, level, and clean. Any damage or unevenness will need to be addressed prior to tile installation, potentially requiring patching or leveling compounds. Finally, determine the pattern in which you’ll lay your tiles. A staggered brick pattern is forgiving and requires fewer precise cuts than a straight grid. Geometric patterns might necessitate more careful measurement and selection of appropriately sized tiles. Investing time in this planning phase will prevent costly mistakes and ensure a smooth installation process.
Material selection is where the "no-saw" aspect of this DIY project truly shines. The key is to choose tiles that can be manipulated and fitted without resorting to a tile saw. Pre-cut mosaic sheets are a fantastic starting point, as they come in manageable sections that can be adhered directly to the countertop. For larger format tiles, look for specific edge-finishing pieces or "bullnose" tiles that are designed to create a smooth, rounded edge without cutting. These are often available for popular tile lines and can be installed along the perimeter of your countertop. If you absolutely need to adjust the size of a larger tile, a manual tile scorer and snap cutter can be a viable alternative to a power saw for straight cuts. This tool scores a line on the tile’s surface, and with a firm snap, breaks the tile along that score. While it requires practice and precision, it’s a far less intimidating and equipment-intensive option than a wet saw. For sink cutouts, carefully measure the dimensions and consider using a series of smaller, pre-cut tiles or mosaic pieces to frame the opening, effectively building the cutout with multiple pieces rather than attempting to cut a large tile around it. Alternatively, if your sink is a drop-in style, you might be able to tile directly up to the existing lip of the sink, eliminating the need for a precise cutout in the tile itself. The substrate preparation materials are also critical. You will need a high-quality tile adhesive or mastic. For wet areas like kitchens, a thin-set mortar is generally recommended, but ensure you choose one suitable for your tile type and substrate. Grout is another essential component. Consider the width of your grout lines and select a grout color that complements your tiles. For ease of cleaning and stain resistance, an epoxy grout or a grout with an added sealant is a wise choice. Lastly, you’ll need a durable, waterproof sealer for both the tiles and the grout once the installation is complete.
Surface preparation is the unsung hero of any successful tile project, and for DIY tiled countertops with no saw required, it’s even more critical to ensure a smooth and lasting finish. Begin by thoroughly cleaning your existing countertop. Remove any grease, grime, or adhesive residue. A degreaser and a good scrub brush will be your allies here. If your existing countertop has a glossy laminate finish, it’s beneficial to lightly sand it with a medium-grit sandpaper (around 80-100 grit). This creates a slightly roughened surface that will improve the adhesion of your tile adhesive. Wipe down the surface thoroughly after sanding to remove all dust. Inspect the countertop for any cracks, chips, or unevenness. Fill any imperfections with a suitable patching compound or leveling agent. Allow these to dry completely and sand them smooth to create a seamless surface. If you’re tiling over wood, ensure it’s stable and free of rot or damage. For laminate countertops, especially those with a curved or bullnose edge, you might consider adding a reinforcing strip of wood along the edge. This will provide a solid base for your edge tiles and help create a clean, defined perimeter. The goal is to create a perfectly flat, clean, and stable canvas for your tiles. Any bumps, dips, or loose areas will inevitably translate to a less professional-looking and potentially less durable final product. Pay close attention to the areas around the sink and faucet. These are high-moisture zones, so ensuring a watertight seal during preparation is paramount.
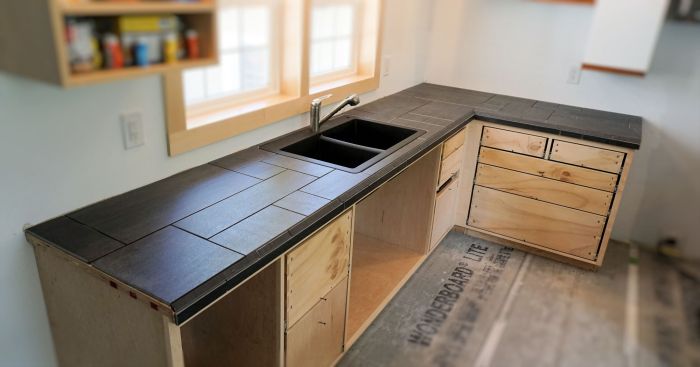
The installation process for your no-saw tiled countertops begins with dry-fitting. This is a crucial step that allows you to visualize the layout, identify any potential fitment issues, and determine the starting point for your adhesive application. Lay out your tiles (or mosaic sheets) on the countertop without any adhesive. This is your opportunity to assess how the tiles will flow, how close they will be to edges, and how they will accommodate features like the sink. If you’re using pre-cut mosaic sheets, arrange them to ensure a visually appealing pattern and to minimize the need for awkward cuts (which we are avoiding, of course). For edge tiles, position them along the perimeter to ensure they meet cleanly at corners and create the desired profile. Once you’re satisfied with the dry-fit, it’s time to apply the adhesive. Work in small, manageable sections. Using a notched trowel specifically designed for tile adhesive, spread an even layer onto a portion of the countertop. The size of the notch on the trowel will depend on the size of your tiles. Consult the adhesive manufacturer’s recommendations for the appropriate trowel size. Avoid spreading too much adhesive at once, as it can start to dry before you can set your tiles. Begin laying your tiles or mosaic sheets, pressing them firmly into the adhesive with a slight twisting motion. This ensures good contact and helps to eliminate air pockets. Use tile spacers to maintain consistent grout lines between tiles. For mosaic sheets, the pre-existing spacing between the individual tiles on the sheet will often suffice, but you may need to adjust them slightly to achieve uniform gaps across the entire surface. If you’re using edge tiles, install these carefully, ensuring they sit flush with the countertop surface and create a clean, finished edge. For sink cutouts, meticulously place your chosen pre-cut tiles or mosaic pieces to frame the opening, working from the inside out. If you opted to tile up to the existing sink lip, ensure a tight fit. Periodically step back and view your progress from a distance to ensure the pattern is consistent and visually pleasing.
Grouting is the step that truly unifies your tiled countertop, transforming individual tiles into a cohesive surface. Once the tile adhesive has cured completely according to the manufacturer’s instructions (typically 24-48 hours), it’s time to apply the grout. First, remove all tile spacers. If any adhesive has squeezed up into the grout lines, carefully scrape it out with a putty knife or utility blade. Mix your grout according to the package directions. Aim for a consistency similar to peanut butter – thick enough to hold its shape but spreadable. Working in small sections, use a grout float (a rubber trowel) to press the grout firmly into the spaces between the tiles. Hold the float at a 45-degree angle to the surface and spread the grout diagonally across the tiles, ensuring all gaps are completely filled. Work the grout from multiple directions to ensure thorough coverage. Once a section is grouted, use the edge of the grout float to scrape off excess grout from the tile surfaces. Be careful not to pull grout out of the joints. After about 15-20 minutes, when the grout begins to haze over the tiles, it’s time for the initial cleanup. Dampen a sponge (not soaking wet) and wipe the tile surfaces in a circular motion to remove the grout haze. Rinse the sponge frequently in clean water to avoid spreading grout residue. You will likely need to repeat this cleaning process several times. The goal is to remove as much grout haze as possible without disturbing the freshly filled grout lines. For stubborn haze, a slightly damp cloth can be effective. Allow the grout to cure for the time recommended by the manufacturer (usually 24-72 hours) before proceeding to the final sealing step. During this curing period, avoid getting the grout wet.
The final stages of your DIY tiled countertop project involve sealing and finishing, which are crucial for both aesthetics and long-term durability. Once the grout has fully cured, it’s time to apply a grout sealer. This is essential to protect the grout from stains and moisture, which are prevalent in a kitchen environment. Apply the sealer with a small brush or a specialized applicator, ensuring thorough coverage of all grout lines. Wipe away any excess sealer that gets onto the tile surface immediately, as it can be difficult to remove once dry. Follow the product’s instructions for drying times between coats, if multiple coats are recommended. Many sealers also recommend sealing the tiles themselves, especially if you’ve chosen porous natural stone tiles. Even with porcelain or ceramic tiles, a topical sealer can add an extra layer of protection and enhance the sheen. Carefully follow the instructions for applying tile sealer, as the application method and drying times can vary significantly. For edge treatments, if you’ve used any special trim pieces or if your tile has a natural edge, ensure these are also sealed for a uniform and protected finish. Once all sealing is complete and the surfaces have fully dried, the final inspection is in order. Examine your countertops for any missed spots, imperfections, or areas that need touch-up. Small dabs of grout can be used to fill any minor voids, and carefully applied touch-up paint can address any scuffs on edges. If you have a drop-in sink, consider applying a bead of waterproof silicone caulk around the perimeter where the sink meets the tile. This creates a watertight seal and prevents moisture from seeping underneath. The same can be done around the backsplash if you’ve incorporated one. For a truly professional finish, take your time with this final detailing. A well-executed DIY tiled countertop, achieved without a saw, not only adds significant value and aesthetic appeal to your kitchen but also serves as a testament to your crafting abilities and resourcefulness.
