Tips for at home fabric dyeing – it’s a phrase that conjures up images of vibrant colors, creative patterns, and a sense of accomplishment. Whether you’re a seasoned crafter or a curious beginner, dyeing fabric at home can be a rewarding and surprisingly accessible experience.
It’s a journey of exploration, allowing you to transform ordinary fabrics into unique and personalized pieces that reflect your individual style. From selecting the right dyes and preparing your workspace to mastering basic techniques and exploring advanced possibilities, this guide will equip you with the knowledge and confidence to embark on your own dyeing adventures.
From choosing the right dyes and preparing your workspace to mastering basic techniques and exploring advanced possibilities, this guide will equip you with the knowledge and confidence to embark on your own dyeing adventures.
Preparing for Fabric Dyeing at Home: Tips For At Home Fabric Dyeing

Fabric dyeing is a fun and creative way to transform old clothes, give new life to plain fabrics, and personalize your home decor. With a little planning and preparation, you can achieve stunning results right in your own home.
Necessary Materials for At-Home Fabric Dyeing
Before you start dyeing, gather the necessary materials to ensure a smooth and successful process.
- Fabric Dye:Choose the right type of dye for your fabric. There are two main types of dye:
- Acid Dyes:These dyes work best on natural fibers like silk, wool, and nylon. They are known for their vibrant colors and excellent colorfastness.
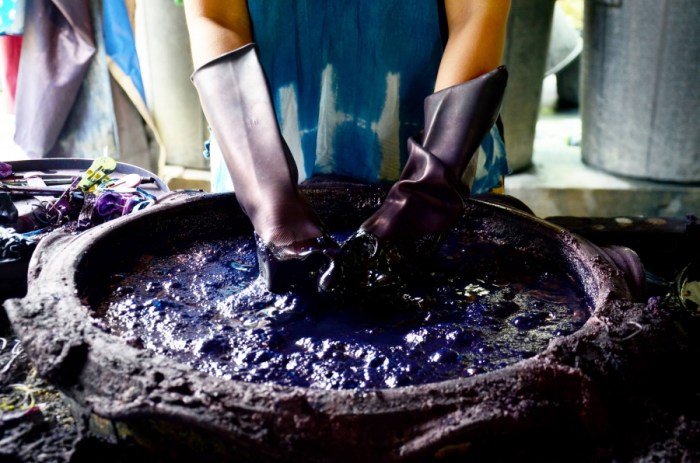
Dyeing fabric at home can be a fun and rewarding experience, but it’s important to get the right tools and techniques. For example, you’ll need a large pot for the dye bath and a pair of rubber gloves to protect your hands.
And speaking of pots, I’ve been experimenting with a new recipe for crispy stovetop brussels bread, which I found on this fantastic blog crispy stovetop brussels bread. Once your fabric is dyed, be sure to rinse it thoroughly to remove any excess dye and prevent staining.
Happy dyeing!
- All-Purpose Dyes:These dyes can be used on both natural and synthetic fibers, making them versatile for various projects.
- Acid Dyes:These dyes work best on natural fibers like silk, wool, and nylon. They are known for their vibrant colors and excellent colorfastness.
- Fabric:Select fabrics that are suitable for dyeing. Natural fibers like cotton, linen, silk, and wool absorb dye well, while synthetic fibers like polyester and nylon can be more challenging to dye.
- Dye Fixative:This helps to set the dye permanently on the fabric, preventing it from fading or bleeding.
- Rubber Gloves:Protect your hands from dye stains.
- Plastic or Stainless Steel Container:Choose a container large enough to hold the fabric and dye solution comfortably.
- Measuring Cups and Spoons:Accurate measurements are crucial for consistent dye results.
- Stirring Utensil:Use a wooden spoon or spatula to mix the dye solution thoroughly.
- Tongs or a Ladle:To safely handle the fabric during the dyeing process.
- Old Towels or Newspaper:Protect your workspace from spills and stains.
- White Vinegar:Used to help set the dye and brighten colors.
- Salt:Some dyes require salt to achieve the desired color intensity.
Preparing Your Workspace
A well-prepared workspace is essential for a successful dyeing experience. Here are some tips:
- Choose a Well-Ventilated Area:Dyeing can produce fumes, so it’s important to work in an area with good ventilation.
- Protect Your Work Surface:Cover your work surface with plastic sheeting, newspaper, or old towels to prevent stains.
- Wear Protective Clothing:Wear old clothes that you don’t mind getting stained.
- Keep Water and Cleaning Supplies Handy:Have a bucket of clean water and a sponge or cloth ready to clean up spills immediately.
Pre-Washing Fabric Before Dyeing
Pre-washing your fabric is crucial to remove any finishes or sizing that may interfere with the dye absorption.
- Wash the Fabric in Hot Water with Detergent:This will remove any impurities and ensure the dye adheres evenly.
- Rinse Thoroughly:Ensure all detergent residue is removed to prevent uneven dyeing.
- Dry the Fabric Completely:A damp fabric will not absorb dye as effectively.
Selecting the Right Dye for Different Fabric Types
The type of dye you choose will depend on the fabric you are dyeing.
- Natural Fibers:For natural fibers like cotton, linen, silk, and wool, acid dyes are generally the best choice. They produce vibrant colors and excellent colorfastness.
- Synthetic Fibers:For synthetic fibers like polyester and nylon, all-purpose dyes are a good option. These dyes can be used on both natural and synthetic fibers, but they may not produce the same vibrant colors as acid dyes.
Dyeing Techniques for Beginners
Dyeing fabric at home can be a fun and rewarding experience. It allows you to transform plain fabrics into unique and colorful pieces. However, understanding the basics of dyeing techniques is crucial for achieving desired results. This section explores common methods and tips for dyeing fabric effectively.
Dyeing fabric at home can be a fun and rewarding experience, but it’s important to have the right tools and techniques. Just like you wouldn’t start painting a room without prepping the walls, dyeing fabric requires some preparation too.
You’ll want to make sure your workspace is well-ventilated and protected, and that you have the right type of dye and dye bath for your fabric. Speaking of prepping, if you’re looking for another creative project, check out this guide on how to paint stone windowsills – it’s a great way to give your home a fresh look.
Once you’ve mastered the basics of dyeing, you can experiment with different techniques and patterns to create truly unique pieces.
Basic Steps in Fabric Dyeing
Dyeing fabric involves three key steps: preparing the dye bath, immersing the fabric, and setting the dye. Each step is crucial for achieving even color and lasting results.
- Preparing the Dye Bath:The dye bath is the solution that will dye the fabric. The type of dye, water temperature, and additives used will vary depending on the specific dyeing method. Most dyes require dissolving in hot water, and some may require additional ingredients like salt or vinegar.
- Immersing the Fabric:Once the dye bath is prepared, the fabric is immersed in it. The fabric should be fully submerged in the dye bath and allowed to soak for the recommended time. The soaking time will depend on the type of dye and the desired color intensity.
- Setting the Dye:After soaking in the dye bath, the fabric needs to be rinsed thoroughly to remove excess dye. The dye is then set using a process that depends on the type of dye used. Some dyes require heat setting, while others may be set with vinegar or salt.
Cold Water Dyeing
Cold water dyeing is a popular method for beginners because it is simple and requires less equipment. It is particularly suitable for natural fibers like cotton, linen, and wool. Here is a step-by-step guide:
- Prepare the Fabric:Wash the fabric in detergent and rinse thoroughly to remove any residues.
- Prepare the Dye Bath:Mix the dye powder with cold water according to the manufacturer’s instructions.
- Immerse the Fabric:Submerge the fabric in the dye bath and ensure it is completely covered.
- Soak the Fabric:Let the fabric soak in the dye bath for the recommended time, usually several hours.
- Rinse the Fabric:Rinse the fabric thoroughly under cold running water until the water runs clear.
- Set the Dye:Add a cup of white vinegar to the final rinse water to help set the dye.
- Dry the Fabric:Hang the fabric to dry completely.
Heat-Set Dyeing
Heat-set dyeing is another common method that uses heat to set the dye. This method is often used for synthetic fibers like polyester and nylon. Here’s a step-by-step guide:
- Prepare the Fabric:Wash and rinse the fabric as in cold water dyeing.
- Prepare the Dye Bath:Mix the dye powder with hot water according to the manufacturer’s instructions.
- Immerse the Fabric:Submerge the fabric in the dye bath and ensure it is completely covered.
- Soak the Fabric:Let the fabric soak in the dye bath for the recommended time.
- Rinse the Fabric:Rinse the fabric thoroughly under cold running water until the water runs clear.
- Set the Dye:Heat-set the dye by placing the fabric in a preheated dryer on a high heat setting for 30 minutes.
- Dry the Fabric:Allow the fabric to cool completely before handling.
Dyeing Techniques and Their Pros and Cons
| Technique | Pros | Cons |
|---|---|---|
| Cold Water Dyeing | Simple and easy, less equipment required, suitable for natural fibers. | Can take longer to achieve desired color intensity, not suitable for all dyes. |
| Heat-Set Dyeing | Quick and efficient, suitable for synthetic fibers, produces vibrant colors. | Requires heat setting, may be more expensive. |
| Tie-Dyeing | Creative and fun, allows for unique designs, suitable for various fabrics. | Requires more time and effort, can be messy. |
| Ombre Dyeing | Creates a gradual color transition, visually appealing, easy to achieve. | Requires careful technique to ensure a smooth transition, may require multiple dye baths. |
| Shibori Dyeing | Produces intricate patterns, traditional Japanese technique, unique and artistic. | Requires specific tools and techniques, can be challenging for beginners. |
Tips for Achieving Different Color Effects
- Tie-Dyeing:To achieve tie-dye effects, gather the fabric into different shapes and secure them with rubber bands before immersing it in the dye bath. The areas that are tightly bound will resist the dye and remain lighter, creating the tie-dye pattern.
- Ombre Dyeing:For ombre effects, create a gradient of colors by immersing the fabric in dye baths of varying shades. Start with the lightest shade and gradually move to the darkest shade.
- Shibori Dyeing:Shibori dyeing involves folding and binding the fabric in specific ways to create patterns. The techniques used in shibori dyeing are diverse, ranging from simple folds to intricate stitching patterns.
Advanced Dyeing Techniques

Taking your fabric dyeing skills to the next level involves exploring more intricate and artistic techniques. These advanced methods allow you to create unique and visually captivating designs, adding depth and complexity to your projects.
Resist Dyeing
Resist dyeing is a technique that involves preventing dye from reaching certain areas of the fabric, creating patterns and designs. This is achieved by using a resist, which is a material that repels dye.
- Wax Resist:A traditional method using melted wax to coat the fabric, creating a barrier to the dye. The wax is then removed, revealing the un-dyed areas.
- Rubber Band Resist:This technique involves tying rubber bands tightly around the fabric, creating folds and creases that resist the dye. The bands are removed after dyeing, revealing the unique patterns formed by the folds.
- Stitching Resist:This technique involves stitching designs onto the fabric using a thread that resists the dye. The stitching creates a barrier, preventing the dye from reaching the fabric beneath.
Batik Dyeing
Batik dyeing is a centuries-old Indonesian art form that uses wax resist techniques to create intricate patterns. The process involves applying melted wax to the fabric, creating a design, then dyeing the fabric. The wax is then removed, revealing the un-dyed areas.
Batik is a complex and time-consuming process, requiring patience and precision.
Dyeing fabric at home can be a fun and rewarding experience, but it can also be a bit overwhelming. One of the things I love about dyeing is the opportunity to create unique and personalized gifts. For the gardening enthusiast in your life, you could consider gifting a beautiful hand-dyed tote bag for carrying their gardening supplies or a set of vibrant placemats for their outdoor dining.
If you need some inspiration for unique gift ideas, check out this article on gifting ideas for gardening enthusiasts farrar and tanner. Once you’ve got your gift idea, you can start experimenting with different dyeing techniques and colors to create a truly special piece.
- Traditional Batik:This method uses a tjanting, a small tool with a spout, to apply molten wax onto the fabric, creating intricate designs.
- Modern Batik:This technique uses a stamp or stencil to apply the wax, allowing for faster and easier creation of patterns.
Screen Printing, Tips for at home fabric dyeing
Screen printing is a technique that uses a stencil to transfer designs onto fabric. The stencil is created on a mesh screen, and the design is then printed onto the fabric using a squeegee.
- Silk Screening:This traditional method uses a silk screen, which is a mesh screen made from silk.
- Digital Screen Printing:This method uses a computer to create the stencil, allowing for more complex and detailed designs.
Natural Dyes
Natural dyes are derived from plants, animals, and minerals. They offer a wide range of colors and unique properties, often producing subtle and earthy tones.
- Plant-Based Dyes:These dyes are extracted from various plant parts, such as roots, bark, leaves, and flowers.
- Animal-Based Dyes:These dyes are derived from insects, mollusks, and other animal sources.
- Mineral-Based Dyes:These dyes are extracted from minerals, such as iron oxides, manganese oxides, and copper oxides.
Creating Patterns and Designs
Creating patterns and designs on fabric using dyeing techniques involves various methods:
- Folding and Pleating:This method involves folding or pleating the fabric before dyeing, creating symmetrical patterns.
- Tie-Dyeing:This technique involves tying the fabric with string or rubber bands, creating a resist pattern.
- Shibori:This traditional Japanese dyeing technique involves folding, twisting, or stitching fabric to create resist patterns.
Comparison of Dyeing Techniques
| Dyeing Technique | Complexity | Color Vibrancy | Durability |
|---|---|---|---|
| Resist Dyeing | Moderate to High | Moderate to High | Moderate to High |
| Batik Dyeing | High | High | High |
| Screen Printing | Moderate | High | High |
| Natural Dyeing | Moderate to High | Moderate | Moderate |
Fabric Dyeing Safety and Precautions
Fabric dyeing can be a fun and creative activity, but it’s crucial to prioritize safety throughout the process. Dyeing involves working with chemicals that can pose potential hazards if not handled properly. By understanding the risks and taking necessary precautions, you can ensure a safe and enjoyable dyeing experience.
Dye Stains and Skin Irritation
Dye stains are a common concern in fabric dyeing. Certain dyes, particularly those containing strong pigments, can be difficult to remove from skin, clothing, and surfaces. To prevent staining, it’s essential to wear protective clothing and gloves.
- Always wear gloves made of nitrile or latex to protect your hands from direct contact with dyes.
- Use an apron or old clothes you don’t mind getting stained.
- Cover any exposed skin, such as your arms and legs, with long sleeves and pants.
Some dyes can also cause skin irritation or allergic reactions. It’s essential to perform a patch test before using any new dye. Apply a small amount of dye to a hidden area of your skin and wait 24 hours to see if any irritation develops.
Chemical Fumes and Ventilation
Dyeing involves using chemicals that can release fumes, particularly during the heating process. These fumes can be irritating to the respiratory system and can cause headaches, dizziness, and nausea. To minimize exposure to fumes, it’s crucial to work in a well-ventilated area.
- Dye in a room with open windows or doors to allow fresh air circulation.
- Consider using a fan to enhance ventilation.
- Avoid dyeing in enclosed spaces, such as a small bathroom or closet.
Proper Disposal of Dye and Chemicals
Proper disposal of dye and other chemicals is essential for environmental protection and personal safety. Never pour dye down the drain, as it can contaminate water sources.
- Follow the manufacturer’s instructions for dye disposal.
- Dispose of dye in sealed containers, labeled appropriately, and take them to a designated hazardous waste disposal facility.
- Consult local regulations for specific disposal guidelines.
Preventing Dye Spills and Stains
Dye spills can be messy and difficult to clean. It’s essential to take precautions to prevent spills and stains on surfaces and clothing.
- Work over a plastic drop cloth or newspaper to protect your work surface.
- Use a container with a lid or a pouring spout to minimize spills.
- Avoid overfilling containers to prevent spills.
Caring for Dyed Fabrics

The beauty of a hand-dyed fabric lies in its unique color and vibrancy. But just like any other fabric, it needs proper care to maintain its beauty and longevity. With a few simple steps, you can ensure your dyed fabrics stay bright and beautiful for years to come.
Washing and Drying Dyed Fabrics
Washing and drying dyed fabrics correctly is crucial for preserving their color and preventing fading.
- First Wash:The first wash is crucial. It’s recommended to wash your dyed fabric separately from other clothes, especially white ones, to prevent any potential color bleeding. Use a mild detergent designed for delicate fabrics and cold water. Avoid using bleach or fabric softeners, as they can strip the dye and dull the colors.
- Subsequent Washes:After the initial wash, you can usually wash your dyed fabric with other similar colors. However, it’s still advisable to use cold water and a mild detergent. Turn the fabric inside out to prevent fading.
- Drying:Air drying is the best way to preserve the color of dyed fabrics. Hang them in a shaded area, away from direct sunlight, which can cause fading. If you must use a dryer, use a low heat setting and remove the fabric as soon as it’s dry.
Storing Dyed Fabrics
Proper storage can help preserve the vibrancy of your dyed fabrics and prevent damage.
- Folding vs. Hanging:Folding is generally recommended for most dyed fabrics, as hanging can cause stretching or creases. If you choose to hang, use a padded hanger to prevent damage.
- Storage Location:Store your dyed fabrics in a cool, dry, and dark place. Avoid areas with high humidity, as this can lead to mold and mildew.
- Protection:Consider wrapping your dyed fabrics in acid-free tissue paper or muslin to protect them from dust and light.
Color-Fast Dyes
Color-fast dyes are designed to resist fading and bleeding, making them an excellent choice for projects that require long-lasting color.
- Types of Color-Fast Dyes:There are various types of color-fast dyes available, including acid dyes, reactive dyes, and fiber reactive dyes. Each type has its unique properties and is suitable for different types of fabrics.
- Advantages:Using color-fast dyes can significantly improve the longevity of your dyed fabrics. They are more resistant to fading, bleeding, and washing, ensuring that your colors remain vibrant for a longer time.
Troubleshooting Dyeing Issues
Even experienced dyers encounter issues sometimes. Here’s how to troubleshoot common dyeing problems:
- Uneven Color Distribution:Uneven color distribution can be caused by insufficient stirring during the dyeing process or inadequate dye penetration. To prevent this, ensure the dye bath is well-stirred and that the fabric is completely submerged in the dye bath.
- Dye Bleeding:Dye bleeding occurs when the dye is not properly fixed to the fabric. This can be caused by using the wrong type of dye, insufficient dye time, or incorrect washing techniques. To prevent bleeding, use a dye that is suitable for the fabric type and follow the manufacturer’s instructions carefully.