DIY Instagram-Worthy Votive Candle Holders: Crafting Ambiance for Your Feed
Creating visually appealing votive candle holders is a fantastic way to enhance your home décor and elevate your social media content, particularly for Instagram. These small, often delicate, vessels offer a wealth of customization possibilities, allowing you to express your personal style and curate a specific aesthetic. The process of making your own is not only cost-effective but also incredibly rewarding, offering a tactile and creative outlet. From minimalist chic to bohemian whimsy, the design potential is virtually limitless. This article will guide you through various techniques, materials, and design considerations to help you craft Instagram-worthy votive candle holders that will illuminate your space and shine on your feed.
Understanding the Basics: Materials and Tools for Votive Candle Holder Creation
Before diving into specific DIY methods, it’s essential to familiarize yourself with the fundamental materials and tools commonly used. The foundation of most votive candle holders is a glass vessel. Thrift stores, craft stores, and even your own recycling bin are excellent sources for discarded jars. Look for straight-sided jars, bell-shaped glasses, or even wine glasses that can be repurposed. For a cohesive look, aim for similar shapes and sizes, or embrace eclectic variety if that’s your desired aesthetic.
Adhesives are crucial for attaching decorative elements. Hot glue guns are indispensable for quick and secure attachments, especially for heavier embellishments. Mod Podge, a versatile decoupage medium, is excellent for adhering paper, fabric, or even delicate embellishments. For a more permanent and water-resistant finish, E6000 glue is a strong option, though it requires good ventilation.
Decorative elements are where your creativity truly shines. Common choices include:
- Paint: Acrylic paints are ideal for their vibrant colors and easy application. Spray paints offer a smooth, even finish and can be used for metallic or matte effects. Glass paints allow for transparent, stained-glass-like results.
- Fabric: Burlap, lace, twine, yarn, and patterned fabrics can be wrapped around the glass to add texture and color.
- Paper: Tissue paper, rice paper, scrapbook paper, and even printed designs can be decoupaged for intricate patterns.
- Embellishments: Beads, sequins, glitter, rhinestones, shells, dried flowers, twigs, and even small stones can add sparkle and dimension.
- Natural Elements: Sand, pebbles, moss, and small branches can create a rustic or naturalistic vibe.
Essential tools to have on hand include:
- Scissors and Craft Knives: For cutting paper, fabric, and other materials.
- Paintbrushes: A variety of sizes for applying paint and Mod Podge.
- Gloves: To protect your hands from glue and paint.
- Newspaper or Drop Cloths: To protect your work surface.
- Ruler or Measuring Tape: For precise measurements.
- Sandpaper (fine-grit): For smoothing rough edges if painting or preparing surfaces.
- Clear Sealant/Varnish: To protect your finished designs and add a glossy or matte finish.
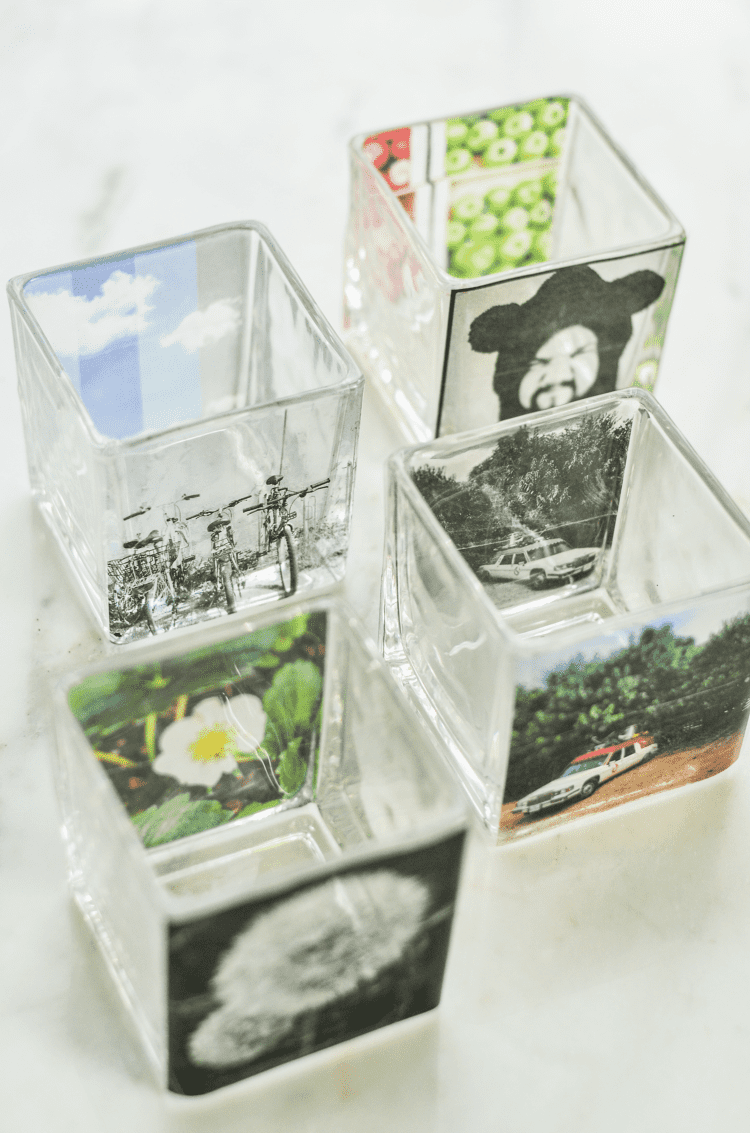
Technique 1: Decoupage Delight – Transforming Jars with Paper and Fabric
Decoupage is a classic and highly effective technique for customizing votive candle holders. It allows you to incorporate intricate patterns, personal photographs, or even just blocks of color.
Materials:
- Clean glass jars
- Mod Podge (Gloss or Matte finish)
- Variety of papers (tissue paper, rice paper, scrapbook paper, printed designs, old maps, book pages)
- Fabric scraps (lace, thin cotton, burlap)
- Soft paintbrush
- Scissors or craft knife
- Optional: Glitter, small embellishments
Instructions:
- Prepare Your Vessel: Ensure your glass jar is thoroughly cleaned and dried. Remove any labels by soaking in warm, soapy water or using a sticker remover.
- Cut Your Materials: Cut your chosen paper or fabric into desired shapes and sizes. For a layered effect, cut a variety of pieces. If using patterned paper, consider how the designs will overlap and interact. For a stained-glass effect with tissue paper, you can create irregular torn edges.
- Apply Mod Podge: Using your paintbrush, apply a thin, even layer of Mod Podge to a section of the glass jar. Work in small areas at a time to prevent the Mod Podge from drying.
- Adhere Your Materials: Carefully place your paper or fabric pieces onto the Mod Podge-coated area, smoothing them down with your fingers or the paintbrush to eliminate air bubbles. Overlap edges for a seamless look or deliberately create layered textures.
- Continue Decoupaging: Continue applying Mod Podge and adhering your materials until the entire surface of the jar is covered, or you have achieved your desired design.
- Apply Top Coat: Once all your pieces are adhered, apply another thin, even layer of Mod Podge over the entire surface of the jar. This seals the design and provides a protective finish. Ensure you cover all edges and seams.
- Add Embellishments (Optional): While the top coat of Mod Podge is still wet, you can sprinkle glitter, adhere small beads, or add other embellishments for extra sparkle and dimension.
- Drying: Allow the votive holder to dry completely. This can take several hours. For a more durable finish, apply a second top coat of Mod Podge and allow it to dry thoroughly.
- Sealing (Optional but Recommended): For added durability and a more professional finish, once the Mod Podge is completely dry, you can apply a clear acrylic sealant or varnish. Choose a matte or glossy finish depending on your preference.
Instagram Considerations for Decoupage Holders:
- Layering and Transparency: Experiment with layering translucent papers like tissue paper or rice paper to create depth and a stained-glass effect.
- Color Palettes: Curate color palettes that complement your home décor or a specific Instagram theme.
- Themed Designs: Use papers featuring specific motifs, like travel maps for a wanderlust theme or floral prints for a romantic vibe.
- Personal Touches: Print personal photos or meaningful text onto thin paper and decoupage them for a truly unique and sentimental holder.
Technique 2: Painted Perfection – From Frosted to Vibrant
Painting offers a quick and dramatic transformation for glass votive holders. The key is to choose the right paints and techniques to achieve the desired effect.
Materials:
- Clean glass jars
- Acrylic paints
- Glass paints (for transparent effects)
- Spray paints (matte or metallic finishes)
- Paintbrushes (various sizes)
- Painter’s tape (for creating clean lines)
- Rubbing alcohol or glass cleaner
- Optional: Stencils, sponges, fine-grit sandpaper
Instructions:
A. Frosted Glass Effect:
- Clean Thoroughly: Clean the inside and outside of the glass jar with rubbing alcohol or glass cleaner to remove any oils or residue.
- Apply Frosting Spray: In a well-ventilated area, lightly spray the outside of the jar with frosted glass spray paint. Apply in thin, even coats, allowing each coat to dry slightly before applying the next. Build up the opacity to your desired level.
- Drying: Allow the spray paint to dry completely according to the manufacturer’s instructions.
B. Solid Color or Patterned Painting:
- Clean and Prepare: Clean the glass jar thoroughly. If you plan to paint the inside, ensure it’s meticulously clean.
- Masking (for patterns): If creating geometric designs or stripes, use painter’s tape to mask off areas you want to remain unpainted. Ensure the tape is pressed down firmly to prevent paint from bleeding.
- Apply Acrylic or Glass Paint:
- Acrylic Paint (Opaque): Apply acrylic paints with brushes. For a smooth finish, you may need multiple thin coats. Allow each coat to dry before applying the next. You can paint the inside or outside of the jar. Painting the inside can create a more protected, durable finish.
- Glass Paint (Transparent/Stained Glass): Apply glass paints with brushes. These paints are designed to be translucent, creating a stained-glass effect. Follow the manufacturer’s instructions for application and drying times.
- Spray Painting: For a uniform, smooth finish, spray paint is an excellent option. In a well-ventilated area, hold the can about 8-12 inches from the jar and spray in light, even strokes. Apply multiple thin coats rather than one thick coat.
- Stenciling: Use stencils to create intricate patterns. Apply paint over the stencil with a brush or sponge.
- Sponge Painting: For a textured effect, dip a sponge into paint and dab it onto the glass.
- Remove Tape and Finish: Once the paint is dry to the touch (but not fully cured), carefully remove the painter’s tape for clean lines.
- Sealing (Optional): For acrylic paints, once fully dry, you can apply a clear acrylic sealant to protect the design. Glass paints often cure to a durable finish on their own, but check the product instructions.
Instagram Considerations for Painted Holders:
- Matte vs. Glossy: Matte finishes offer a sophisticated, modern look, while glossy finishes can add a touch of glamour.
- Color Blocking: Use bold color blocks or subtle gradients for a striking visual impact.
- Geometric Designs: Painter’s tape is your best friend for sharp, clean geometric patterns.
- Ombre Effects: Blend colors gradually for a beautiful ombre effect.
- Silhouette Designs: Paint a solid background and then use a contrasting color to add silhouette elements.
Technique 3: Textured Treasures – Embracing Natural and Crafty Materials
Adding texture to your votive candle holders can create a tactile and visually interesting element that photographs beautifully.
Materials:
- Clean glass jars
- Hot glue gun and glue sticks
- Twine, yarn, rope
- Burlap, lace, fabric scraps
- Sand, small pebbles, shells
- Dried flowers, twigs, moss
- Beads, sequins, glitter
- Optional: Mod Podge, spray adhesive
Instructions:
A. Wrapped Wonders (Twine, Yarn, Rope):
- Start Point: Secure the end of your twine, yarn, or rope to the glass jar using a dab of hot glue or Mod Podge.
- Wrap Tightly: Begin wrapping the material around the jar, ensuring each layer is tight against the previous one. Apply small dabs of glue as you go to keep the material in place.
- Continue Wrapping: Continue wrapping until you’ve covered the desired portion of the jar. You can cover the entire jar, create stripes, or a defined section.
- Secure End: Once you’ve reached your stopping point, secure the end of the material with a generous dab of hot glue. Trim any excess.
B. Fabric Draping and Adhesion:
- Cut Fabric: Cut fabric into strips or shapes.
- Apply Adhesive: You can adhere fabric in several ways:
- Hot Glue: Apply hot glue to the glass and press the fabric into place. This is best for thicker fabrics like burlap.
- Mod Podge: Apply Mod Podge to the glass and then to the fabric, smoothing it down. This works well for thinner fabrics like lace or cotton.
- Spray Adhesive: Lightly spray the glass or the fabric with spray adhesive and then press the fabric onto the glass.
- Create Texture: Crinkle, pleat, or layer the fabric to create interesting textures.
C. Natural Elements and Embellishments:
- Adhesive Choice: Hot glue is generally the best adhesive for attaching heavier natural elements like stones, shells, or twigs. For lighter elements like sand or glitter, Mod Podge or spray adhesive can be used.
- Application:
- Sand/Small Pebbles: Apply a layer of Mod Podge or spray adhesive to the jar and then roll or press the sand or pebbles into the adhesive.
- Shells/Stones/Twigs: Apply hot glue to the item you are attaching and then press it firmly onto the glass. Work in sections.
- Dried Flowers: These can be delicate. You can adhere them with Mod Podge by carefully brushing it over the petals. Alternatively, you can arrange them and then carefully spray them with a clear sealant.
- Layering: Don’t be afraid to layer different natural elements for a rich, organic look.
Instagram Considerations for Textured Holders:
- Macro Shots: Textured holders lend themselves beautifully to close-up, macro photography that highlights the details.
- Natural Light: Position these holders near a window to capture the interplay of light and shadow on the textures.
- Bohemian and Rustic Aesthetics: Natural textures are perfect for achieving a bohemian, rustic, or coastal vibe.
- Contrast: Contrast smooth glass surfaces with rough textures for visual interest.
Technique 4: Glitter Glamour – Sparkle and Shine for Your Feed
Glitter is synonymous with celebration and glamour, making it a perfect addition to votive candle holders destined for Instagram.
Materials:
- Clean glass jars
- Glitter (various colors and sizes)
- Mod Podge or spray adhesive
- Paintbrush
- Newspaper or drop cloth
- Optional: Clear sealant
Instructions:
- Prepare Your Workspace: Spread newspaper or a drop cloth to catch excess glitter.
- Apply Adhesive:
- Mod Podge: Apply a thin, even layer of Mod Podge to the area of the glass jar you want to cover with glitter.
- Spray Adhesive: Lightly spray the glass with spray adhesive.
- Apply Glitter:
- Sprinkling: While the adhesive is still wet, generously sprinkle glitter over the glued area.
- Rolling/Dipping: You can also pour glitter onto a plate and then roll or dip the glued section of the jar into the glitter.
- Cover Completely: Ensure the entire area is covered with glitter. Gently shake off any excess glitter.
- Second Coat (Optional): For an even more intense sparkle, allow the first layer of glitter to dry slightly, then apply another layer of Mod Podge or spray adhesive and sprinkle with more glitter.
- Sealant (Recommended): Once the glitter is completely dry, it’s highly recommended to seal it to prevent shedding. Apply a thin layer of Mod Podge over the glitter, or spray with a clear acrylic sealant. Be careful not to disturb the glitter too much when sealing.
Instagram Considerations for Glitter Holders:
- Shimmer and Shine: Glitter catches the light beautifully, creating a dazzling effect.
- Color Coordination: Choose glitter colors that complement your existing décor or a specific photo theme.
- Subtle Sparkle vs. Full Bling: You can opt for a subtle dusting of glitter or go for full-on sparkle.
- Macro Shots with Bokeh: Glitter in the foreground can create a beautiful bokeh effect in the background of your photos.
Bringing It All Together: Tips for Instagram-Worthy Presentation
Once your votive candle holders are crafted, the next step is to present them in a way that will capture attention on Instagram.
- Lighting is Key: Natural light is your best friend. Position your candle holders near a window and allow the light to illuminate them. Avoid harsh overhead lighting, which can create unflattering shadows.
- Background Matters: Choose a background that complements your candle holders and the overall aesthetic you’re trying to achieve. Clean, minimalist backgrounds can make your creations pop, while textured backdrops like linen or wood can add depth.
- Focus on Ambiance: The purpose of votive candle holders is to create ambiance. Include a lit candle in your photos to showcase their true function. The soft glow of candlelight is incredibly photogenic.
- Composition and Framing: Experiment with different angles and perspectives. Try shooting from slightly above, at eye level, or even from a low angle to showcase different aspects of your holders. Utilize the rule of thirds for balanced compositions.
- Props and Styling: Incorporate complementary props like books, flowers, greenery, or other decorative items to enhance your scene. Keep it simple and avoid overcrowding.
- Highlight Textures and Details: Use macro lenses or zoom in to capture the intricate details of your designs, whether it’s the texture of burlap, the shimmer of glitter, or the delicate pattern of decoupage.
- Video Content: Consider creating short video clips showcasing the flickering candlelight, the movement of fabric, or the way light plays off glitter. Boomerangs and short Reels are perfect for this.
- Hashtag Strategy: Research relevant hashtags to increase the visibility of your posts. Think about broad terms like #DIYCandleHolder, #VotiveCandles, #HomeDecor, as well as more specific ones related to your techniques and style, such as #DecoupageCrafts, #GlitterDecor, #BohoHome.
- Consistency is Key: Develop a consistent visual style for your Instagram feed. This will help your followers recognize your content and build a cohesive aesthetic.
By mastering these techniques and paying attention to presentation, you can transform ordinary glass jars into stunning, Instagram-worthy votive candle holders that will not only enhance your living space but also shine brightly on your social media feed. The joy of DIY lies in the creative freedom it offers, so experiment, have fun, and let your imagination guide you.
