Tips for installing a gallery wall: Ever dreamed of creating a stunning visual display in your home with a collection of your favorite artwork? A gallery wall is a fantastic way to add personality and style to any room, but it can seem daunting to tackle.
Don’t worry, with a little planning and the right approach, you can transform your blank wall into a captivating art masterpiece.
This guide will walk you through the entire process, from selecting the perfect pieces to hanging them with precision. We’ll cover everything from choosing the right tools and hardware to creating a balanced and cohesive design that you’ll love for years to come.
Planning Your Gallery Wall
Creating a gallery wall is a fantastic way to personalize your space and showcase your favorite artwork. Before you start hammering in nails, however, there’s some planning to do to ensure a visually appealing and balanced result.
Installing a gallery wall can be a fun and rewarding project, but it can also feel overwhelming. One of the most important tips I’ve learned is to plan everything out beforehand, just like I did when I refreshed my kitchen cabinets in one afternoon.
Having a clear vision for the arrangement and spacing of your artwork will make the process much smoother and ensure a cohesive final result. So, grab a measuring tape and start visualizing your dream gallery wall!
Measuring the Wall Space and Artwork
The first step is to measure the wall space you’ll be working with. This includes the width and height of the area, as well as any obstacles like windows, doors, or electrical outlets. Once you have these measurements, you can start planning the arrangement of your artwork.
You’ll also need to measure each piece of artwork to determine its dimensions.
Arranging the Artwork
There are two main approaches to arranging your artwork: using a grid or a freeform layout.
Grid Layout
A grid layout provides a structured and symmetrical look. To create a grid, you’ll need to decide on the spacing between each piece of artwork. This spacing can be equal or varied, depending on your preference. You can also use a grid to create a sense of balance by arranging the artwork in a symmetrical or asymmetrical pattern.
Freeform Layout
A freeform layout allows for more creativity and flexibility. This approach involves arranging the artwork in a more organic and less structured way. You can use different sizes and shapes of artwork to create a visually interesting and dynamic arrangement.
Planning a gallery wall is a fun project, but getting it right can be tricky. You’ll want to consider the size and weight of each piece, as well as the spacing between them. For inspiration, you might check out news like the recent announcement of ptx metals green canada subsidiary announces acquisition of thelon basin uranium claims , which could be a good conversation starter for your wall! Once you’ve got your layout figured out, make sure to use a level to ensure everything is straight and even.
After all, a perfectly balanced gallery wall is a thing of beauty.
Selecting Artwork
When selecting artwork for your gallery wall, it’s important to consider the overall style and color scheme of your room.
Planning a gallery wall is a fun project, but it can be overwhelming. You want to make sure everything is balanced and visually appealing. It’s like crafting a delicious dessert – you want all the flavors to complement each other perfectly.
Maybe a little bit of sweet, a touch of tart, and a hint of spice? Just like you wouldn’t add a scoop of baked apple and bourbon ice cream to a chocolate cake, you wouldn’t want to mix mismatched frames or sizes in your gallery wall.
The key is to consider the overall theme and create a cohesive look.
Complementary Style
Choose artwork that complements the style of your room. For example, if your room has a modern aesthetic, you might select abstract prints or minimalist photography. If your room has a traditional style, you might choose paintings or prints with classic subjects.
Harmonious Color Scheme
Select artwork that incorporates colors that are already present in your room’s color scheme. This will create a cohesive and unified look. You can also use artwork to introduce new colors to your room, but it’s important to choose colors that complement the existing color scheme.
Gathering Your Supplies: Tips For Installing A Gallery Wall
You’ll need a few essential tools and materials to create your gallery wall. This will ensure you have everything you need to hang your artwork safely and securely.
Essential Tools, Tips for installing a gallery wall
The right tools will make your gallery wall installation easier and more efficient.
- Level:A level is crucial for ensuring that your artwork is hung straight. A small level is usually sufficient for most gallery walls.
- Hammer:You’ll need a hammer for driving nails into the wall. Choose a hammer with a comfortable grip and a head that’s not too heavy.
- Drill:A drill is essential for hanging heavier artwork or if you’re working with drywall. A cordless drill with a variety of drill bits will be most useful.
- Measuring Tape:A measuring tape is indispensable for measuring the size of your artwork and spacing it correctly on the wall.
- Pencil:You’ll need a pencil for marking the wall where you want to hang your artwork.
Hanging Hardware
Choosing the right hanging hardware is essential for safely and securely hanging your artwork.
- Picture Hangers:Picture hangers are designed to hold lightweight artwork and come in a variety of sizes and styles. Choose a picture hanger that is appropriate for the weight of your artwork.
- Hooks:Hooks are great for hanging lightweight items like posters or photographs. Choose a hook that can support the weight of your artwork.
- Nails:Nails are a common option for hanging artwork, but they may not be suitable for all wall types. Choose nails that are the appropriate size for your artwork and wall.
- Screws:Screws are a more secure option for hanging heavier artwork, especially if you’re working with drywall. Choose screws that are the appropriate length and diameter for your artwork and wall.
- Wire:Wire is often used to hang heavier artwork, such as paintings or mirrors. Choose wire that is strong enough to support the weight of your artwork.
- D-rings:D-rings are used to attach wire to the back of artwork. They come in various sizes and can be attached with screws or wire.
Materials Checklist
Before you start hanging your gallery wall, ensure you have the following materials on hand:
- Picture hangers or hooks(depending on the weight and type of artwork)
- Nails or screws(depending on the weight and type of artwork)
- Wire(if necessary)
- D-rings(if necessary)
- Wall anchors(if needed for drywall)
- Hammer
- Drill(if needed)
- Level
- Measuring tape
- Pencil
Hanging the Artwork
Now that your gallery wall is planned and your supplies are gathered, it’s time for the fun part: hanging the artwork! This step requires precision and a bit of patience, but with the right techniques, you’ll be able to create a stunning and balanced display.
Marking the Wall
Before you start hammering nails, it’s crucial to mark the wall accurately. This ensures your artwork is level and hangs at the desired height. Here’s how to do it:
- Use a level to determine the starting point for your first piece. If you’re hanging multiple pieces, make sure the top of each piece aligns with the others.
- Use a pencil to mark the wall where you want to hang the artwork. Remember to consider the height of the artwork and the location of any electrical outlets or switches.
- If you’re using a template, like a grid or a layout plan, use it to mark the positions of the remaining pieces on the wall.
Hanging the Artwork
Once you’ve marked the wall, you can start hanging your artwork.
- Choose the appropriate hanging hardware for each piece. Consider the weight of the artwork and the type of wall. For heavier pieces, use heavy-duty hooks or D-rings. For lighter pieces, you can use command strips or adhesive hooks.
- If you’re using nails, use a hammer to carefully drive them into the wall at the marked positions. Ensure the nails are hammered straight to prevent the artwork from tilting.
- If you’re using hooks, hang them on the nails or screws you’ve already installed. Make sure the hooks are secure and won’t easily come loose.
- Hang the artwork on the hooks or nails, making sure it’s level and centered. Use a level to double-check the alignment.
Adjusting the Spacing
The spacing between your artwork is essential for creating a balanced and cohesive look.
- Start by using a tape measure to determine the desired spacing between your pieces. This will depend on the size of the artwork and the overall style of your gallery wall.
- If you’re using a grid system, the spacing between the pieces will be predetermined. If you’re not using a grid, experiment with different spacing options to find what works best for your space.
- Remember to consider the overall flow of the gallery wall and how the pieces complement each other.
Using the Right Hanging Hardware
Choosing the right hanging hardware is crucial for ensuring your artwork stays securely on the wall.
- For drywall:Use drywall anchors or toggle bolts for heavier pieces. For lighter pieces, you can use command strips or adhesive hooks.
- For plaster walls:Use plaster wall anchors or toggle bolts. Avoid using nails, as they can damage the plaster.
- For brick walls:Use brick wall anchors or toggle bolts. You can also use heavy-duty hooks designed for brick walls.
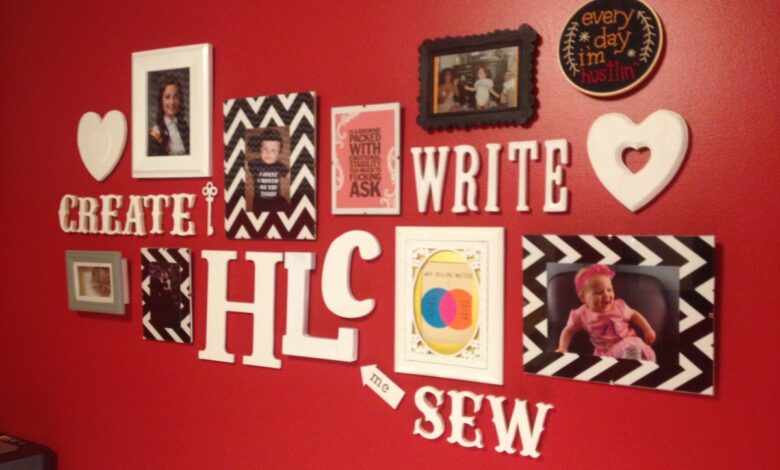
Creating a Cohesive Gallery Wall

A cohesive gallery wall is a beautiful and dynamic display that reflects your personal style and taste. It’s more than just hanging a bunch of artwork together; it’s about creating a visual story that draws the eye and sparks conversation.
The key is to curate a collection that works together harmoniously, regardless of individual pieces.
Choosing Artwork
Choosing artwork that complements each other in terms of style, color, and theme is crucial for a cohesive gallery wall. Consider these tips:
- Style: Explore different art styles, but choose pieces that share a common thread. For instance, you might combine abstract art with minimalist prints or vintage posters with contemporary paintings. The key is to find a unifying element, such as a similar color palette, subject matter, or overall aesthetic.
- Color: Use a color palette that creates a sense of unity. This doesn’t mean everything has to match perfectly; you can use complementary colors, analogous colors, or even a monochromatic scheme. The important thing is to create a visual flow that ties the pieces together.
- Theme: Choosing artwork around a theme can help create a more cohesive and meaningful gallery wall. This could be a specific subject matter, like nature, travel, or cityscapes, or a broader theme like nostalgia, abstract expressionism, or modern art. The theme can serve as a unifying factor, guiding your selection and arrangement.
Incorporating Different Sizes and Shapes
Varying the size and shape of your artwork is essential for creating visual interest and preventing a monotonous look.
- Size: Play with a mix of large and small pieces to create a dynamic and visually appealing arrangement. A large statement piece can anchor the wall, while smaller pieces can add pops of color and detail. Consider using a few large pieces to create a focal point and then filling in the gaps with smaller pieces.
- Shape: Experiment with different shapes, such as squares, rectangles, circles, and even irregular shapes. Mixing shapes adds visual complexity and breaks up the monotony of a wall dominated by squares or rectangles.
Using Negative Space
Negative space, or the empty space around your artwork, is just as important as the artwork itself. It helps create a balanced and visually appealing arrangement.
“Negative space is not merely the absence of something, but the presence of something else.”
Robert Henri
- Balance: Too much negative space can make the wall feel empty, while too little can make it feel cluttered. Aim for a balance that creates a sense of harmony and visual flow. Experiment with different arrangements and step back to see how the negative space affects the overall composition.
- Visual Interest: Use negative space to create visual interest and guide the viewer’s eye. For example, you can use negative space to create a sense of depth or to highlight a particular piece of artwork.
Adding Finishing Touches

Now that your artwork is hung, it’s time to add some finishing touches to elevate your gallery wall from good to great. These final details can make all the difference in creating a truly cohesive and stylish display.
Adding Decorative Elements
Adding decorative elements can enhance the visual interest and personality of your gallery wall. Here are some ideas:
- Shelves:Floating shelves can add dimension and functionality to your gallery wall. They can display smaller items like sculptures, plants, or books, creating a layered effect.
- Mirrors:Mirrors can visually enlarge a space and add a touch of glamour. They can be incorporated into the gallery wall itself or placed strategically nearby to reflect the artwork and create a sense of depth.
- Lighting:Proper lighting is crucial for showcasing your artwork. Consider using spotlights or track lighting to highlight specific pieces, or string lights to create a warm and inviting ambiance.
Choosing Frames
The frames you choose can significantly impact the overall look of your gallery wall. Here are some tips:
- Consider the Artwork:The frames should complement the style and colors of the artwork. For example, a minimalist print might look best in a simple black or white frame, while a vibrant painting could benefit from a bold, colorful frame.
- Match the Room’s Style:Choose frames that harmonize with the overall style of the room. A traditional room might call for ornate frames, while a modern space might benefit from sleek, minimalist frames.
- Create Visual Unity:For a cohesive look, consider using frames with a similar finish or color scheme. However, you can also create visual interest by mixing and matching frames with different textures and styles.
Creating a Cohesive Look
- Consider the Overall Design:Your gallery wall should complement the design of the room. If the room has a minimalist aesthetic, your gallery wall should reflect that. If the room is eclectic, your gallery wall can be more playful and experimental.
- Maintain Balance:Ensure that the gallery wall is balanced visually. Avoid overcrowding one area and leaving another sparse.
- Play with Shapes and Sizes:Don’t be afraid to experiment with different shapes and sizes of artwork and frames. This can add visual interest and prevent the gallery wall from looking too monotonous.