Indigo Christmas stocking DIY is a delightful way to bring a touch of handcrafted charm to your holiday decor. The rich, deep blue of indigo dye evokes a sense of tradition and artistry, while the DIY aspect allows you to personalize your stocking with unique details that reflect your style and spirit.
This project combines the joy of crafting with the beauty of natural dyes, resulting in a truly one-of-a-kind Christmas stocking that you’ll cherish for years to come. Whether you’re a seasoned crafter or a curious beginner, this step-by-step guide will empower you to create a stunning indigo stocking that’s sure to be a treasured holiday heirloom.
Introduction to Indigo Christmas Stocking DIY

Christmas stockings are a cherished tradition, hanging by the fireplace, filled with small gifts and treats. They symbolize the magic and joy of the holiday season, bringing a touch of whimsy and excitement to every home. But while traditional red and green stockings are popular, a unique and stylish alternative is emerging: indigo-dyed Christmas stockings.Indigo dye has a rich history, steeped in tradition and craftsmanship.
Its deep blue hue, reminiscent of the night sky, has captivated artists and artisans for centuries. This natural dye is known for its vibrant color and its ability to create intricate patterns and textures. Creating a DIY indigo Christmas stocking offers several benefits.
It allows for personalization, letting you express your individual style and creativity. You can choose the size, shape, and design, making your stocking truly unique. The process of dyeing the fabric itself is a rewarding experience, connecting you to the ancient art of indigo dyeing.
I’m so excited about my indigo Christmas stocking DIY project! I’m using a natural dye technique to create a beautiful, deep blue color. While I’m waiting for the dye to set, I’m planning out my holiday menu. I found a great recipe for 5 easy crostini appetizers perfect for the holidays that I’m going to try out.
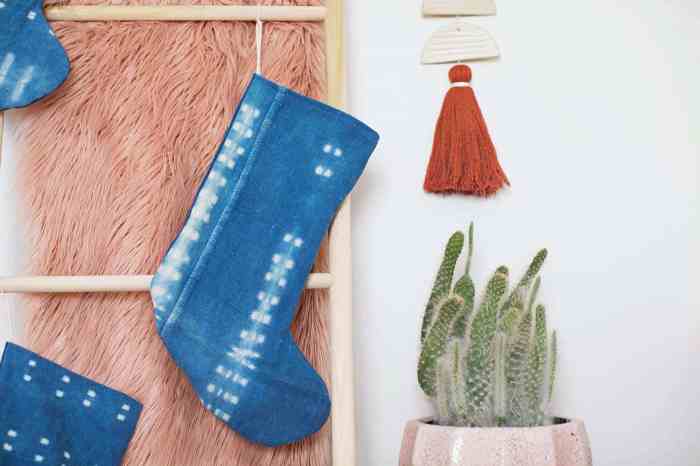
I think they’ll be a perfect complement to my homemade mulled cider. Once the stockings are dry, I’ll be adding a personal touch with some embroidery. I can’t wait to see how they turn out!
The Appeal of Indigo Dye
Indigo dye’s popularity stems from its versatility and unique characteristics. Its deep blue color, often described as a “true blue,” evokes a sense of tranquility and sophistication. It complements various holiday decorations, from rustic farmhouse to modern minimalist styles.
Making indigo-dyed Christmas stockings this year? They’ll look amazing hanging by the fireplace! But where to store them when not in use? I’m thinking about using my new elsies super secret storage cabinet – it’s perfect for hiding away seasonal decor! Once the stockings are finished, I’ll tuck them away in Elsie’s cabinet until next December, ready to be filled with festive treats.
Indigo dye also has a natural, earthy quality, making it a sustainable and eco-friendly choice for your holiday crafts.
I’m so excited to share my latest DIY project – indigo-dyed Christmas stockings! The process was a bit messy, but the results are stunning. It’s amazing how much you can learn online, especially with the recent news that net neutrality wins again.
Now I can freely research and share my creative endeavors without worrying about internet throttling. Back to the stockings – I’m thinking of adding some personalized embroidery to really make them special.
Benefits of a DIY Indigo Christmas Stocking
Creating your own indigo Christmas stocking offers several advantages over commercially available options:
- Personalization:You can customize the size, shape, and design of your stocking to match your personal style and preferences.
- Unique Style:An indigo-dyed stocking stands out from the crowd, adding a touch of sophistication and originality to your holiday decor.
- Sense of Accomplishment:The process of dyeing the fabric yourself is a rewarding experience, allowing you to connect with traditional crafts and create something truly special.
- Cost-Effectiveness:Making your own stocking can be more cost-effective than purchasing a pre-made one, especially if you already have some basic supplies.
Materials and Supplies

To create a stunning indigo-dyed Christmas stocking, you’ll need a few essential materials and supplies. This section will guide you through the process of gathering the right tools and ingredients for a successful indigo dyeing experience.
Indigo Dye and Soda Ash
Indigo dye is the key ingredient for achieving the iconic blue color. It’s available in powder form and needs to be mixed with water and soda ash to create a dyeing solution. Soda ash, also known as sodium carbonate, acts as an alkali, helping to dissolve the indigo dye and make it ready for dyeing.
Fabric Selection
Choosing the right fabric is crucial for a durable and aesthetically pleasing stocking. Natural fibers like cotton, linen, and silk are excellent choices for indigo dyeing. These fabrics readily absorb the dye and create a rich, deep blue hue.
- Cotton: A popular choice due to its affordability, durability, and excellent dye absorption.
- Linen: Offers a slightly rougher texture and a natural, rustic look, perfect for a vintage-inspired stocking.
- Silk: Known for its luxurious feel and vibrant color, silk produces a stunning and delicate indigo-dyed stocking.
Tools and Equipment, Indigo christmas stocking diy
Having the right tools and equipment will make the indigo dyeing process smoother and more enjoyable.
- Gloves: Protect your hands from the indigo dye, which can stain. Rubber gloves are ideal for this purpose.
- Containers: You’ll need several containers for mixing the dye solution, soaking the fabric, and rinsing it after dyeing. A large plastic tub or bucket is suitable for the dyeing process, while smaller containers are helpful for rinsing and soaking.
- Stirring Stick: Use a sturdy stick to thoroughly mix the indigo dye solution and ensure the dye is evenly distributed.
Dyeing the Fabric

Now that you have your fabric prepped, it’s time to dive into the magical world of indigo dyeing. This process involves submerging the fabric in a vat of indigo dye and allowing it to soak, resulting in the beautiful, vibrant blue color we all love.
The Science Behind Indigo Dyeing
Indigo dye is a natural dye derived from plants, and its color development relies on a fascinating chemical process called oxidation. When indigo dye is in its powdered form, it is actually colorless. The magic happens when it comes into contact with an alkaline solution and air.
This process involves a series of chemical reactions that transform the colorless indigo into its iconic blue hue.
Indigo dye is a natural dye derived from plants, and its color development relies on a fascinating chemical process called oxidation.
Achieving Even Dye Distribution
To achieve a consistent, even dye distribution across your fabric, there are a few crucial steps to follow:* Pre-soak the fabric:Before introducing the fabric to the dye bath, soak it in clean water for at least 30 minutes. This helps the fabric absorb the dye evenly.
Submerge the fabric gently
Avoid forcefully pushing the fabric into the dye bath, as this can create wrinkles and uneven dye distribution. Gently lower the fabric into the bath and allow it to settle.
Stir the dye bath
Regularly stir the dye bath to ensure that the dye is evenly distributed and the fabric is fully submerged.
Avoid over-dyeing
Over-dyeing can lead to a muddy, dark blue color. Stick to the recommended dye bath time for the desired shade.
Rinse thoroughly
After dyeing, rinse the fabric thoroughly with clean water until the water runs clear. This removes any excess dye and prevents the fabric from bleeding.
Creating the Stocking Shape
Now that your fabric is dyed, it’s time to turn it into a beautiful indigo Christmas stocking. This step involves cutting the fabric into the desired stocking shape and then carefully sewing it together.You can use a pattern to create a perfectly symmetrical stocking, or you can freehand it for a more whimsical look.
If you’re using a pattern, be sure to transfer the pattern onto the fabric using a fabric marker or pencil. If you’re freehanding it, sketch out the shape directly on the fabric.
Cutting the Fabric
Before cutting, remember to account for seam allowances, typically 1/2 inch. Carefully cut out the stocking shape, paying close attention to the details of the pattern or your freehand design. Remember, this is your chance to add a personal touch to your stocking.
You can create unique shapes, like a boot or a mitten, or add intricate details like a cuff or a pointy toe.
Sewing the Stocking
Now comes the sewing part. Here, you can choose from a variety of stitching techniques and seam finishes that suit your skill level and the desired look.
Stitching Techniques
- Backstitch: This is a strong and reliable stitch that’s great for securing seams. It’s ideal for the main body of the stocking, especially around the top opening.
- Slip stitch: This nearly invisible stitch is perfect for finishing seams on the inside of the stocking, creating a clean and professional look.
- Zigzag stitch: This stitch can be used to finish raw edges, preventing fraying and adding a decorative touch.
Seam Finishes
- Serging: This technique uses a special machine to create a professional and durable seam finish. It’s ideal for fabrics that fray easily, such as silk or linen.
- Pinked edges: This involves cutting the raw edges of the fabric with a pinking shears. It prevents fraying and adds a decorative touch.
- French seams: This technique encloses the raw edges of the fabric within the seam, creating a neat and durable finish. It’s often used for delicate fabrics.
Tips for Creating a Durable Stocking
- Reinforce the top opening: The top of the stocking will experience the most wear and tear, so it’s important to reinforce it. Use a strong fabric, like canvas, or double-stitch the opening for extra durability.
- Choose a strong thread: Use a high-quality thread that’s appropriate for the fabric you’re using. For example, a thicker thread is better for heavier fabrics.
- Press the seams: Pressing the seams as you go will help create a smooth and professional finish. It also helps to prevent the seams from puckering.