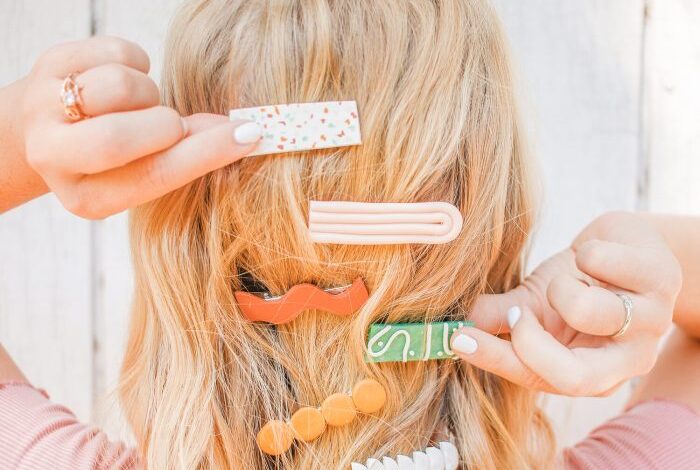
3 Trendy DIY Hair Clips So Easy – Tired of boring hair accessories? Want to add a touch of personality to your style without breaking the bank? DIY hair clips are the perfect solution! These trendy designs are surprisingly simple to create, and you can customize them to match your unique taste.
From scrunchies to beaded embellishments, we’ll guide you through three easy projects that will have you rocking your own creations in no time.
Imagine the possibilities! You can whip up a set of clips in a few minutes using supplies you probably already have at home. Not only is it a fun and rewarding craft, but it’s also a great way to express your individuality and save money on expensive hair accessories.
Ready to get creative? Let’s dive into these easy-to-follow DIY projects!
Trendy DIY Hair Clips: Easy and Stylish

Accessorizing with hair clips is a fun and easy way to elevate your style. Making your own DIY hair clips allows you to create unique pieces that perfectly match your personality and wardrobe. Plus, it’s a budget-friendly way to experiment with different styles and trends.
Not only is it a fun craft, but it also offers a chance to express your creativity and create something truly special.
Looking for some easy and stylish DIY projects? You can create 3 trendy hair clips in just a few minutes with materials you probably already have around the house. If you’re feeling extra crafty, try out this easy magnetic photo puzzle tutorial – it’s a fun way to personalize your space and make a unique gift.
Once you’ve mastered the puzzle, you’ll be back to those hair clips in no time, experimenting with different colors and embellishments!
DIY hair clips are trending because they offer a unique way to personalize your look. You can choose colors, patterns, and embellishments that perfectly match your style. These clips also provide a way to showcase your creativity and artistic flair.
Crafting those trendy DIY hair clips is a fun way to personalize your look, but sometimes it’s nice to just sit back and scroll through social media for inspiration. While I was browsing, I came across a thought-provoking article on probeat twitter should bantrump , which sparked a lively debate in the comments.
It’s amazing how even something as simple as a hair clip can lead to such diverse conversations! Anyway, back to those DIY clips – I’m thinking of trying out a new design with some vintage buttons.
From minimalist designs to bold and colorful creations, there’s a DIY hair clip trend for everyone.
DIY Hair Clip Projects
This blog post will explore three trendy DIY hair clip projects. These projects are easy to follow, require minimal materials, and offer a variety of design options.
DIY Hair Clip Project #1
This project will guide you through creating a stylish and functional scrunchie hair clip, adding a touch of whimsy to your hair accessories.
I’m all about finding fun and easy DIY projects, and these 3 trendy hair clips are right up my alley! I’m always looking for ways to express my personal style, and making my own accessories is a great way to do that.
While I’m on the topic of creativity, have you heard about the bold chatbot david byttow secret ? It’s a fascinating concept that’s really got me thinking about the future of technology. Anyway, back to the hair clips! I’m so excited to get started on these projects and add some personality to my look.
Materials and Tools
This project requires basic materials and tools commonly found in craft supplies.
- Scrunchie: Choose a scrunchie in your desired color and fabric.
- Hair clip: Select a plain hair clip that matches the size and style of your scrunchie.
- Sewing needle and thread: Matching the color of your scrunchie is recommended.
- Scissors: For cutting the thread.
Steps to Create a Scrunchie Hair Clip
The steps to create a scrunchie hair clip are simple and straightforward.
- Place the hair clip in the center of the scrunchie.
- Carefully fold the scrunchie over the hair clip, ensuring it is evenly distributed.
- Use your needle and thread to sew the scrunchie closed around the hair clip, making sure to secure it tightly.
- Tie off the thread and trim any excess.
Project Summary
This table summarizes the materials, tools, and steps involved in creating a scrunchie hair clip:
| Materials | Tools | Steps | Notes |
|---|---|---|---|
| Scrunchie | Sewing needle | Place the hair clip in the center of the scrunchie. | Choose a scrunchie that complements your hair color and style. |
| Hair clip | Thread | Fold the scrunchie over the hair clip. | Select a hair clip that matches the size and style of your scrunchie. |
| Scissors | Sew the scrunchie closed around the hair clip. | Use thread that matches the color of your scrunchie. | |
| Tie off the thread and trim any excess. | Ensure the hair clip is securely attached to the scrunchie. |
DIY Hair Clip Project #2: Beaded Hair Clip

This project is perfect for adding a touch of elegance and sparkle to your hair. You can customize the colors and bead styles to match your personal style. It’s a fun and easy way to elevate your hair accessories.
Materials and Tools
Here are the materials you’ll need to create your beaded hair clip:
- Hair clip (metal or plastic)
- Beads (various colors and sizes)
- Wire (flexible, thin, and strong)
- Wire cutters
- Pliers (round-nose or needle-nose)
Creating the Beaded Hair Clip
Here are the step-by-step instructions for creating your beaded hair clip:
- Cut the wire.Measure and cut a length of wire that is about twice the length of your hair clip. This will give you enough wire to work with and create loops on both ends.
- Attach the wire to the hair clip.Using your pliers, create a small loop at one end of the wire. Slide the loop onto the hair clip, making sure it’s secure. Use the pliers to tighten the loop around the hair clip.
- String the beads.Start stringing your beads onto the wire. You can create any pattern or design you like. If you’re using different sizes of beads, be sure to alternate them for a more interesting look.
- Secure the beads.Once you’ve strung all of your beads, create a small loop at the other end of the wire. Slide the loop onto the hair clip, making sure it’s secure. Use the pliers to tighten the loop around the hair clip.
- Trim the wire.Cut off any excess wire with your wire cutters. Your beaded hair clip is now ready to wear!
Project Overview
Here is a table that summarizes the materials, tools, and steps involved in this project:
| Category | Item | Description | Steps | |
|---|---|---|---|---|
| Materials | Hair clip | Metal or plastic clip for holding hair | 1. Attach wire to clip | 4. Secure beads to clip |
| Beads | Various colors and sizes for decoration | 3. String beads onto wire | ||
| Wire | Flexible, thin, and strong for stringing beads | 1. Cut wire to desired length | 2. Create loops at both ends | |
| Tools | Wire cutters | For cutting wire | 1. Cut wire to desired length | 5. Trim excess wire |
| Pliers | Round-nose or needle-nose for creating loops | 2. Create loops at both ends | 4. Secure beads to clip |
DIY Hair Clip Project #3: Fabric Covered Hair Clip
This project is a fantastic way to add a personal touch to your hair accessories. You can choose fabrics that match your outfits or reflect your style. It’s a simple and fun project that allows you to express your creativity.
Materials Needed for the Fabric Covered Hair Clip
The materials needed for this project are readily available at most craft stores or online retailers.
- Hair clips (metal or plastic)
- Fabric scraps (cotton, felt, or any other fabric of your choice)
- Fabric glue or hot glue
- Scissors
- Optional: Decorative embellishments (ribbons, beads, buttons)
Steps for Creating the Fabric Covered Hair Clip
This project involves covering the hair clip with fabric, giving it a new look and feel.
- Cut a piece of fabric slightly larger than the hair clip. You can use a ruler to measure the dimensions of the hair clip and add a small margin for seam allowance.
- Apply fabric glue or hot glue to the back of the hair clip. Make sure the glue covers the entire surface of the clip.
- Carefully place the fabric over the glued hair clip, ensuring it is centered and smooth. Press down firmly to secure the fabric to the clip.
- Trim any excess fabric around the edges of the hair clip using scissors. If you want a clean finish, you can fold the edges of the fabric under before gluing.
- Let the glue dry completely before adding any decorative embellishments. You can use ribbons, beads, buttons, or other decorative elements to personalize your fabric-covered hair clip.
Materials, Tools, and Steps for the Fabric Covered Hair Clip
| Materials | Tools | Steps |
|---|---|---|
| Hair clips (metal or plastic) | Scissors | Cut a piece of fabric slightly larger than the hair clip. |
| Fabric scraps (cotton, felt, or any other fabric of your choice) | Ruler | Apply fabric glue or hot glue to the back of the hair clip. |
| Fabric glue or hot glue | N/A | Carefully place the fabric over the glued hair clip. |
| Optional: Decorative embellishments (ribbons, beads, buttons) | N/A | Trim any excess fabric around the edges of the hair clip. |
| N/A | N/A | Let the glue dry completely before adding any decorative embellishments. |
Conclusion: 3 Trendy Diy Hair Clips So Easy

Creating your own hair clips is a fun and rewarding experience. Not only can you personalize your style, but you can also save money compared to buying them at the store. Plus, you can feel good knowing you made something unique and special with your own hands.
Why You Should Try These DIY Hair Clip Projects, 3 trendy diy hair clips so easy
These DIY hair clip projects are easy and affordable, making them perfect for beginners. They are also great for experimenting with different colors, textures, and styles to create unique hair accessories that reflect your personal style.