Peter Pan Collar Necklace DIY: Craft Your Own Vintage-Inspired Accessory
The Peter Pan collar, a timeless emblem of girlish charm and vintage elegance, has transcended its sartorial origins to become a beloved motif in the world of jewelry. A Peter Pan collar necklace, with its signature rounded, delicate neckline, offers a whimsical yet sophisticated touch to any outfit. This article provides a comprehensive, step-by-step guide to crafting your own Peter Pan collar necklace DIY, catering to various skill levels and material preferences. We will explore different design approaches, essential techniques, and tips for customization, ensuring you can create a unique and eye-catching accessory.
Understanding the Peter Pan Collar Motif in Jewelry
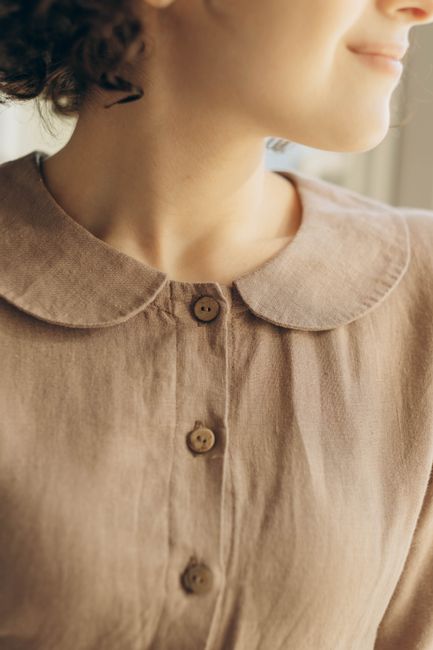
The essence of a Peter Pan collar necklace lies in its miniaturized representation of the iconic garment detail. Typically, these necklaces feature a band that encircles the base of the neck, adorned with a rounded, often slightly pointed, "collar" element that sits just below the collarbone. The appeal stems from its inherent sweetness, a nod to retro aesthetics, and its versatility. It can be crafted from a wide array of materials, from intricate beadwork and delicate metalwork to fabric and even laser-cut acrylic. The "DIY" aspect allows for personalization, enabling wearers to imbue their creations with their own style, whether it’s a minimalist modern interpretation or a richly ornate vintage-inspired piece.
Essential Materials and Tools for Your Peter Pan Collar Necklace DIY
Regardless of the specific design you choose, certain fundamental materials and tools will be indispensable for your Peter Pan collar necklace DIY.
- Base Material for the Collar: This could be:
- Felt or Fabric: For a softer, more approachable collar. Choose fabrics like cotton, silk, or even a stiff interfacing for structure.
- Metal Sheeting: For a more robust and metallic look. Brass, copper, or aluminum are good choices for beginners.
- Embroidery Floss or Yarn: For a crocheted or embroidered collar.
- Beads: Seed beads, seed pearls, or larger statement beads can form the entire collar structure or be used for embellishment.
- Wire: Sterling silver, craft wire, or artistic wire can be used for wire-wrapping or creating a delicate filigree.
- Necklace Chain or Cord:
- Metal Chain: Sterling silver, gold-filled, plated metal, or even antique brass chains. Consider the thickness and style to complement your collar.
- Leather Cord or Ribbon: For a more bohemian or casual look.
- Clasp and Jump Rings: A lobster clasp, toggle clasp, or magnetic clasp, along with appropriate-sized jump rings to connect the chain and clasp to the collar.
- Adhesives (if applicable):
- Fabric Glue: For attaching fabric elements or embellishments.
- Jewelry Glue: Strong, clear-drying glue for securing beads or small components.
- E6000: A robust adhesive suitable for metal and other jewelry materials.
- Tools:
- Scissors: Sharp scissors for cutting fabric, felt, or thin metal.
- Pliers:
- Round-Nose Pliers: For creating loops and curves in wire.
- Chain-Nose Pliers: For opening and closing jump rings, gripping small components.
- Wire Cutters: For cleanly snipping wire.
- Needles: Depending on your materials, you might need a fine sewing needle or a beading needle.
- Awl or Hole Punch: For creating precise holes in fabric or thin metal.
- Measuring Tape or Ruler: For accurate measurements.
- Optional Tools:
- Jewelry Saw and Files: For shaping and finishing metal.
- Embossing Tools: For adding texture to metal.
- Crochet Hook or Knitting Needles: If working with yarn or thread.
- Sewing Machine: For quicker fabric assembly.
- Jewelry Chamois or Polishing Cloth: For finishing metal components.
DIY Design Approach 1: The Fabric Peter Pan Collar Necklace
This is an accessible and versatile option, perfect for beginners.
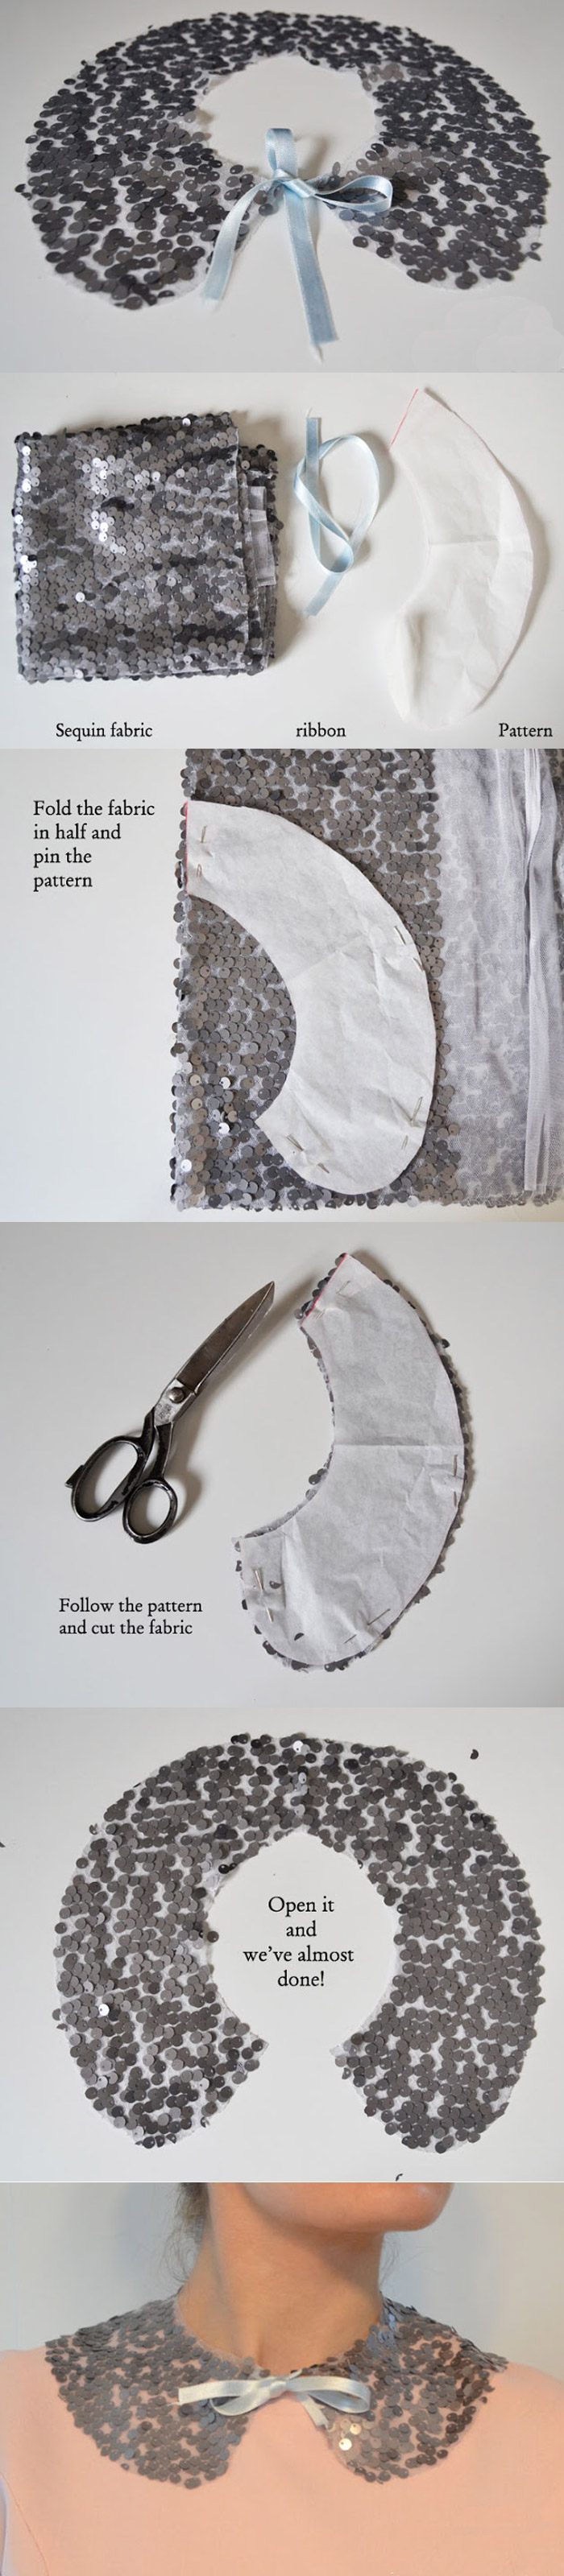
Step 1: Design and Pattern Creation
Decide on the size and shape of your Peter Pan collar. A typical collar can range from 1.5 to 3 inches in width. You can sketch your design directly onto paper or use an existing garment collar as a template. For a classic Peter Pan look, aim for a rounded curve that meets at the front, creating a smooth neckline. You can also opt for a slightly more pointed or scalloped edge for variation.
Step 2: Material Selection
Choose your fabric. Cotton is a great starting point for its ease of handling. For a crisper collar, consider using a stiff interfacing or a more structured fabric like linen. For a softer feel, silk or velvet could be employed.
Step 3: Cutting the Fabric
Trace your collar design onto the chosen fabric. You will need two identical pieces for the front and back of the collar. If using interfacing, cut one piece of interfacing to match the collar shape.
Step 4: Assembling the Collar
- Method A (Simple Seam): Place the two fabric pieces right sides together. Sew around the outer edge, leaving the inner neckline edge open. Trim excess seam allowance, especially around the curves, to reduce bulk and allow for a smooth turn. Turn the collar right side out and press it flat.
- Method B (Interfaced): Fuse the interfacing to the wrong side of one of the fabric collar pieces. Then, place the interfaced piece and the plain fabric piece right sides together. Sew around the outer edge as in Method A. This method provides a firmer, more structured collar.
Step 5: Finishing the Inner Edge
The inner edge of the collar, which will sit against the neck, needs a clean finish.
- Fold and Stitch: Fold the raw edge of the inner neckline inwards by about ¼ inch and press. Then, fold it in again to encase the raw edge and press. Topstitch close to the folded edge to secure it.
- Bias Tape: Alternatively, bind the inner edge with bias tape for a professional and durable finish.
Step 6: Attaching Necklace Findings
At each end of the inner neckline of your finished collar, you need to attach jump rings.
- Option A (Sewn Loops): Create small fabric loops (about ½ inch long and ¼ inch wide) from the same fabric or a coordinating one. Fold the ends of the collar’s inner edge inwards and sandwich the loop within the fold. Sew securely to create a hidden loop. Attach a jump ring to this loop.
- Option B (Direct Attachment): If your collar has a sturdy enough finish, you can carefully punch small holes at each end of the inner neckline using an awl or hole punch. Attach jump rings through these holes.
- Option C (Fabric Glue Reinforcement): For added security, especially with Option B, you can reinforce the area around the jump ring attachment with a small dab of fabric glue.
Step 7: Assembling the Necklace
Attach your chosen chain or cord to the jump rings on either end of the collar using chain-nose pliers. Ensure the jump rings are securely closed. Attach your chosen clasp to the other end of the chain or cord.
DIY Design Approach 2: The Metal Peter Pan Collar Necklace
This approach offers a more contemporary and refined aesthetic.
Step 1: Design and Template Creation
Sketch your collar design on paper. You can also find printable templates online for inspiration. Consider the thickness of the metal you want to work with. For beginners, thinner gauge craft metal (around 24-28 gauge) is easier to cut and shape.
Step 2: Transferring the Design to Metal
There are several ways to do this:
- Tracing Paper: Trace your design onto tracing paper. Place the tracing paper over your metal sheet and trace the design firmly with a pencil or stylus. The impression will transfer to the metal.
- Permanent Marker: Draw directly onto the metal with a permanent marker. Ensure the metal surface is clean and free of oils.
Step 3: Cutting the Metal
This is the most challenging step and requires caution.
- Jewelry Saw: For intricate shapes, a jewelry saw is the most effective tool. Clamp the metal sheet firmly and carefully saw along your drawn lines. This requires practice and a steady hand.
- Heavy-Duty Scissors or Shears (for very thin metal): For very thin and soft metals, strong craft shears might suffice for straight cuts, but curves will be difficult.
- Metal Snips: Dedicated metal snips can be used for rough cutting, followed by filing for precision.
Step 4: Shaping and Refining
Once the basic shape is cut, you’ll need to refine it.
- Files: Use various jewelry files (needle files for detail, coarser files for initial shaping) to smooth rough edges and perfect the curves.
- Embossing Tools: You can use embossing tools to create subtle textures or raised patterns on the metal collar.
- Doming Tools and Mallets: If you want a slightly curved, three-dimensional collar, you can gently dome the metal over a dapping block or with a wooden mallet on a curved surface.
Step 5: Creating Attachment Points
You need a way to attach the necklace chain.
- Holes: Use an awl or a small drill bit to carefully create two small holes at each end of the inner neckline of the collar. Ensure the holes are placed where the chain will attach discreetly.
- Loops: For a more integrated look, you can create small loops from the same metal wire or thicker gauge wire. Solder or epoxy these loops to the ends of the collar.
Step 6: Finishing and Polishing
- Sandpaper/Emery Paper: Start with coarser grit sandpaper and gradually move to finer grits to smooth the metal surface.
- Polishing Compounds and Buffing Wheels: For a mirror finish, use polishing compounds with a buffing wheel on a rotary tool or by hand with a jewelry chamois.
- Metal Patina (Optional): For an antique look, you can apply a metal patina. Follow the manufacturer’s instructions carefully.
Step 7: Assembling the Necklace
Attach jump rings to the holes or loops you created on the collar. Then, connect your chosen metal chain and clasp using chain-nose pliers.
DIY Design Approach 3: The Beaded Peter Pan Collar Necklace
This approach allows for intricate and colorful designs.
Step 1: Design and Bead Selection
Plan the size and shape of your collar. Consider using seed beads for intricate patterns, seed pearls for a classic look, or a combination of larger beads for focal points. You can create a solid beaded collar or a more open, lacy design.
Step 2: Foundation Material (Optional but Recommended)
For a well-defined collar shape, it’s often helpful to have a foundation.
- Felt or Stiff Fabric: Cut a collar shape from felt or a stiff fabric. This will serve as the base onto which you will stitch or glue your beads.
- Stiff Mesh or Netting: This can create a lighter, more transparent beaded collar.
Step 3: Beading Techniques
- Stitching onto Fabric: Use a beading needle and strong beading thread (like FireLine or Nymo) to stitch beads onto your fabric foundation. Techniques like peyote stitch, brick stitch, or simple linear stringing can be employed.
- Wire Weaving: Use beading wire or artistic wire to weave beads together, creating the collar structure. This offers more flexibility in design without a fabric base.
- Bead Crochet or Knitting: If you have crochet or knitting skills, you can create intricate beaded collars using fine yarn and specialized beads with larger holes.
Step 4: Creating the Collar Shape
As you bead, continuously refer to your design to ensure you are maintaining the Peter Pan collar shape. For fabric foundations, stitch outwards from the center or edge. For wire weaving, build the shape as you go.
Step 5: Finishing the Edges
- Fabric Foundation: Once the beading is complete, you can trim the excess fabric foundation around the beaded edge, or cover the raw edges with a thin layer of fabric glue or a beaded edging.
- Wire Weaving: Ensure all wire ends are securely tucked or finished to avoid snagging.
Step 6: Attaching Necklace Findings
- For Fabric Foundations: Similar to the fabric collar, create small loops or punch holes at the ends of the beaded collar to attach jump rings. Ensure these attachment points are reinforced with extra stitching or glue.
- For Wire Weaving: Incorporate attachment loops into your wire design at the ends of the collar.
Step 7: Assembling the Necklace
Connect your chosen chain or cord to the jump rings or loops on the beaded collar, and then attach your clasp.
Customization and Embellishment Ideas
The beauty of a DIY Peter Pan collar necklace lies in its potential for personalization.
- Embellishments:
- Pearls: Freshwater pearls, glass pearls, or faux pearls add elegance.
- Crystals/Rhinestones: For sparkle and glamour.
- Charms: Small charms can be dangled from the collar or integrated into the design.
- Embroidery: Add delicate embroidery stitches to fabric or felt collars.
- Lace: Incorporate sections of lace for a romantic feel.
- Ribbons: Weave ribbons through holes or attach them as accents.
- Color Palettes: Experiment with bold colors, soft pastels, or monochromatic schemes.
- Collars with Ties: Consider adding small ribbon ties at the back of the collar for a more secure and adjustable fit.
- Layering: Create multiple smaller collars to layer around the neck.
- Detachable Collars: Design a collar that can be attached and detached from a basic chain, allowing for versatility.
Tips for Success and Longevity
- Work in a Well-Lit Area: This is crucial for detailed work, especially with small beads or fine metal.
- Use Quality Materials: Investing in good quality findings and materials will result in a more durable and aesthetically pleasing necklace.
- Practice Techniques: If you’re new to a particular technique (like wire wrapping or metal stamping), practice on scrap materials before working on your main project.
- Secure All Connections: Ensure jump rings are properly closed, knots are tight, and glue is fully cured to prevent your necklace from falling apart.
- Cleanliness is Key: Keep your workspace and materials clean to avoid transferring dirt or oil, especially when working with metal or clear adhesives.
- Consider Wearability: Think about how the necklace will feel against the skin. Smooth any rough edges on metal or fabric.
- Storage: Store your finished necklace carefully to prevent tangling or damage. A jewelry box with compartments is ideal.
SEO Considerations for "Peter Pan Collar Necklace DIY"
To maximize the visibility of this article for searches related to "Peter Pan collar necklace DIY," the following SEO elements have been incorporated:
- Keyword Integration: The primary keyword "Peter Pan collar necklace DIY" is used naturally throughout the title and headings. Related keywords such as "DIY necklace," "collar necklace," "vintage jewelry," "handmade jewelry," "crafting," "beading," "metalwork," and specific material terms (e.g., "fabric collar," "metal collar") are also woven in.
- Clear Structure and Headings: The article is broken down into logical sections with descriptive headings (H2, H3 tags conceptually). This improves readability for users and helps search engines understand the content’s organization.
- Comprehensive Content: By providing detailed instructions for multiple design approaches, material lists, and customization ideas, the article offers valuable and in-depth information that users are likely to search for.
- Actionable Advice: The "Tips for Success" section provides practical advice that directly addresses potential user pain points.
- Natural Language: While optimized for keywords, the language remains conversational and easy to understand, avoiding keyword stuffing.
- Internal and External Linking (Conceptual): In a real-world scenario, you would link to relevant internal articles (e.g., "Beginner’s Guide to Beading") and external reputable resources (e.g., a supplier of jewelry findings).
- Image Optimization (Conceptual): For a live article, each image would be optimized with descriptive alt text that includes relevant keywords.
By following these detailed instructions and design approaches, you can confidently embark on your Peter Pan collar necklace DIY project, creating a truly unique and stylish accessory that reflects your personal flair.
