Craft Your Own Chic: The Ultimate SEO-Friendly Guide to a DIY Circle Tote Bag
The DIY circle tote bag is a burgeoning trend in the handmade fashion and accessories market, offering a unique silhouette that sets it apart from traditional rectangular totes. This guide provides comprehensive, SEO-friendly instructions for creating your own fashionable and functional circle tote, perfect for everything from a beach day to a farmers market haul. We’ll cover material selection, pattern drafting, cutting techniques, construction steps, and finishing touches, ensuring a successful and enjoyable crafting experience. By focusing on search engine optimization, this article aims to attract crafters searching for "DIY circle tote," "easy tote bag pattern," "sewing project," "handmade bag," and related keywords.
Understanding the Anatomy of a Circle Tote
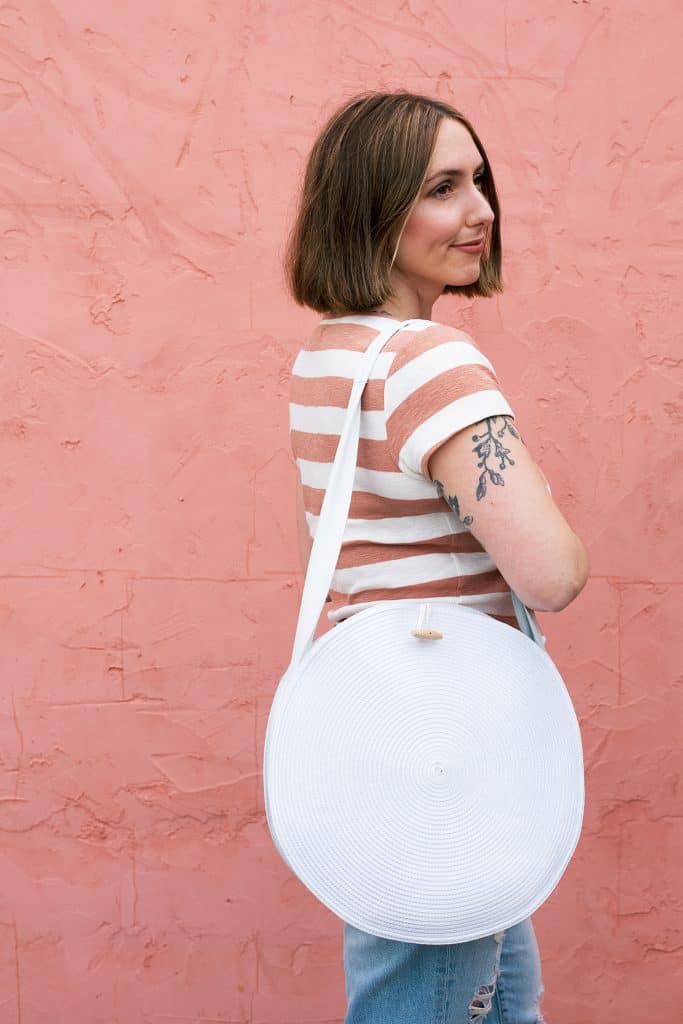
A circle tote, at its core, is a clever construction that utilizes circular fabric pieces for the main body, often combined with a rectangular base or gusset to create depth and structure. The inherent roundness of the main panels gives the bag its signature, effortlessly chic aesthetic. Unlike a standard tote, the seams of a circle tote often wrap around, creating a visually interesting and seamless look. The beauty of this design lies in its simplicity, yet the execution requires attention to detail. Understanding how the curves will come together is crucial for a polished finish. The main components typically include two large circular panels for the front and back, and often a rectangular piece for the base or sides, depending on the desired fullness and shape. Handles are usually attached to the top edge of the circular panels.
Material Matters: Choosing the Right Fabric for Your DIY Circle Tote
Selecting the appropriate fabric is paramount to the success and longevity of your DIY circle tote. For a sturdy and structured bag, consider heavier weight cottons like canvas, denim, or duck cloth. These fabrics are durable, hold their shape well, and are readily available in a vast array of colors and prints, allowing for ample customization. If you’re aiming for a softer, more relaxed feel, consider medium-weight cottons, linen blends, or even upholstery fabrics. For a more luxurious or bohemian vibe, explore materials like corduroy, velvet, or faux leather, though these might require a heavier-duty sewing machine. Lining the tote is also a good idea for added durability and a cleaner interior finish. Cotton quilting fabric or a coordinating medium-weight cotton works well as a lining. When thinking about SEO, terms like "best fabric for tote bag," "durable sewing materials," and "DIY bag supplies" are key.
Pattern Drafting: Creating Your Unique Circle Tote Blueprint
While pre-made patterns are available, drafting your own allows for ultimate personalization. To draft your circle tote pattern, you’ll need a large piece of paper (pattern paper or even butcher paper), a ruler, a compass or a large circular object (like a dinner plate or a hula hoop for a truly oversized tote), and a pencil.
- Determine the Diameter of Your Circles: This will dictate the overall size of your tote. A common starting point for a medium-sized tote is a 16-inch diameter circle. For a larger beach tote, you might aim for 20-24 inches.
- Draw the Circles: Use your compass or trace a circular object to draw two identical circles on your paper. These will be the front and back panels of your tote. Remember to add seam allowance – typically ½ inch to ¾ inch – to the outer edge of these circles. This is crucial for sewing and ensuring your final dimensions are as intended. When adding seam allowance, draw a second, larger circle around your initial one, maintaining a consistent distance.
- Consider a Gusset (Optional but Recommended): A gusset adds depth and allows your tote to stand up. For a gusset, you’ll need a rectangular piece of fabric. The length of this rectangle will be the circumference of your circle (circumference = π diameter). The width of the rectangle will determine the depth of your tote. For a 16-inch diameter circle and a 4-inch deep tote, you’d calculate the circumference: 3.14 16 = 50.24 inches. So, your rectangle would be approximately 50.24 inches long by 4 inches wide, plus seam allowance on all sides. Alternatively, you can create the illusion of a gusset by sewing the bottom seam of the circles together and then folding the corners inwards, creating a boxed-out bottom. This method often uses less fabric and results in a softer structure. For SEO purposes, keywords such as "DIY circle bag pattern," "sewing a gusset," and "free tote bag template" are highly relevant.
Cutting Your Fabric: Precision for a Perfect Circle Tote
Once your pattern pieces are drafted, it’s time to transfer them to your chosen fabric. Lay your fabric flat, ensuring it’s smooth and free of wrinkles. For accurate cutting, it’s often best to use a rotary cutter and a cutting mat, especially with heavier fabrics, as this yields cleaner edges than scissors. However, sharp fabric scissors will also work.
- Pinning the Pattern: Securely pin your drafted pattern pieces onto the fabric, ensuring they are aligned with the grainline if your fabric has one. This is particularly important for avoiding stretching or distortion.
- Cutting the Circles: Carefully cut along the outer lines of your pattern pieces, which include the seam allowance. Take your time to ensure smooth, continuous cuts. For the circular panels, a continuous, flowing cut is ideal to avoid jagged edges.
- Cutting the Gusset (if applicable): Cut your rectangular gusset piece according to your drafted measurements, again including seam allowance on all sides.
- Cutting the Lining: If you’re lining your tote, cut identical pieces from your lining fabric. You can often use the outer fabric pattern pieces directly for the lining, or adjust them slightly if you prefer a different lining material or thickness.
Constructing the Circle Tote: Step-by-Step Sewing Guide
This is where your DIY circle tote begins to take shape. A standard sewing machine is sufficient for most fabrics, but a walking foot can be helpful for preventing layers from shifting, especially with slippery or thick materials.
Step 1: Prepare the Circular Panels:
If your fabric tends to fray, consider finishing the raw edges of your two main circular panels. This can be done using a serger, a zig-zag stitch on your sewing machine, or by using pinking shears before sewing.
Step 2: Attaching the Gusset (if using a separate gusset piece):
- Prepare the Gusset: Fold your rectangular gusset piece in half lengthwise, right sides together, and sew the short ends to form a continuous loop. Finish the raw edges as desired.
- Attach to One Circle: Pin the raw edge of the gusset to the raw edge of one of your circular panels, right sides together. Start by matching up the side seams (if you’ve marked them) or any chosen reference points. Ease the fabric as you go, as you’re attaching a straight edge to a curved edge. This will require careful pinning and a gentle feed through your sewing machine. Sew along the pinned edge, maintaining a consistent seam allowance.
- Attach to the Second Circle: Repeat the process, attaching the other raw edge of the gusset to the second circular panel.
Alternative Method (No Separate Gusset):
If you’re opting for the no-separate-gusset method (creating a boxed bottom), you’ll sew the two circular panels together around their curved edges, leaving the top open. Once the side seam is sewn, you’ll then fold the bottom corners inwards and sew across them to create the boxed bottom. This is often achieved by aligning the side seam with the bottom center point, creating a triangle, and then sewing a straight line across the widest part of that triangle.
Step 3: Sewing the Main Seam:
If you have a separate gusset, you will have already sewn the circles to it. Now, you will sew the two circular panels together at the bottom seam, encasing the gusset. If you are not using a separate gusset and are creating a boxed bottom, you will have already completed this step when creating the boxed corners.
Step 4: Constructing and Attaching the Handles:
- Cut Handle Strips: Cut two rectangular strips for your handles. A common size is 2 inches wide by 20-24 inches long, but adjust this to your preference.
- Fold and Press: Fold each strip in half lengthwise, wrong sides together, and press. Then, open it up and fold each raw edge towards the center fold line, pressing again. Finally, fold the strip in half along the original center fold, enclosing the raw edges. Press well.
- Topstitch: Topstitch along both long edges of the folded handle strips to secure them.
- Attach Handles to the Tote: Decide where you want your handles to be positioned on the top edge of your tote. Mark these points evenly. Pin the raw ends of the handles to the right side of the tote bag’s top edge, facing outwards. Ensure they are securely in place and at the same distance from the side seams. You may want to reinforce this attachment by sewing a square with an "X" inside at each end of the handle attachment point.
Step 5: Finishing the Top Edge:
- Fold and Press: Fold the top edge of the tote bag down towards the inside by your chosen seam allowance (e.g., ½ inch). Press well.
- Fold Again: Fold the top edge down again, encasing the raw edge and the raw ends of the handles within the fold. Press firmly.
- Topstitch: Topstitch along the folded edge to secure the hem and the handles. Stitch close to the folded edge for a clean finish.
Step 6: Attaching the Lining (if applicable):
- Prepare the Lining: With right sides together, sew the lining pieces in the same manner as you sewed the outer fabric, ensuring you leave an opening for turning.
- Insert Lining: Turn the outer tote bag right side out. Insert the lining bag (which should be wrong side out) inside the outer tote bag. The right sides of both the outer bag and the lining should be facing each other.
- Align Top Edges: Align the top raw edges of the outer bag and the lining. Pin them together securely.
- Sew Top Edge: Sew around the entire top edge, joining the outer bag to the lining. You’ll have a small opening left from when you prepared the lining to turn the entire bag right side out.
- Turn and Close: Reach through the opening and pull the entire tote bag right side out. Press the top edge flat, ensuring the lining is neatly tucked inside. Hand stitch or machine stitch the opening closed.
Finishing Touches and Embellishments for Your DIY Circle Tote
The beauty of a DIY project is the opportunity for personalization.
- Pockets: Add internal or external pockets for added organization. An internal slip pocket or a zippered pocket is a practical addition.
- Embellishments: Consider adding patches, embroidery, fabric paint, or decorative stitching to your circle tote.
- Hardware: D-rings can be added to the sides for a crossbody strap option.
- Tassel or Charm: A fun tassel or charm attached to a handle can add a playful touch.
- Contrasting Colors: Use a contrasting color for the lining, handles, or gusset to make your tote pop.
Troubleshooting Common Issues
- Fabric Stretching While Sewing: Use a walking foot or ensure your fabric is well-supported. Sew slowly and avoid pulling the fabric.
- Wavy Edges on Curves: This often happens when the fabric is not eased properly. Pin generously and sew slowly, allowing the fabric to feed naturally.
- Handles Coming Loose: Reinforce the handle attachment with extra stitching in a square or "X" pattern.
SEO Strategy for Your DIY Circle Tote Article
To maximize visibility for search engines, strategically incorporate the following:
- Keywords: Naturally integrate terms like "DIY circle tote bag," "sew a round tote," "easy sewing projects," "handmade bag tutorial," "beginner sewing," "tote bag pattern," "fabric tote bag," "custom tote," and "crafting ideas."
- Title Tag & Meta Description: Craft compelling title tags and meta descriptions that include primary keywords and encourage clicks.
- Headings & Subheadings (H2, H3): Use headings to break up content and incorporate keywords, making it easier for both users and search engines to scan and understand the article’s structure.
- Image Alt Text: Optimize images with descriptive alt text that includes relevant keywords. For example, "DIY circle tote bag front view with canvas fabric."
- Internal & External Linking: Link to other relevant articles on your blog (internal linking) and reputable external resources (external linking) to add value and improve SEO.
- Readability: Use clear, concise language and short paragraphs to improve user experience, which indirectly benefits SEO.
- User Intent: Focus on answering the questions a user searching for "DIY circle tote" would have, from material selection to the final stitch.
Conclusion: Your Stylish and Sustainable Circle Tote Awaits
Creating your own DIY circle tote bag is a rewarding project that results in a unique, fashionable, and functional accessory. By following these comprehensive instructions, focusing on precise cutting and careful construction, and adding your personal touch, you’ll have a beautiful tote that’s as durable as it is stylish. Whether you’re a seasoned sewer or a beginner looking for an engaging project, the circle tote is an excellent choice, offering a delightful blend of creativity and practicality. Embrace the handmade movement and stitch your way to a chic new tote!
