
DIY Copper Pipe Side Table: A Step-by-Step Guide to Industrial Elegance
This comprehensive guide details the process of constructing a stylish and functional DIY copper pipe side table. The project is suitable for intermediate DIYers and offers a blend of industrial aesthetics with modern practicality. The use of copper piping not only lends a unique visual appeal but also provides robust structural integrity. This guide covers material selection, essential tools, step-by-step assembly instructions, finishing techniques, and considerations for customization, ensuring a successful and satisfying build.
Materials for Your Copper Pipe Side Table
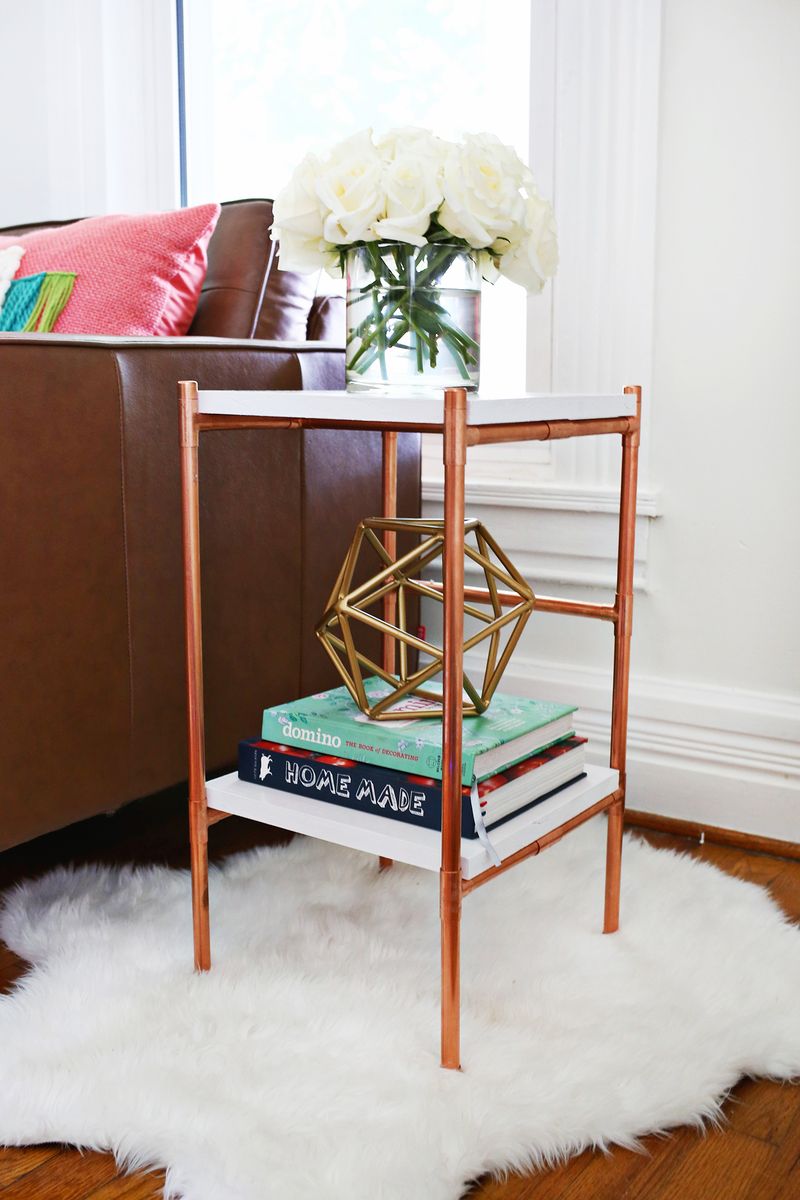
Successful execution of this DIY project hinges on selecting the right materials. For the frame of the side table, copper pipes are the primary component. Opt for Type L or Type M copper tubing, commonly available at hardware stores and plumbing supply centers. Type L is generally thicker and more durable, making it ideal for furniture construction. The diameter of the pipes will dictate the overall scale and sturdiness of your table. A common and manageable diameter for side tables is 3/4 inch. You will need enough pipe to construct the legs, the supporting structure, and potentially a decorative element.
To connect these pipes and create a stable frame, you will require copper fittings. The most crucial fittings are couplings (to join two straight pipes), elbows (90-degree and potentially 45-degree for angled joints), and tees (to create branches for the legs). The exact number and type of fittings will depend on your chosen table design. For example, a simple four-legged table will likely require four 90-degree elbows for the top of the legs, four tee fittings to connect the horizontal supports, and four couplings to extend the legs downwards. If you’re incorporating a lower shelf, you’ll need additional tees and straight pipe sections.
For the tabletop, you have several excellent options. A popular choice for an industrial look is a reclaimed wood slab. This could be a salvaged piece of barn wood, an old workbench top, or even a thick plank of ethically sourced lumber. Alternatively, a plywood sheet cut to size and finished can offer a more contemporary feel. For a truly unique and durable top, consider a metal sheet, such as brushed aluminum or galvanized steel, or even a concrete slab (though this adds significant weight). The size and shape of your tabletop will determine the dimensions of your copper frame.
Adhesive is critical for securing the copper pipes and fittings. Oatey No-Knead Flux and Lead-Free Solder are essential for a permanent and strong bond if you choose to solder your joints. For a simpler, non-permanent assembly that allows for disassembly and adjustment, high-strength epoxy adhesive designed for metal is a viable alternative. Many DIYers opt for this method for its ease of use and the ability to correct mistakes. If you choose the epoxy route, ensure you purchase a product specifically formulated for copper.
To secure the tabletop to the frame, you’ll need screws. The type and length of screws will depend on the material of your tabletop. For wooden tops, wood screws are appropriate. For metal tops, you may need self-tapping metal screws. If using a concrete slab, consider using specialized anchors.
Finally, for finishing touches and protection, you might consider clear coat spray paint for the copper pipes if you wish to preserve their natural sheen and prevent oxidation. If you want the copper to develop a patina over time, you can skip this step. For wooden tabletops, wood stain and sealant are necessary to protect the wood and achieve the desired aesthetic.
Tools for Assembling Your Copper Pipe Side Table
A well-equipped toolbox is crucial for a smooth and efficient build. The most vital tool for working with copper pipes is a pipe cutter. A copper pipe cutter will provide clean, straight cuts, essential for proper fitting of your joints. Ensure you have a cutter that can accommodate the diameter of your chosen pipes.
If you opt for soldering your copper joints, you will need a propane torch (such as a Bernzomatic TS8000), soldering flux, and lead-free solder. Proper ventilation and safety precautions are paramount when working with a torch.
For an epoxy-based assembly, you will need sandpaper (various grits, from 80 to 220) to clean and roughen the surfaces of the pipes and fittings for optimal adhesion. You will also need rags and a degreaser or rubbing alcohol to ensure all surfaces are free of dirt, grease, and oxidation before applying the epoxy.
To assemble the frame, you’ll likely need a rubber mallet to gently tap pipes into fittings, especially when using epoxy. This helps ensure a snug fit without damaging the copper.
For attaching the tabletop, a power drill with appropriate drill bits is essential. You’ll need bits for pilot holes (smaller than your screw diameter) and for driving the screws. A tape measure and a pencil are necessary for accurate marking and measuring of your pipe lengths and tabletop placement.
If you are cutting your own tabletop from wood or other materials, you will need appropriate cutting tools such as a hand saw, jigsaw, or circular saw.
For finishing, paint brushes or rags will be needed for applying wood stain, sealant, or clear coats. Safety glasses and gloves are crucial throughout the entire process to protect yourself from cuts, burns, and chemical exposure.
Design and Planning Your Copper Pipe Side Table
Before cutting any pipes or purchasing materials, a clear design and plan are essential. Consider the desired dimensions of your side table. Typical side table dimensions range from 18 to 24 inches in height and 12 to 20 inches in width and depth. Sketch your design on paper, noting the exact lengths of each pipe section and the types and placement of each fitting. This visual representation will serve as your blueprint.
Think about the stability and intended use of the table. If it will be placed on an uneven surface, consider adjustable feet at the bottom of the legs. For a more robust feel, you might opt for a cross brace between the legs or a lower shelf. The tabletop material will also influence the design; a heavy concrete slab will require a more substantial frame than a lightweight wooden top.
The aesthetic you’re aiming for should also guide your design. For a raw, industrial look, leave the copper unpolished and allow it to naturally oxidize. For a shinier, more refined appearance, polish the copper and apply a clear coat. The type of wood or finish on your tabletop should complement the copper.
Step-by-Step Assembly: Soldering Method
For a permanent and strong build, soldering is the preferred method for joining copper pipes.
-
Measure and Cut Pipes: Using your design plan and tape measure, mark the required lengths on your copper pipes. Carefully cut each pipe section using your copper pipe cutter, ensuring clean, square cuts.
-
Clean and Deburr: Thoroughly clean the ends of each pipe and the inside of each fitting. Use sandpaper to lightly abrade the surfaces that will be joined. This removes oxidation and ensures good solder adhesion. Then, use a deburring tool or the edge of your sandpaper to remove any rough edges from the cut pipes.
-
Apply Flux: Apply a thin, even layer of soldering flux to the cleaned ends of the pipes and the inside of the fittings. Flux acts as a cleaning agent and promotes solder flow.
-
Assemble Dry Fit: Assemble your frame components without soldering to ensure everything fits correctly and your dimensions are as planned. This is your last chance to make adjustments before permanent bonding.
-
Heat and Solder: Begin heating the joint. Aim the torch flame at the fitting, not directly at the pipe. Once the fitting and pipe reach the appropriate temperature, touch the solder to the opposite side of the joint from the flame. The heat from the copper will melt the solder, which will then be drawn into the gap by capillary action. Continue applying solder until a small bead forms around the entire joint.
-
Cool and Clean: Allow the joint to cool naturally without disturbing it. Once cool, use a damp rag to wipe away any excess flux residue. Repeat this process for all necessary joints in your frame.
-
Attach Tabletop: Once the copper frame is fully assembled and all solder joints have cooled and been cleaned, position your tabletop. Drill pilot holes through the tabletop and into the copper frame (if the frame is designed to receive screws). Secure the tabletop with appropriate screws.
Step-by-Step Assembly: Epoxy Method
The epoxy method offers a less permanent but more accessible approach to building your copper pipe side table.
-
Measure and Cut Pipes: As with the soldering method, meticulously measure and cut all necessary pipe sections according to your design.
-
Clean and Prepare Surfaces: This is a critical step for strong epoxy adhesion. Thoroughly clean the ends of all pipes and the interior of all fittings. Use sandpaper to lightly roughen all surfaces that will come into contact with the epoxy. Follow up with a degreaser or rubbing alcohol and clean rags to remove any remaining residue.
-
Dry Fit and Mark: Assemble the entire frame without adhesive to confirm your design and dimensions. Once satisfied, disassemble it. You can lightly mark the alignment of each pipe within its fitting with a pencil to ensure accurate reassembly.
-
Apply Epoxy: Mix your chosen high-strength epoxy adhesive according to the manufacturer’s instructions. Apply a generous amount of epoxy to the inside of the fitting and to the end of the pipe.
-
Assemble and Hold: Immediately insert the pipe into the fitting. Twist the pipe slightly as you insert it to help distribute the epoxy evenly. Hold the joint firmly in place for the time recommended by the epoxy manufacturer. A rubber mallet can be used for gentle tapping to ensure a snug fit.
-
Repeat and Cure: Repeat the epoxy application and assembly process for all joints. Once the entire frame is assembled, allow it to cure undisturbed for the full duration specified by the epoxy product. This curing period is crucial for achieving maximum bond strength.
-
Attach Tabletop: After the epoxy has fully cured, place your tabletop onto the frame. Drill pilot holes and secure the tabletop using appropriate screws.
Finishing Your Copper Pipe Side Table
The finishing stage transforms your assembled frame into a polished piece of furniture.
For the Copper Frame:
- Polishing: If you desire a bright, shiny copper finish, use a metal polish (like Brasso or Simichrome) and a soft cloth to buff each pipe section. Work in small sections and buff vigorously.
- Clear Coat: To preserve the polished finish and prevent tarnishing, apply a thin, even coat of clear spray lacquer or a specialized metal sealant. Apply in a well-ventilated area and follow the product’s instructions for multiple light coats.
- Patina: Alternatively, you can embrace the natural aging process of copper. Allow the pipes to oxidize naturally, developing a beautiful, earthy patina over time. You can accelerate this process by using a patina solution if you desire.
For the Tabletop:
- Wood: If using a wooden tabletop, sand it smooth with progressively finer grits of sandpaper (e.g., 80, 120, 220). Apply your chosen wood stain evenly with a brush or rag. Once the stain has dried, apply several coats of a durable sealant or varnish, sanding lightly between coats for a smooth finish.
- Metal: Metal tabletops may require degreasing and a clear coat to prevent rust or smudges, depending on the metal type.
- Concrete: Concrete tabletops will require sealing to protect them from stains and moisture. Use a concrete sealer specifically designed for countertops.
Customization and Variations
The beauty of DIY is its adaptability. Consider these variations for your copper pipe side table:
- Leg Height and Style: Adjust the leg length to create a coffee table or a console table. Experiment with angled legs for a more dynamic look, using 45-degree elbows.
- Lower Shelf: Incorporate a lower shelf by using additional tee fittings and pipe sections. This adds valuable storage space and structural support.
- Wheels: Attach caster wheels to the bottom of the legs for added mobility and an even more industrial aesthetic.
- Tabletop Material: Explore different materials like tempered glass (requiring specialized fittings for attachment), mosaic tiles, or even a thick leather hide for a unique statement piece.
- Pipe Size: Experiment with different pipe diameters for a bolder or more delicate look. Larger diameter pipes will create a more substantial table.
- Color Accents: While copper is beautiful on its own, you could paint certain sections of the frame in a contrasting color for a pop of personality.
By following these detailed steps and considering the customization options, you can create a unique, handcrafted copper pipe side table that adds a touch of industrial charm and functional elegance to your living space.
