
Floral Embroidered Top DIY: A Comprehensive Guide for Beginners and Beyond
Creating a floral embroidered top is a rewarding and accessible DIY project that allows for immense personalization and style. This guide will walk you through every step, from selecting your base garment and embroidery supplies to executing intricate floral designs. Whether you’re a complete beginner or have some sewing experience, this tutorial will empower you to craft a unique, fashionable piece that reflects your individual aesthetic. We’ll cover material selection, essential embroidery stitches, pattern transfer techniques, and tips for achieving a professional finish. By the end of this article, you’ll possess the knowledge and confidence to transform a plain top into a wearable work of art.
The foundation of any successful DIY floral embroidered top is the careful selection of your base garment. The fabric type, color, and silhouette will all influence the overall aesthetic and the embroidery process. For beginners, consider smooth, tightly woven fabrics like cotton, linen blends, or even some knits. These provide a stable surface for stitching, preventing snags and allowing for precise needlework. Avoid very thin, stretchy, or loosely woven fabrics initially, as they can be more challenging to manage. The color of your top is equally crucial. Lighter colors offer a brighter canvas for vibrant floral embroidery, making the stitches stand out beautifully. However, darker fabrics can be equally stunning when paired with contrasting thread colors. Think about the mood you want to evoke: a white or cream top might lend itself to delicate pastel florals, while a black or navy top could be a dramatic backdrop for bold, jewel-toned blooms. The silhouette of your top also plays a role. A simple t-shirt, a sleeveless camisole, a button-down blouse, or a structured crop top can all be excellent choices. Consider where you want to place your embroidery. Will it be a small cluster on the collar, a scattering across the bodice, or a statement design on the back? This will help you choose a top that offers the right amount of surface area and visual appeal for your chosen design. For instance, a V-neck top can be enhanced with cascading floral motifs down the neckline, while a plain tank top might benefit from a single, large bloom or a border of smaller flowers along the hem. When choosing your garment, also consider its existing construction. Tops with seams in the areas you intend to embroider might require careful planning to avoid stitching over bulky seams, which can be difficult and detract from the final look.
Next, let’s delve into the essential embroidery supplies you’ll need to bring your floral vision to life. The quality of your materials will directly impact the ease of your project and the longevity of your finished piece.
Embroidery Floss: This is the backbone of your embroidery. Embroidery floss typically comes in six strands, which can be separated to create finer stitches. For floral embroidery, you’ll want a wide range of colors to accurately represent the diverse hues of flowers and foliage. Consider purchasing skeins in various shades of green for leaves, reds, pinks, purples, yellows, and oranges for petals, and even browns or blues for accents and shadows. DMC is a popular and widely available brand, offering excellent color saturation and durability. Cotton embroidery floss is the standard, but silk floss can offer a luxurious sheen for special projects.
Embroidery Needles: The right needle is crucial for smooth stitching and preventing fabric damage. Embroidery needles have a larger eye than sewing needles, making them easier to thread with multiple strands of floss. They also have a sharper point than tapestry needles, which are designed for yarn. Look for embroidery needles with a medium to long shaft. The size of the needle will depend on the weight of your floss and the weave of your fabric. Generally, for standard 6-strand floss and cotton fabrics, size 7 or 8 embroidery needles are a good starting point.
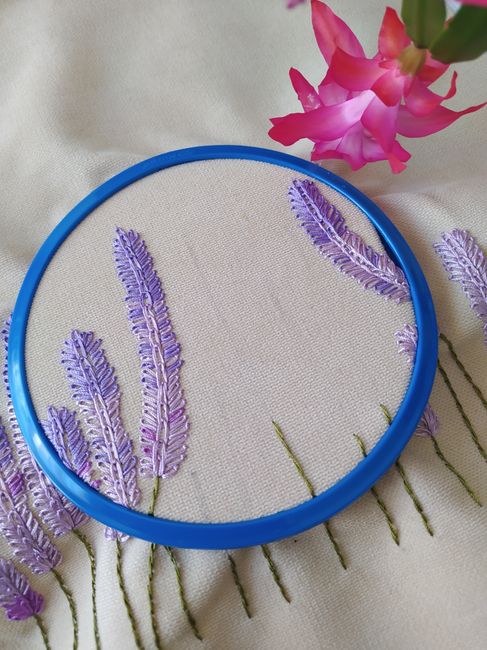
Embroidery Hoop: An embroidery hoop is essential for keeping your fabric taut while you stitch. This prevents puckering and ensures even stitches. Hoops typically come in pairs: an inner hoop that fits snugly around your fabric and an outer hoop that screws onto the inner one, holding everything in place. Wooden hoops are classic and offer good grip, while plastic hoops are lightweight and durable. Choose a hoop size that comfortably accommodates your design area. For smaller, intricate designs, a 4-6 inch hoop might suffice. For larger patterns, consider an 8-10 inch hoop.
Embroidery Scissors: Sharp, small-tipped scissors are vital for precise cutting of floss. You’ll need them for trimming threads close to the fabric without accidentally snipping the garment itself. Dedicated embroidery scissors with fine points are ideal for this task.
Fabric Marking Tools: To transfer your floral design onto the fabric, you’ll need a way to mark it. Options include:
- Water-soluble pens: These disappear with water, making them ideal for light-colored fabrics.
- Air-soluble pens: These fade on their own over time, so ensure your design is stitched before the marks vanish.
- Tailor’s chalk: A classic choice for marking fabric, though it can be a bit messier and may require brushing off.
- Tracing paper and a pencil (for delicate fabrics): You can trace your design onto tracing paper and then transfer it using a pencil or by lightly pressing the paper onto the fabric.
Pattern or Design: You can freehand your floral design, draw it directly onto the fabric, or use a pre-made pattern. There are countless floral embroidery patterns available online, in craft books, and on embroidery supply websites. You can also adapt motifs from nature, photographs, or other artistic sources.
Understanding basic embroidery stitches is fundamental to creating beautiful floral designs. While many stitches can be used, a few core techniques will form the basis of most floral embroidery.
Satin Stitch: This stitch is perfect for filling in petal shapes with smooth, solid color. It involves laying down parallel stitches of the same length next to each other, covering the entire area. The direction of the stitches should follow the natural curve of the petal. For a more dimensional look, you can vary the stitch length or use lighter and darker shades of floss.
Backstitch: The backstitch creates a strong, continuous line and is excellent for outlining petals, stems, and leaves. It’s created by making a stitch, then moving back approximately half the stitch length and bringing the needle up, then forward again to the end of the previous stitch. This creates a solid line that resembles machine stitching.
French Knot: French knots are small, raised dots that are perfect for adding texture and detail, such as the center of a flower or small buds. To create a French knot, bring your needle up through the fabric. Wrap the floss around the needle one or two times (more wraps create a larger knot). Insert the needle back into the fabric very close to where it emerged, but not in the exact same hole. Hold the floss taut as you pull the needle through. Practice this stitch until you achieve a consistent size and shape.
Lazy Daisy Stitch (Detached Chain Stitch): This stitch is ideal for creating individual petals or small flower shapes. Bring your needle up where you want the tip of the petal to be. Loop the floss back towards where the needle emerged, creating a small tail. Insert the needle back into the fabric right next to where it emerged, securing the loop. Pull the thread through, forming a petal-like loop.
Stem Stitch: Similar to the backstitch but with a slightly different appearance, the stem stitch is excellent for creating curved stems and vines. Bring your needle up at the starting point of your stem. Make a small stitch forward. Bring the needle back up through the fabric at the end of that stitch, ensuring the floss lies under the needle. Pull the thread through. Continue in this manner, creating a staggered, continuous line.
Seed Stitch: This is a simple stitch consisting of short, random stitches, perfect for filling in small gaps or creating a textured background.
Transferring your chosen floral design onto your top is a critical step that requires precision. The method you choose will depend on the fabric of your top and the complexity of your design.
For Light-Colored Fabrics:
- Iron-on Transfer Paper: Print your design onto special iron-on transfer paper. Follow the manufacturer’s instructions carefully for transferring the design to your fabric using an iron. This method is quick and produces a clean transfer, but ensure your design is mirrored if it has text.
- Water-Soluble Stabilizer: Print your design onto a water-soluble stabilizer sheet. Pin or temporarily adhere the stabilizer to your fabric. Embroider directly through the stabilizer. Once complete, rinse the fabric in water, and the stabilizer will dissolve, leaving your embroidery. This method is excellent for knits and prevents puckering.
- Direct Marking: If your fabric is smooth and you’re confident in your drawing skills, you can draw the design directly onto the fabric using a water-soluble or air-soluble pen.
For Dark-Colored Fabrics:
- Carbon Paper/Transfer Paper: Place a piece of carbon paper (graphite side down) onto your fabric. Place your design (drawn on paper) on top of the carbon paper. Trace over your design with a stylus or a dull pencil. This will transfer a faint outline onto the fabric.
- Appliqué: For bolder designs or to avoid complex stitching on dark fabric, consider appliqué. Cut out floral shapes from contrasting fabric (like cotton, silk, or felt) and appliqué them onto your top using a sewing machine or by hand. You can then add embroidery details to the appliquéd shapes.
- Lightbox or Window Transfer: Place your design on a lightbox or tape it to a window. Place your fabric over the design and trace the outline with a chalk pencil or an air-soluble pen.
General Transfer Tips:
- Pre-wash your fabric: Always wash and dry your garment before transferring your design. This removes any sizing or finishes that might interfere with the transfer process and accounts for any shrinkage.
- Iron your garment: Ensure your garment is smooth and free of wrinkles before transferring.
- Secure your pattern: If using a paper pattern, tape it securely to your fabric or use temporary fabric adhesive to prevent it from shifting.
- Consider the placement: Pin your pattern to your garment to visualize the placement before marking.
Once your design is transferred, it’s time to start stitching! Begin with the areas that will be in the background or foundational elements of your design, such as leaves and stems, and then move to the more prominent floral elements.
Embroidery Process for a Floral Top:
- Thread your needle: Separate your embroidery floss into the desired number of strands (usually 2-3 for general embroidery, 1-2 for fine details). Thread your needle.
- Secure your fabric in the hoop: Place the inner hoop under your fabric, position your design over the inner hoop, and then place the outer hoop over the fabric and inner hoop. Tighten the screw until the fabric is taut.
- Start stitching: Begin with a knot at the end of your floss (or use a waste knot if you prefer to avoid knots on the back). If not knotting, leave a tail on the back and secure it with a few small stitches once you start stitching.
- Work your stitches: Follow your design and the stitch techniques outlined previously. For satin stitch, work your stitches smoothly and consistently to create a solid fill. For outlines, use backstitch or stem stitch. For details, use French knots or lazy daisy stitches.
- Vary your thread colors: Use different shades of floss to create depth and dimension in your florals. Lighter shades for highlights and darker shades for shadows can make your embroidery pop.
- Stitch in sections: It’s often easier to work on smaller sections of your design at a time.
- Manage your threads: Try to keep the back of your embroidery as neat as possible. Avoid long, loose threads that can snag. You can secure new threads with small stitches and trim excess.
- Layer your embroidery: For a truly realistic floral look, consider layering stitches. For example, you might use a backstitch for the outline of a petal and then fill it with satin stitch. You can also layer different colors of satin stitch to create subtle color variations.
- Take breaks: Embroidery can be intricate work. Take regular breaks to rest your eyes and hands.
Achieving a professional finish will elevate your DIY floral embroidered top from a craft project to a stylish garment.
Finishing Touches:
- Remove the hoop: Once you’ve completed your embroidery, carefully remove the embroidery hoop.
- Trim excess threads: On the back of your embroidery, trim any loose threads or tails close to the fabric.
- Clean up your work: If you used a water-soluble pen, gently dampen the marked areas with a damp cloth or sponge to remove the lines. For air-soluble pens, let them fade naturally or follow the manufacturer’s instructions. If you used tailor’s chalk, brush it away.
- Press your work: Gently press the embroidered area from the wrong side of the fabric. Use a pressing cloth to protect the stitches and prevent them from flattening. Iron on a low to medium heat setting, depending on your fabric.
- Consider a backing (optional): For very delicate fabrics or if you want extra durability, you can iron on a lightweight fusible interfacing to the back of the embroidered area. This will add stability and prevent the stitches from pulling. Cut the interfacing to the size of your embroidered area.
- Wash with care: When it’s time to wash your embroidered top, hand wash it in cool water with a mild detergent. Avoid harsh chemicals or abrasive scrubbing. Roll it in a towel to remove excess water and then air dry it flat.
SEO-Specific Keywords and Phrases:
- Floral embroidered top DIY
- Embroidery tutorial top
- DIY floral shirt
- How to embroider a top
- Beginner embroidery project
- Floral embroidery patterns for clothes
- Custom embroidered clothing
- DIY fashion
- Hand embroidery top
- Sewing and embroidery projects
- Embroidered t-shirt DIY
- Personalized top embroidery
- Stitch guide for floral embroidery
- Fabric marking for embroidery
- Finishing embroidered garments
By following this comprehensive guide, you can embark on a fulfilling DIY journey to create a stunning floral embroidered top. Experiment with different designs, stitches, and color combinations to truly make your creation your own. The art of embroidery allows for endless possibilities, and with a little practice and patience, you’ll be creating beautiful, wearable art in no time.
