
Mastering the Double Waterfall Twist: A Comprehensive Styling Guide
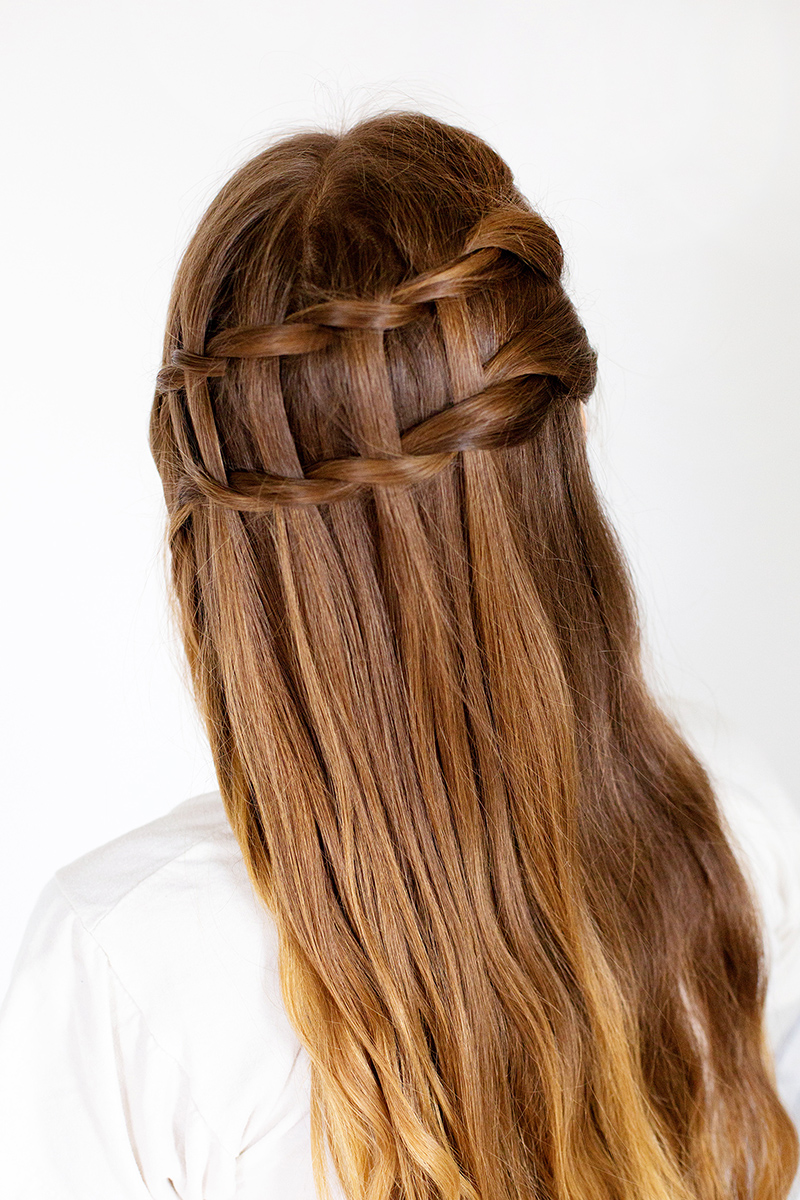
The double waterfall twist is a sophisticated and intricate braided hairstyle that offers versatility and elegance. This tutorial breaks down the technique, providing step-by-step instructions for achieving a flawless double waterfall twist, suitable for various hair types and occasions. Understanding the mechanics of a waterfall braid is foundational to mastering its double counterpart. A single waterfall braid involves picking up new strands from the top layer of hair as you cross them over, while dropping strands are left to cascade down. The double waterfall twist builds upon this by incorporating two such braids simultaneously, weaving them together for a more complex and eye-catching effect. This style is particularly effective for those with medium to long hair, as it allows ample length for the "waterfall" effect to be visually prominent. Fine hair can benefit from texturizing sprays or backcombing to add volume, while thick hair may require more precise sectioning to ensure the twists remain defined.
Section 1: Preparation is Key: Setting the Stage for Success
Before embarking on the double waterfall twist, proper hair preparation ensures a smoother styling process and a more polished final result. Begin by thoroughly brushing your hair to remove any tangles. This is crucial, as knots can snag and disrupt the braiding process, leading to an uneven and messy outcome. If your hair is prone to frizz, consider applying a smoothing serum or anti-frizz spray to tame flyaways and create a sleeker canvas. For added grip and hold, especially for finer hair textures, a texturizing spray can be beneficial. This adds a slight tackiness to the hair, making it easier to grip and manipulate the strands during braiding. Ensure your hair is completely dry, as styling damp hair can lead to frizz and a less defined braid. If you’re aiming for a more structured look, a light application of a styling cream can provide control without weighing the hair down.
Section 2: The Foundation: Creating the Initial Sections
The double waterfall twist begins with establishing two distinct parting lines. The most common and effective way to achieve this is by creating a central, vertical parting down the back of your head, from the crown to the nape of the neck. This effectively divides your hair into two equal halves. However, variations exist. A slightly off-center parting can create a more asymmetrical and dynamic look. Experiment with the placement of this initial part to suit your face shape and desired aesthetic. Once the central parting is established, you will work on each side independently to create the individual waterfall braids. It’s helpful to clip or temporarily secure the hair on the opposite side you’re currently working on to prevent it from interfering with the braiding process. For example, if you’re starting on the right side, clip the left side out of the way.
Section 3: The Right Side Waterfall: A Detailed Breakdown
Let’s focus on creating the first waterfall braid on the right side. Start at the front of your hairline, near the part. Take a small section of hair, about an inch wide, and divide it into three equal strands: strand A (closest to your face), strand B (in the middle), and strand C (closest to the crown). This is the beginning of a standard three-strand braid.
- Step 1: The First Cross. Cross strand A over strand B. Strand A is now in the middle.
- Step 2: The Waterfall Element. Now, take strand C and cross it over the newly positioned strand A. This is where the "waterfall" magic happens. Instead of bringing strand C under the middle strand, you are going to drop strand C completely. Let it hang loose.
- Step 3: Picking Up New Hair. With strand C now dropped, you need to replenish it with new hair to continue the braid. From the section of hair beneath where strand C was dropped, pick up a small, clean section of hair (similar in size to the original strands). This new section now becomes your "new" strand C.
- Step 4: The Next Cross. Cross this new strand C over the strand that is currently in the middle.
- Step 5: Repeat and Progress. Continue this pattern. Take the strand closest to your face (which will be strand A from the previous step), cross it over the middle strand. Then, drop the next strand (strand C) and pick up a new section of hair from underneath to replace it. Cross this new strand over the middle strand.
Continue this process, working your way down the side of your head towards the nape of your neck. Aim for consistent section sizes for a uniform look. Pay attention to tension; too loose and the braid will be messy, too tight and it might pull uncomfortably. The key is to keep the dropped strands falling neatly, creating the cascading "waterfall" effect. As you approach the back of your head, you’ll be able to see the braid forming.
Section 4: The Left Side Waterfall: Mirroring the Technique
Now, turn your attention to the left side of your head, mirroring the exact same process you followed on the right. Start at the front of the hairline on the left side, again taking a small section of hair and dividing it into three strands.
- Step 1: Initial Braid. Begin with a standard three-strand braid: cross the strand closest to your face over the middle strand, then the strand closest to the crown over the middle strand.
- Step 2: The Waterfall Drop. When you’re ready to incorporate the waterfall element, take the strand closest to the crown and cross it over the middle strand, then drop it.
- Step 3: Incorporate New Hair. Pick up a new section of hair from beneath the dropped strand and use this as your new outer strand.
- Step 4: Continue the Pattern. Cross this new strand over the middle strand. Then, take the strand closest to your face and cross it over the middle strand. Repeat the process of dropping an outer strand and picking up new hair.
Continue this braiding motion down the left side of your head, working towards the nape. The goal is to create a braid that is symmetrical in its placement and technique to the right-side braid. Consistency in tension and section size is paramount for a balanced and polished double waterfall twist. If your hair is particularly thick, you might find it easier to periodically secure the completed sections of each waterfall braid with a small clip to keep them separated and manageable.
Section 5: Uniting the Falls: Weaving the Braids Together
Once both individual waterfall braids are complete, the next crucial step is to weave them together to create the signature double waterfall effect. This is where the true artistry of the style comes into play.
- Option 1: Simple Overlap. The simplest method is to bring the tail of the right waterfall braid across to the left side of your head, and the tail of the left waterfall braid across to the right side. Secure them discreetly at the back of your head with bobby pins. You can then tuck the ends of the braids underneath or let them hang loose, depending on your preference.
- Option 2: Intertwining. For a more integrated look, you can gently intertwine the two braid tails. Carefully weave the end of the right braid through the loops of the left braid, and then vice versa. This requires a bit of finesse and patience. Use your fingers to loosen the loops of each braid slightly to create space for the weaving. Secure the intertwined tails firmly with bobby pins, ensuring they lie flat against your head.
- Option 3: A Central Braid. You can also gather the two waterfall braid tails at the nape of your neck and combine them into a single, regular three-strand braid. This creates a more structured and unified finish. Once the central braid is complete, you can secure its end with a hair tie and then tuck it or let it hang.
When securing the braids, use bobby pins that match your hair color for an invisible finish. Pinning in the direction of the braid’s natural flow can help it lay more smoothly.
Section 6: Refining and Finishing Touches: The Art of Polish
The final stage involves refining the double waterfall twist to enhance its visual appeal and ensure longevity.
- Pancaking the Braids: To achieve a fuller, more voluminous look, you can gently "pancake" the braids. This involves carefully pulling on the edges of each braid segment, starting from the bottom and working your way up. Be gentle to avoid unraveling the braid entirely. This technique makes the braids appear wider and more substantial, which is particularly effective for finer hair.
- Taming Flyaways: Use a fine-tooth comb or your fingers to smooth down any stray hairs or flyaways. A light mist of hairspray can help to keep them in place. For an extra polished look, you can use a small amount of hair wax or pomade on your fingertips to tame stubborn flyaways.
- Accessorizing: The double waterfall twist provides an excellent canvas for hair accessories. Consider adding decorative pins, sparkling clips, or a delicate hair vine to elevate the style for special occasions. Flowers can also be woven into the braids for a romantic, bohemian aesthetic.
- Hairspray for Hold: A final spritz of strong-hold hairspray will set your double waterfall twist, ensuring it stays in place throughout the day or evening. Focus the spray on the braids themselves, as well as any areas where you’ve secured pins or accessories.
Section 7: Variations and Customization: Making it Your Own
The beauty of the double waterfall twist lies in its adaptability. Here are a few ways to personalize this elegant style:
- Fishtail Waterfall: Instead of a traditional three-strand braid for the waterfall sections, you can incorporate a fishtail braid. This creates a more intricate and delicate texture within the waterfall effect.
- Braided Crown: By bringing the waterfall braids around the front of your head and securing them at the back, you can create a stunning braided crown effect. This requires more precise sectioning and careful pinning.
- Adding Buns or Updos: The tails of the waterfall braids can be incorporated into a bun or other updos, adding a unique braided element to a more classic style.
- Half-Up, Half-Down: You can create a double waterfall twist on just the top half of your hair, leaving the rest of your hair down. This offers a more casual yet still elegant variation.
- Color Dimension: If you have highlights or lowlights, the double waterfall twist will beautifully showcase the different tones in your hair, adding depth and dimension.
SEO Keywords: Double waterfall twist, how to style, braided hairstyles, intricate braid, step-by-step guide, hair tutorial, elegant hairstyle, hair styling tips, long hair styles, medium hair styles, wedding hairstyles, special occasion hair, hair braiding techniques, DIY hair, textured braids, hair accessories, hair care.
