DIY Faux Cement Tile: An Affordable and Achievable Alternative for Stunning Floors and Backsplashes
The allure of authentic cement tiles, with their intricate patterns and artisanal charm, is undeniable. However, their substantial cost, inherent porosity requiring diligent sealing, and the labor-intensive installation process can be significant deterrents for many homeowners. Fortunately, the world of DIY offers a compelling and accessible solution: faux cement tile. This technique allows you to achieve the coveted aesthetic of genuine cement tiles without the hefty price tag, complex installation, or ongoing maintenance concerns. Whether you’re aiming to refresh a dated kitchen backsplash, add character to a bathroom floor, or even create a unique accent wall, faux cement tile DIY provides a budget-friendly and remarkably effective path to achieving professional-looking results. This comprehensive guide will delve into the various methods, essential materials, step-by-step processes, and crucial tips for successfully executing your own faux cement tile project.
The core principle behind DIY faux cement tile is the artful application of paint and stencils to an existing, suitable surface. This transformation can be applied to various substrates, including existing tile (ceramic, porcelain, even some vinyl), plywood, MDF, concrete, or even drywall. The key is to prepare the surface meticulously to ensure optimal adhesion and a durable, long-lasting finish. Unlike genuine cement tiles that are individually manufactured and grouted, faux cement tiles are essentially a painted illusion, meticulously crafted through careful layering and design. This allows for unparalleled design flexibility, enabling you to customize colors, patterns, and even the perceived texture to perfectly complement your décor.
One of the most popular and accessible methods for creating faux cement tiles involves using specialized tile paint or durable enamels. These paints are formulated to adhere to various surfaces, withstand foot traffic and moisture, and offer a resilient finish. The process typically begins with thoroughly cleaning the chosen surface. For existing tile, this means removing all soap scum, grease, and grime. A degreaser and a scrub brush are essential for this stage. For other surfaces like plywood or MDF, a light sanding might be necessary to create a slightly porous surface for better paint adhesion, followed by a thorough dusting.
Once the surface is clean and dry, priming is a crucial step, especially when painting over existing tile or darker colors. A high-quality bonding primer designed for the specific substrate will ensure excellent adhesion of your subsequent paint layers and prevent the underlying color from showing through. Apply the primer evenly and allow it to dry completely according to the manufacturer’s instructions. For a truly durable finish on floors, a primer specifically formulated for high-traffic areas or tile is highly recommended.
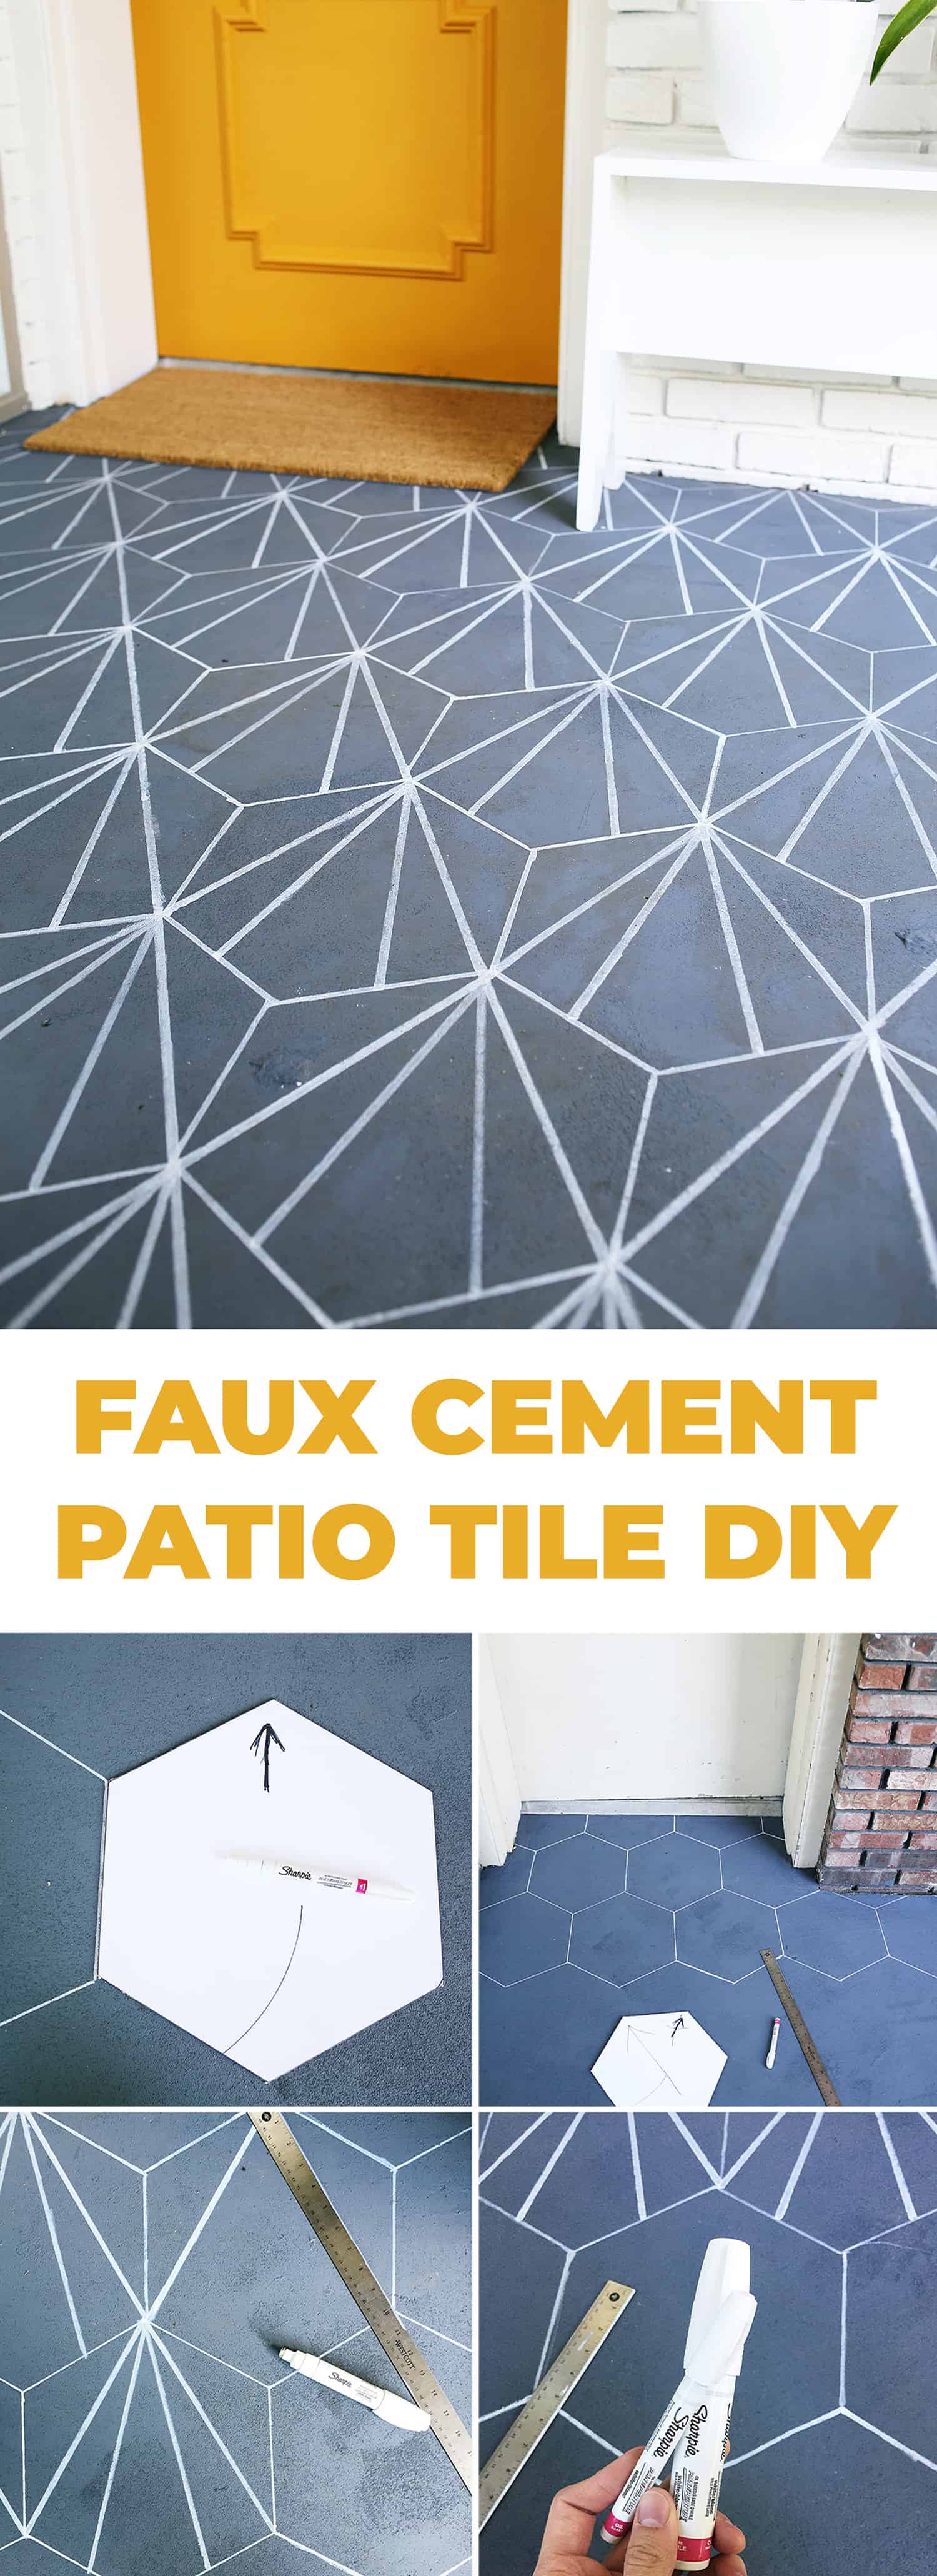
The real magic of faux cement tile lies in the stenciling process. A wide array of stencils designed for tile patterns are readily available online and at craft stores. You can opt for classic geometric designs, intricate Moroccan-inspired motifs, or even create your own custom stencils for a truly unique look. For the initial color of your faux tiles (often the base color of the cement), apply your chosen tile paint or enamel using a roller or a brush. Aim for thin, even coats, allowing each layer to dry completely before proceeding. Multiple thin coats are always preferable to one thick, gloopy layer for a smoother, more professional finish.
After the base color is dry, it’s time to introduce the pattern. This is where careful stencil placement and precise application are paramount. Secure the stencil firmly to the surface using painter’s tape. A stencil brush, with its short, dense bristles, is ideal for dabbing paint onto the stencil openings, minimizing bleed-through. You can also use a stencil roller for larger areas, ensuring you don’t overload the roller with paint. Work in small sections, applying the contrasting paint color (often a darker hue for the pattern) with a light touch. Remove the stencil carefully while the paint is still slightly wet to achieve crisp, clean lines. If any paint has seeped under the stencil, gently lift the edge with a craft knife before it dries completely.
This stenciling process is repeated for every single tile you wish to create. Patience and meticulousness are key here. Measure and mark your tile lines with chalk or a pencil to ensure accurate alignment and consistent spacing. For a truly authentic look, consider varying the intensity of the pattern color slightly in different tiles, mimicking the subtle imperfections of handmade tiles. Allow the patterned paint to dry thoroughly before moving on to the next step.
The final and arguably most critical stage for durability and longevity is the application of a protective topcoat. For floors, a high-traffic, durable sealer or a clear epoxy coating is essential to protect the painted surface from scuffs, scratches, and moisture. For backsplashes, a water-resistant sealant or a clear polycrylic designed for high-moisture areas is recommended. Apply the topcoat in thin, even layers, allowing each coat to dry completely before applying the next. Most topcoats will require at least two to three coats for optimal protection. Ensure the topcoat is also UV-resistant if the area receives direct sunlight to prevent fading.
Beyond the paint and stencil method, other DIY faux cement tile techniques exist, offering different aesthetics and levels of effort. One such method involves using a textured paint or a Moroccan-style plaster combined with stenciling. This approach can create a more tactile, three-dimensional effect, mimicking the slightly uneven surface of real cement tiles. The process is similar, starting with surface preparation and priming, but the application of the textured paint or plaster requires a trowel or a putty knife, creating a unique, handmade feel. Once dry, the stenciling and sealing steps follow. This method can be more forgiving in terms of minor surface imperfections, as the texture itself can mask some irregularities.
Another interesting, albeit more involved, DIY approach utilizes vinyl flooring or peel-and-stick tiles as a base. You can purchase blank, unpatterned vinyl tiles or large sheets of vinyl flooring and then use specialized stencil paints or even permanent markers to create your desired cement tile design. This method offers a durable, water-resistant base from the outset, making it particularly suitable for high-moisture areas like bathrooms. The key here is to ensure the vinyl is properly adhered to the subfloor and that the paints or markers used are compatible with vinyl and are highly durable. Sealing these painted vinyl tiles is still advisable for an extra layer of protection.
For those seeking a truly robust and long-lasting solution, consider exploring the use of epoxy coatings for faux cement tiles. Epoxy offers exceptional durability, chemical resistance, and a beautiful, glossy finish. You can apply epoxy over a properly prepared and primed surface, and then use stencils to create the tile patterns within the wet epoxy or on top of a dried epoxy base. This method is particularly well-suited for garage floors, basements, or areas that experience heavy wear and tear. However, epoxy application requires careful attention to detail, proper ventilation, and can be more challenging for novice DIYers.
When embarking on your faux cement tile project, material selection is paramount. Invest in high-quality paints and sealers specifically designed for floors or high-traffic areas. Cheaper alternatives may not offer the necessary durability and will likely lead to premature wear and tear. Consider brands known for their tile paints, enamels, or floor coatings. For stencils, choose those made from durable materials like mylar or plastic that can withstand repeated use and cleaning. Look for stencils with precise cutouts to achieve crisp, defined patterns.
Surface preparation cannot be overemphasized. A clean, smooth, and properly primed surface is the foundation of a successful faux cement tile project. Skipping this step is a recipe for adhesion issues, peeling paint, and an unprofessional finish. If you are painting over existing tile, consider using a grout pen to refresh the grout lines and create a clean separation between your faux tiles. This will enhance the illusion of individual tiles and contribute to a more polished final look.
Experimentation is your friend, especially when it comes to color palettes and pattern combinations. Before committing to your main project area, test your chosen paints and stencils on a scrap piece of material or an inconspicuous area. This will allow you to gauge how the colors look together, how the paint adheres, and the ease of stencil application. Don’t be afraid to play with different color combinations, from traditional black and white to vibrant, contemporary hues.
The scale of your stencils should also be considered. If you are working with standard-sized tiles, choose stencils that are scaled appropriately. For larger areas, you might opt for larger stencils to speed up the process, or use multiple smaller stencils to create a more intricate and varied design. Remember that the grout lines between your faux tiles are just as important as the tile itself. Consider painting them a slightly darker shade than the tile base or using a grout pen for a more defined look.
Ventilation is crucial throughout the painting and sealing process. Ensure the area is well-ventilated, especially when working with strong-smelling paints or sealers. Consider wearing a respirator mask to protect yourself from fumes. When working with epoxy, ventilation is even more critical.
The lifespan of your DIY faux cement tiles will largely depend on the quality of materials used and the thoroughness of the application process. With proper preparation, high-quality paints, and a durable topcoat, your faux cement tiles can last for many years, offering a beautiful and cost-effective alternative to genuine cement tiles. Regular cleaning with mild detergents and avoiding harsh abrasive cleaners will also help to preserve their appearance.
In conclusion, DIY faux cement tile offers a transformative and accessible approach to achieving a high-end designer look without the associated costs and complexities. By understanding the various methods, prioritizing meticulous surface preparation, investing in quality materials, and exercising patience and precision, you can successfully create stunning faux cement tile floors, backsplashes, and accent walls that will elevate the aesthetic of your home for years to come. The ability to customize colors, patterns, and even textures empowers you to bring your unique design vision to life, proving that beautiful and durable tiling solutions are well within reach for the dedicated DIY enthusiast.
