
Transform Your Walls with Easy Washi Tape Art: A Step-by-Step Guide
Washi tape, the decorative paper tape originating from Japan, has revolutionized the DIY home décor scene. Its versatility, affordability, and ease of use make it an ideal medium for creating stunning wall art without the need for specialized skills or expensive materials. This comprehensive guide will delve into the world of washi tape wall art, exploring its benefits, providing inspiration, and offering detailed, SEO-friendly instructions for bringing your vision to life. Whether you’re a seasoned crafter or a complete beginner, this guide will equip you with the knowledge and confidence to embark on your own washi tape art adventure.
Why Choose Washi Tape for Wall Art?
The appeal of washi tape wall art lies in its inherent accessibility and adaptability. Unlike traditional paint or wallpaper, washi tape is a temporary, removable, and repositionable medium. This means you can experiment with designs, change your décor with the seasons, or simply refresh your space without committing to a permanent alteration. The adhesive is gentle, typically leaving no residue on most painted surfaces, making it a renter-friendly option. Furthermore, the sheer variety of patterns, colors, and textures available in washi tape is staggering. From subtle pastels and bold geometrics to whimsical florals and metallic finishes, there’s a washi tape to suit every aesthetic and mood. This vast selection allows for endless creative possibilities, enabling you to personalize your walls in a way that truly reflects your individual style. The tactile nature of washi tape also adds an interesting dimension to your wall art, creating subtle texture and depth that can be visually captivating. Finally, the cost-effectiveness of washi tape is a significant advantage. A few rolls of tape can transform a drab wall into a vibrant focal point, making it an incredibly budget-friendly way to elevate your home’s interior design.
Washi Tape Wall Art: Inspiration for Every Style
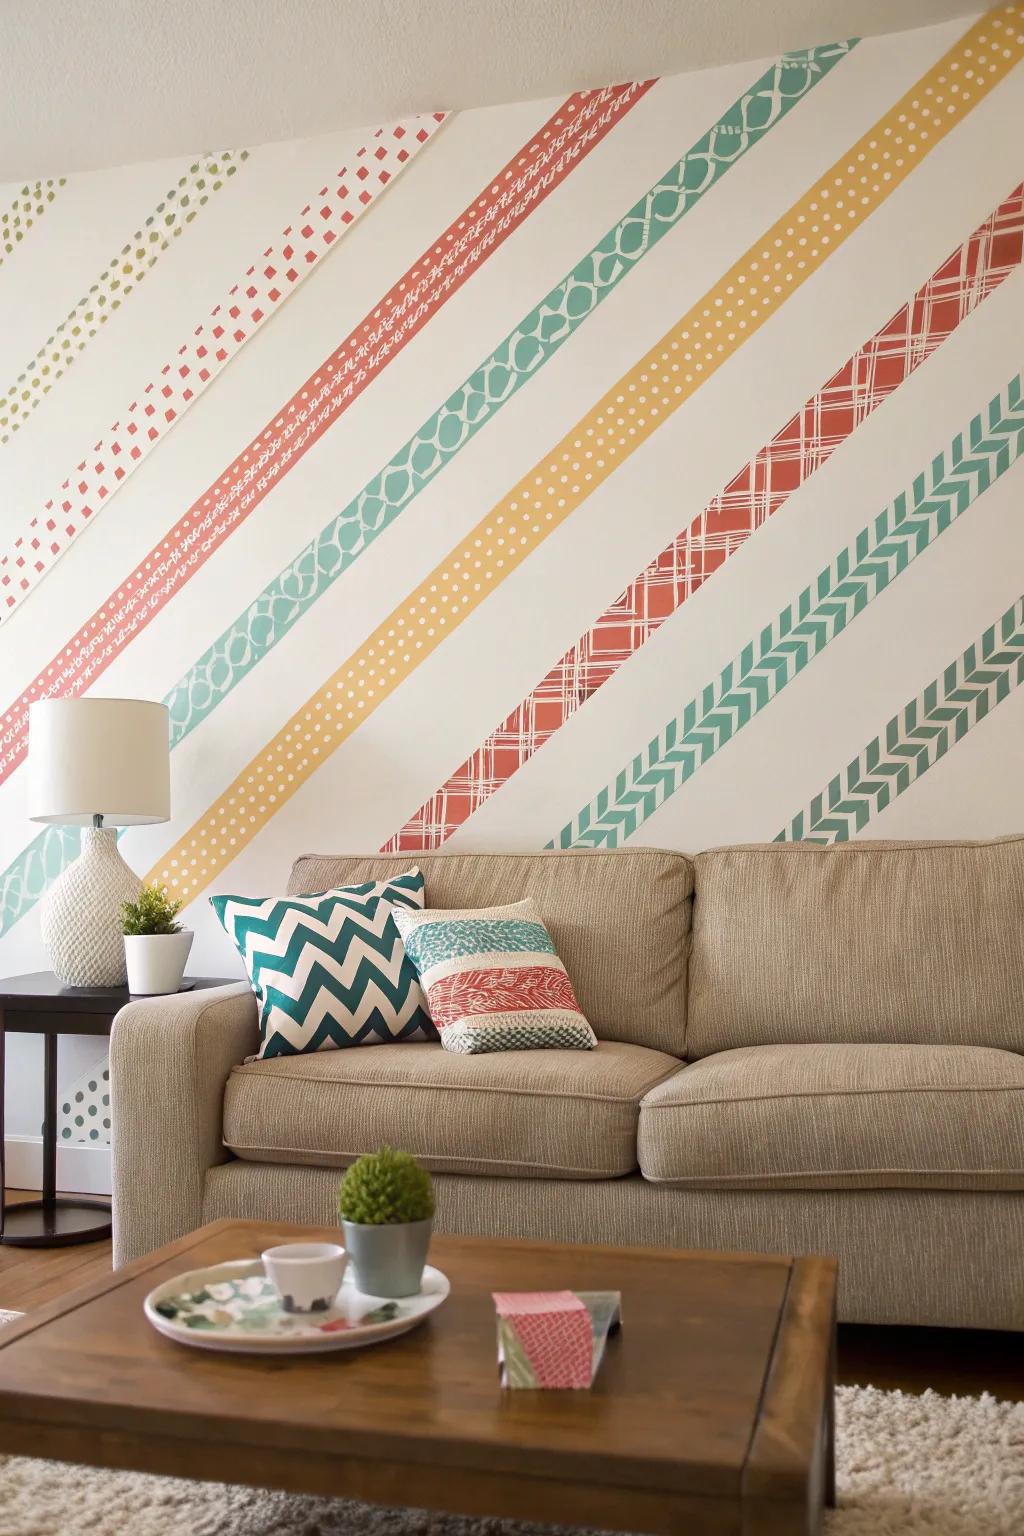
The beauty of washi tape wall art is its chameleon-like ability to adapt to various design aesthetics. Consider geometric patterns for a modern and minimalist look. Straight lines, triangles, chevrons, and hexagons can be arranged in countless configurations to create dynamic and eye-catching designs. Think about using contrasting colors to make the patterns pop, or opt for a monochromatic scheme for a more sophisticated feel. For a touch of bohemian charm, explore floral or nature-inspired washi tapes. Create whimsical vine patterns that climb your walls, or form abstract floral motifs that add a splash of color and organic energy. Combining different floral patterns can create a rich and layered effect.
If you’re drawn to a more playful and whimsical aesthetic, consider creating characters, abstract shapes, or even mimicking the look of other materials like brick or wood. For a truly unique approach, try creating a gallery wall with washi tape frames around existing artwork or photographs. This adds a cohesive and artistic touch to your display. Another popular trend is the use of washi tape to create accent walls. A single wall adorned with a bold pattern or a vibrant color can become a striking focal point in any room. Consider the scale of your room and the desired impact when choosing your pattern. Large, bold patterns can work well in spacious rooms, while smaller, more intricate designs might be better suited for smaller areas or as accents.
For those who love a touch of glamour, metallic or glitter-infused washi tapes are a fantastic choice. Use them to create shimmering stripes, starbursts, or to outline existing features like doorways or windows. Even simple, solid-colored tapes can be incredibly effective when used strategically. Consider using them to create ombre effects, color blocking, or to outline furniture and fixtures for a polished look. Don’t underestimate the power of negative space; sometimes, what you don’t cover can be just as impactful as what you do.
Essential Tools and Materials for Your Washi Tape Project
Before you begin, gather the necessary supplies to ensure a smooth and successful crafting experience. The star of the show, of course, is washi tape. Select a variety of colors, patterns, and widths that align with your chosen design. Consider the quality of the tape; higher-quality tapes tend to be more opaque, less likely to tear, and adhere better.
You’ll also need a sharp craft knife or precision scissors. These are crucial for making clean cuts and achieving sharp edges, especially when working with intricate designs or creating straight lines. A metal ruler or straight edge is indispensable for guiding your cuts and ensuring perfectly straight lines for geometric patterns. A pencil is useful for light marking of guidelines, though it’s important to use it very sparingly and ensure it can be easily erased or covered by the tape. A soft cloth or a squeegee is vital for smoothing down the tape, ensuring good adhesion, and preventing air bubbles.
For larger projects, a level can be helpful to ensure your designs are straight and balanced. If you plan on creating complex geometric patterns, a template or stencil might be beneficial, though many designs can be created freehand. Finally, ensure your walls are clean and dry. Dust and moisture can compromise the adhesion of the washi tape, so wipe down the walls with a damp cloth and allow them to dry completely before starting.
Step-by-Step Guide: Creating Your Washi Tape Wall Art
Let’s dive into the practical steps of bringing your washi tape wall art to life.
Step 1: Plan Your Design and Prepare Your Space
This is arguably the most important step. Before peeling a single piece of tape, visualize your design. Sketch it out on paper, paying attention to scale and proportions. Consider the existing furniture and décor in the room. Measure the area where you intend to apply the tape to ensure your design will fit appropriately. If you’re going for a geometric pattern, decide on the spacing and orientation of your shapes. If you’re creating a more organic design, consider how the lines will flow.
Once your design is finalized, gather all your materials. Ensure you have ample lighting in your workspace. Clear away any furniture or decor that might obstruct your work area. Thoroughly clean the designated wall space with a mild cleaner and water, then allow it to dry completely. This ensures optimal adhesion for your washi tape.
Step 2: Mark Your Guidelines (Optional but Recommended)
For precise designs, especially geometric ones, lightly marking guidelines on the wall can be incredibly helpful. Use a pencil and your ruler or level to draw faint lines that will guide your tape placement. These lines should be subtle enough to be easily covered by the washi tape. For freehand designs, you might only need to mark key anchor points.
Step 3: Begin Applying the Washi Tape
Start with one roll of washi tape. Carefully unroll a length of tape, aiming for slightly longer than you think you’ll need. Position the tape along your guideline or desired starting point. Slowly and steadily press the tape onto the wall, smoothing it down as you go to prevent wrinkles and air bubbles. Use your cloth or squeegee to firmly adhere the tape. Work in sections, ensuring each piece is well-pressed before moving on.
Step 4: Cutting and Trimming for Precision
When you reach the end of a line, the edge of the wall, or need to change direction, use your sharp craft knife or scissors for a clean cut. For straight lines, place your ruler along the desired cut line and run the craft knife along the edge. This will result in a crisp, professional finish. If you’re creating a pattern that requires overlapping tape, ensure the underlying tape is securely adhered before applying the next layer.
Step 5: Building Your Design
Continue applying tape, following your planned design. If you’re creating a geometric pattern, meticulously measure and cut each segment. For more organic designs, let your creativity flow, carefully observing how the lines connect and complement each other. Don’t be afraid to experiment. If a section doesn’t look quite right, gently peel back the tape and reposition it. Washi tape is forgiving, allowing for minor adjustments.
Step 6: Adding Layers and Details
Once the main structure of your design is in place, consider adding layers or intricate details. This could involve adding thinner strips of tape to outline shapes, creating borders, or adding small decorative elements. Mixing different patterns and textures can add depth and visual interest to your artwork. For instance, you could use a solid color tape for the main lines and a patterned tape to fill in a section.
Step 7: Final Smoothing and Inspection
Once your design is complete, take a step back and inspect your work. Run your hand over all the taped areas to ensure they are smoothly adhered. Pay close attention to the edges and corners to make sure there are no loose bits. Gently press down any areas that might have lifted. If you notice any minor imperfections, such as small air bubbles, you can often gently prick them with a fine needle and smooth them down.
Step 8: Enjoy Your New Wall Art!
Congratulations! You’ve transformed your wall with your own unique washi tape art. Step back and admire your handiwork. The beauty of this medium is that you can always adapt and change it as your style evolves.
Tips for Achieving Professional-Looking Washi Tape Art
- Start Small: If you’re new to washi tape art, begin with a small accent wall or a specific section of a wall to get a feel for the material and techniques.
- Quality Matters: Invest in good quality washi tape. It’s more opaque, easier to work with, and less likely to tear or leave residue.
- Clean Walls are Key: Always ensure your walls are clean, dry, and free from dust and grease for optimal adhesion.
- Patience is a Virtue: Take your time and don’t rush the process. Careful application and precise cutting will yield the best results.
- Embrace Imperfection: While precision is important, especially for geometric designs, don’t strive for absolute perfection. Washi tape art often has a charming handmade quality.
- Contrast is Your Friend: Use contrasting colors and patterns to make your designs pop.
- Consider the Scale: Think about the size of your room and the overall aesthetic when choosing the scale of your design and patterns.
- Light Box for Complex Patterns: For incredibly intricate geometric patterns, consider using a light box to project your design onto the wall for easier tracing.
- Layering for Depth: Don’t be afraid to layer washi tape. This can create interesting visual effects and textures.
- Protect from Sun: While washi tape is generally durable, prolonged exposure to direct sunlight can cause colors to fade over time.
- Removal is Easy: When you’re ready for a change, gently peel the washi tape away from the wall at an angle. If any residue remains, it can usually be removed with a bit of rubbing alcohol or a dedicated adhesive remover.
Beyond the Wall: Creative Washi Tape Applications
The creativity with washi tape doesn’t stop at walls. Consider using it to:
- Frame Artwork and Photos: Create custom frames for your existing pictures and artwork.
- Decorate Furniture: Add decorative stripes, patterns, or accents to furniture like dressers, tables, or bookshelves.
- Personalize Laptops and Electronics: Give your gadgets a unique makeover.
- Create Habit Trackers or Calendars: Design functional and stylish trackers on a whiteboard or directly on your wall.
- Embellish Notebooks and Journals: Add a pop of color and personality to your stationery.
- Make Gift Tags and Wrapping: Elevate your gift-giving with custom washi tape accents.
Conclusion
Washi tape wall art offers an accessible, affordable, and incredibly versatile way to inject personality and style into your living space. From bold geometric statements to delicate floral accents, the possibilities are limited only by your imagination. By following this comprehensive guide, gathering the right tools, and embracing a bit of creativity, you can transform any wall into a captivating work of art. The ease of application and removal makes it an ideal solution for renters, DIY enthusiasts, and anyone looking to refresh their décor without a significant investment or commitment. So, grab some tape, unleash your inner artist, and start creating a home that truly reflects your unique style.
