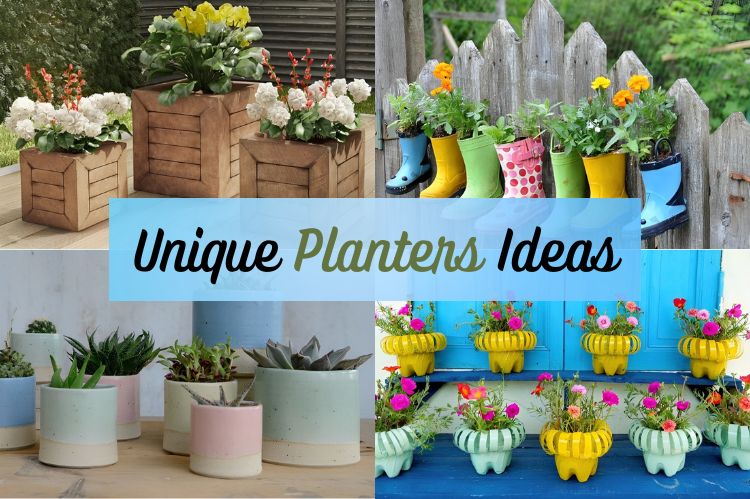
10 Unique DIY Planters to Elevate Your Home Garden
Repurposing everyday objects into functional and stylish planters is a cornerstone of sustainable and creative home gardening. Beyond the standard terracotta or plastic pots, a world of unique DIY planter possibilities exists, transforming discarded items into conversation starters and thriving homes for your beloved plants. This guide explores ten distinct and achievable DIY planter projects, ranging from rustic chic to modern minimalism, all designed to inspire your inner crafter and bring a personalized touch to your living spaces. Each project emphasizes accessibility, using readily available materials and straightforward techniques, making them perfect for both novice and experienced DIYers.
1. The Tire Planter: Rustic Charm Reimagined
An old tire, destined for the landfill, can be given a new lease on life as a surprisingly attractive and durable planter. This project is ideal for outdoor spaces, balconies, or even large patios. The inherent flexibility of rubber makes it adaptable to various shapes, and its resilience withstands harsh weather conditions. To begin, thoroughly clean the tire, removing any dirt or debris. For a more refined look, consider painting the exterior with outdoor-grade spray paint in a color that complements your garden aesthetic. Bold colors like teal or coral can add a vibrant pop, while muted earth tones offer a more subtle integration. For drainage, simply poke or drill several holes in the bottom sidewall of the tire. You can also strategically cut out sections of the top sidewall to create pockets for multiple plants or a cascading effect. To add a decorative element and further enhance drainage, consider adding a layer of gravel or small stones to the bottom before filling with soil. For larger gardens, stacking multiple tires, perhaps painted in alternating colors, can create a tiered planting system that adds visual depth and maximizes planting real estate. This DIY planter is particularly well-suited for robust plants like succulents, herbs, or even small ornamental trees. The tire’s dark color also absorbs sunlight, which can be beneficial for plants that thrive in warmer soil temperatures. When planting, ensure the tire is placed on a stable surface, as it can become quite heavy when filled with soil and plants. The texture of the tire itself can also be leveraged; for instance, leaving some of the tread pattern visible can add an interesting visual element. Consider filling the tire with a well-draining potting mix, especially if you are planting drought-tolerant species. The sheer volume of soil a tire can hold allows for substantial root growth, making it a great option for larger, established plants. To prevent soil erosion, especially on slopes, you can anchor the tire using stakes driven into the ground. This project is not only eco-friendly but also incredibly cost-effective, turning a waste product into a functional and aesthetically pleasing garden feature.
2. The Book Planter: Literary Blooms for the Bookworm
For bibliophiles, transforming old hardcover books into miniature planters offers a unique and whimsical way to display small plants. This project is best suited for indoor settings and small succulents, air plants, or shallow-rooted herbs. The key is to select books that have seen better days, with sturdy covers that can hold their shape. Carefully hollow out the pages, leaving a substantial border around the edges to maintain the book’s integrity. Use a craft knife or a sharp box cutter for precision. The depth of the cavity will determine the size of the plant you can accommodate. Once the cavity is carved, line it with a layer of plastic sheeting or a small plastic container to protect the book pages from moisture and soil. Poke a few small drainage holes in the plastic lining or container. You can then fill this lined cavity with a lightweight potting mix suitable for your chosen plant. To further enhance the aesthetic, consider preserving some of the original book pages or adding a thin layer of moss around the plant for a natural, organic look. These book planters make excellent desk accessories, bookshelf decorations, or unique gifts for fellow book lovers. For added stability, you can glue the bottom edges of the book together. Some crafters opt to seal the carved-out pages with a clear sealant, like Mod Podge, to further protect them from moisture and add a subtle sheen. When watering, be exceedingly careful to avoid saturating the pages, opting for a gentle misting or a small watering can with a narrow spout. The charm of this planter lies in its inherent narrative; imagine a botanical display emerging from the pages of a classic novel or a well-loved cookbook. The color of the book cover can also play a significant role in the overall visual impact, with vintage-toned books lending themselves to a more antique feel, while brighter covers can create a more modern, playful look. For an extra touch of personalization, consider incorporating small handwritten notes or quotes within the planter, creating a truly bespoke piece. This project requires a delicate touch and a keen eye for detail, resulting in a planter that is as much a work of art as it is a home for your greenery.
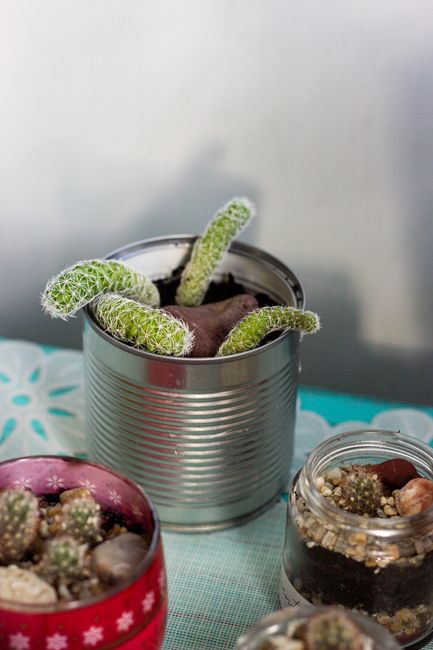
3. The Tin Can Planter: Vibrant Colors and Versatile Forms
Repurposed tin cans offer an incredibly versatile and budget-friendly canvas for creating a multitude of unique planters. From soup cans to coffee tins, their sturdy construction and readily available nature make them ideal for DIY projects. Begin by thoroughly cleaning the cans and removing any labels. For a polished finish, you can sand down any sharp edges. The true magic of tin can planters lies in their decorative potential. They can be painted with vibrant acrylics, covered in decorative paper, fabric, or even wrapped in twine or rope for a rustic feel. Consider creating a collection of cans in varying sizes and colors to create a dynamic display. For drainage, drill several small holes in the bottom of each can using a metal drill bit. If you prefer a more seamless look, you can opt for planters without drainage holes and use a layer of gravel at the bottom, but be mindful of overwatering. These planters are perfect for small herbs, succulents, or even as seed-starting pots. For a more cohesive look, paint all your cans in a unified color palette or create a repeating pattern across multiple cans. Adding small embellishments like beads, buttons, or even repurposed hardware can further personalize your tin can creations. For outdoor use, ensure you use weather-resistant paints and sealants. A particularly charming approach is to decoupage the cans with old maps or sheet music, tying in the theme of exploration or artistry. When planting, use a well-draining potting mix and avoid overcrowding the can to ensure adequate airflow for the roots. The metallic sheen of some cans, when left unpainted, can also create a modern, industrial aesthetic, especially when paired with minimalist greenery. For a more elaborate display, consider creating a vertical planter by attaching multiple cans to a wooden board or pallet. This project is remarkably forgiving, allowing for experimentation with different textures and finishes. The accessibility of tin cans makes them a fantastic option for crafters of all ages and skill levels, providing a simple yet effective way to inject personality into your plant displays.
4. The Light Bulb Planter: Delicate Dwellings for Air Plants
This project transforms discarded incandescent light bulbs into enchanting miniature terrariums, perfect for housing delicate air plants. The fragile nature of the glass requires a gentle approach, making this planter ideal for those with a steady hand. Carefully remove the metal base of the light bulb using pliers or a specialized tool, taking care not to shatter the glass. Once the base is removed, you will have a hollow glass orb. Clean the inside of the bulb thoroughly. Air plants require no soil, only occasional misting and good air circulation, making them perfectly suited for these enclosed environments. You can suspend these light bulb planters using fine wire, twine, or fishing line, creating a whimsical floating garden effect. For stability, consider creating a small stand from wire or wood. The transparency of the glass allows for a captivating view of the air plant’s intricate structure. To add a decorative touch, you can fill the bottom of the bulb with a small amount of sand, colored pebbles, or even a tiny piece of driftwood before introducing the air plant. This project is a beautiful way to showcase the ethereal beauty of air plants. When misting, use a fine spray bottle and ensure the air plant has adequate time to dry before returning it to its enclosed environment to prevent rot. Avoid direct sunlight, as the glass can magnify the sun’s rays and scorch the delicate plant. This project is particularly suited for small, ornamental air plant varieties. The simplicity of this planter allows the air plant itself to be the star of the show. For a more dramatic display, cluster several light bulb planters together at varying heights. This DIY project is a testament to the beauty that can be found in the most unexpected of places, turning a common household item into a miniature botanical wonder.
5. The Concrete Block Planter: Industrial Chic for Bold Blooms
For those embracing an industrial or minimalist aesthetic, concrete blocks offer a robust and architecturally interesting base for planters. Their modular nature allows for a variety of configurations, from simple individual planters to elaborate multi-tiered garden walls. Begin by selecting clean, dry concrete blocks. For a more finished look, you can paint the blocks with concrete paint or stain them to achieve a desired hue. However, the raw, unadorned look of concrete also possesses a powerful aesthetic appeal. The hollow core of the block naturally creates a planting cavity. For enhanced drainage, you can position the blocks so that the openings face upwards, allowing for natural water runoff. If you are stacking multiple blocks, consider using a strong adhesive or rebar to ensure stability, especially for taller structures. These planters are ideal for larger, more substantial plants that require ample root space. Think succulents, ornamental grasses, or even small shrubs. The weight of the concrete blocks provides excellent stability, making them a good choice for windy locations. You can also create a visually striking effect by staggering the blocks or arranging them in a geometric pattern. For a more refined finish, you can cap the top of the blocks with wooden planks or decorative stones. When filling with soil, ensure you use a well-draining mix to prevent waterlogging. The inherent porosity of concrete can also be an advantage, allowing for some degree of air circulation to the roots. This project is remarkably durable and low-maintenance, requiring little upkeep once constructed. The starkness of the concrete can beautifully contrast with the vibrant colors and textures of blooming plants, creating a dynamic visual interplay. For an added touch of creativity, you can etch designs into the concrete before it fully cures or incorporate decorative elements like mosaic tiles. This DIY planter is a statement piece, offering both functionality and a strong architectural presence in your garden or patio space.
6. The Pallet Wood Planter: Rustic and Reclaimed Beauty
Wooden pallets, often discarded after their initial use, are a treasure trove for rustic and eco-friendly DIY projects, including planters. Their slatted construction lends itself perfectly to creating charming, farmhouse-style planters. Begin by dismantling a pallet, carefully separating the wooden planks. Sand down the wood to remove splinters and rough edges, and consider treating it with a non-toxic sealant or outdoor-grade stain to protect it from the elements and prolong its lifespan. You can then construct a simple box shape, using screws or nails to join the planks. The beauty of pallet wood lies in its imperfections; the weathered look and unique grain patterns add character to the finished planter. For drainage, drill several holes in the bottom of the planter or line the base with landscape fabric, which will allow water to escape while preventing soil loss. These planters are ideal for a variety of plants, from herbs and vegetables to colorful annuals. For a tiered effect, you can create multiple planters of varying sizes and arrange them together. Consider adding wheels to the base of larger planters for easy mobility. The natural, unfinished look of pallet wood creates a charming, down-to-earth aesthetic that complements many garden styles. You can also paint or stencil the wood for a more personalized touch. For a more substantial planter, you can reinforce the corners with metal brackets. When planting, ensure you use a good quality potting mix that offers adequate drainage. This project is not only visually appealing but also incredibly sustainable, giving new life to materials that would otherwise be wasted. The tactile quality of the wood adds a warm, inviting feel to your planting spaces, making them a delightful addition to any outdoor or indoor area.
7. The Colander Planter: Whimsical Wonders with Built-in Drainage
Kitchen colanders, with their numerous pre-drilled holes, are inherently designed for drainage, making them surprisingly effective and visually unique planters. This project is a simple yet impactful way to repurpose a common kitchen item. Select a sturdy metal or plastic colander. Clean it thoroughly. The built-in drainage holes eliminate the need for drilling, simplifying the process. For a more decorative touch, you can paint the exterior of a metal colander with outdoor-grade spray paint. Consider vibrant colors that will pop against the greenery. For a softer, more natural look, you can line the inside of the colander with burlap or moss before adding soil. This also helps prevent soil from sifting through the holes. Colander planters are perfect for trailing plants, such as petunias, ivy, or strawberries, as their vines can cascade beautifully through the holes. They can also be used for herbs or small flowering plants. To hang your colander planter, you can attach sturdy chains or ropes to the handles. If using a metal colander, ensure it is rust-resistant. For a more whimsical display, consider using multiple colanders of different sizes and colors. This project requires minimal effort and offers maximum impact, transforming a humble kitchen utensil into a charming and functional plant holder. The unique texture and pattern created by the holes are inherently decorative, adding an element of intrigue to your plant display. When planting, use a lightweight, well-draining potting mix.
8. The Teacup Planter: Delicate Delights for Mini Gardens
For a touch of vintage charm and delicate beauty, teacups offer an exquisite canvas for miniature planters. This project is ideal for small succulents, air plants, or shallow-rooted herbs, and is best suited for indoor display. Select vintage teacups and saucers, ideally those that are no longer in use or have minor chips. The key challenge with teacups is drainage. You can address this in several ways. The most common method is to carefully drill a small drainage hole in the bottom of the teacup using a diamond-tipped drill bit designed for ceramics. This requires patience and a steady hand. Alternatively, you can create a "false bottom" by adding a thick layer of gravel or small stones to the bottom of the teacup, followed by a layer of activated charcoal to help absorb excess moisture and prevent odors. Then, add your soil. These teacup planters make delightful additions to windowsills, desks, or as charming table centerpieces. You can even create a collection of teacups in various patterns and colors for a more elaborate display. For added stability, you can glue the teacup to its saucer. When watering, be extremely conservative to avoid waterlogging the roots, especially if you have opted for the gravel drainage method. The delicate nature of teacups lends itself to petite and elegant plant selections. Consider using a fine-tipped watering can or a spray bottle for precise watering. This project is a celebration of small details and adds a touch of nostalgic elegance to your plant collection.
9. The Hanging Shoe Planter: Quirky and Playful Blooms
Give old shoes a new life by transforming them into quirky and playful planters. This project is a fantastic way to add personality and a touch of whimsy to your garden, balcony, or even a fence. Almost any type of shoe can be adapted, from old sneakers and boots to even wellington boots. Clean the shoes thoroughly. For drainage, cut several holes in the sole of the shoe using a sharp knife or drill. If using fabric shoes, you can also create small openings in the sides for better airflow. For boots, ensure there is adequate depth for planting. You can then fill the shoe with a well-draining potting mix. Consider using plants that have a trailing or cascading habit, as their growth will accentuate the form of the shoe. Brightly colored flowers or lush greenery will create a striking contrast against the material of the shoe. You can also add a sealant to the inside of the shoe to prevent rot, especially for fabric shoes. For a more permanent display, you can attach the shoes to a fence, wall, or even hang them from tree branches using strong wire or rope. This project is incredibly versatile and allows for a great deal of personal expression. Consider creating a themed collection of shoes, such as all hiking boots or all children’s shoes. The novelty of this planter is sure to be a conversation starter. When planting, use a lightweight potting mix to avoid adding too much weight. Ensure the shoes are placed on a stable surface or securely fastened to prevent them from falling.
10. The PVC Pipe Planter: Modern and Modular Vertical Gardens
For a modern, space-saving, and modular solution, PVC pipes offer a sleek and versatile option for creating vertical planters. This project is ideal for small spaces, balconies, or urban gardens where maximizing planting area is crucial. Begin by acquiring lengths of PVC pipe in your desired diameter. You can find PVC pipes at most hardware stores. For drainage, drill several holes along the bottom of each pipe section using a suitable drill bit. You can then cut the pipe into various lengths to create different levels for your vertical garden. To create planting cavities, you can either cap the top of the pipes and cut openings in the sides, or you can cut the pipes horizontally into shorter sections and stack them. To create a stable vertical structure, you can use PVC fittings and connectors, or you can mount the pipes onto a wooden frame or trellis. For planting, fill the pipes with a lightweight, well-draining potting mix. Consider using plants that have a compact growth habit, such as herbs, strawberries, or smaller varieties of lettuce and greens. The vertical orientation of these planters allows for excellent air circulation and can help reduce the risk of fungal diseases. You can also paint the PVC pipes in a color that complements your outdoor décor, or embrace the industrial look of bare PVC. This project is incredibly customizable, allowing you to design a vertical garden that perfectly suits your needs and aesthetic. When planting, ensure you water thoroughly, as water can drain quickly through the vertical pipes. This DIY planter is a testament to the ingenuity of repurposing industrial materials for functional and aesthetically pleasing applications, creating a thriving green space in even the most confined areas.
