
How to Sew a Lace Kimono: A Step-by-Step Guide for Elegant Drapery
Sewing a lace kimono offers a blend of elegance and personal expression, allowing for a unique garment that can be dressed up or down. This comprehensive guide provides detailed instructions for creating your own lace kimono, focusing on techniques that will result in a professional finish. We will cover fabric selection, pattern considerations, cutting, sewing construction, and finishing touches, aiming for clarity and precision to ensure a successful project. SEO considerations will be woven throughout, using relevant keywords like "sew lace kimono," "DIY kimono," "lace fabric sewing," "easy kimono pattern," "elegant dressing gown," and "handmade lace cardigan."
Selecting the Right Lace Fabric for Your Kimono
The choice of lace fabric is paramount to the success and aesthetic of your kimono. Not all lace is created equal, and understanding the different types will help you achieve the desired drape and opacity. Consider the weight, drape, and stretch of the lace. Delicate Chantilly lace or Alençon lace are beautiful but can be prone to snagging and may require a lining for modesty and structure. More robust guipure lace, which is often embroidered and has motifs connected by threads, offers more body and can be used unlined for a sheer effect. Stretch lace can be forgiving for beginners, providing ease of movement and a more comfortable fit, especially if your pattern has any fitted elements (though kimonos are typically very loose). For a truly elegant kimono, consider laces with intricate patterns, such as floral motifs, geometric designs, or damask. Think about the width of the lace; some laces are sold in panels with finished edges, which can be advantageous for kimono construction as they can be used as sleeve or hem borders. When purchasing lace, always buy a little extra to account for pattern matching, potential mistakes, or for creating additional embellishments. Check the selvage for any information about fiber content, as this can impact washing and pressing.
Understanding Kimono Silhouettes and Pattern Options
Kimono patterns are generally quite simple, relying on rectangular or slightly shaped pieces to create a flowing silhouette. While you can draft your own basic kimono pattern by measuring your shoulders and desired length, utilizing a commercial pattern designed for kimonos is often the most straightforward approach, especially for beginners. Look for patterns labeled "easy" or "beginner" which typically involve minimal pieces and straightforward construction. Key pattern elements to consider include the main body panels, sleeve pieces (often wide and rectangular), and a separate collar piece or facing. Some patterns might include optional elements like belts or ties, or even lining pieces. If you’re working with a patterned lace, consider how the motifs will align across seams. This "pattern matching" can be time-consuming but significantly elevates the finished product. For a true beginner, opting for a lace without a strong directional print or with a more abstract pattern will simplify the cutting and sewing process. When choosing a pattern, pay attention to the finished garment measurements. Kimonos are meant to be oversized, so select a size that aligns with your desired amount of ease.
Preparing Your Lace Fabric and Pattern
Lace fabric can be delicate and prone to stretching or shifting, so careful preparation is essential. Pre-washing your lace is crucial, especially if it’s a natural fiber like cotton or silk. This will pre-shrink the fabric and remove any manufacturing residues. Hand-wash delicate laces in cool water with a mild detergent, or use a mesh laundry bag in a gentle machine cycle. Avoid harsh detergents or excessive agitation. If your lace is very delicate, consider lining it with a lightweight silk or rayon charmeuse for added structure and opacity, and wash the lining fabric separately. Pressing lace requires a gentle touch. Use a low heat setting on your iron and consider using a pressing cloth (a piece of cotton muslin or silk organza) between the lace and the iron to prevent scorching or snagging. Press from the wrong side whenever possible. If the lace has a nap or a defined right and wrong side, pay close attention to this during pressing.
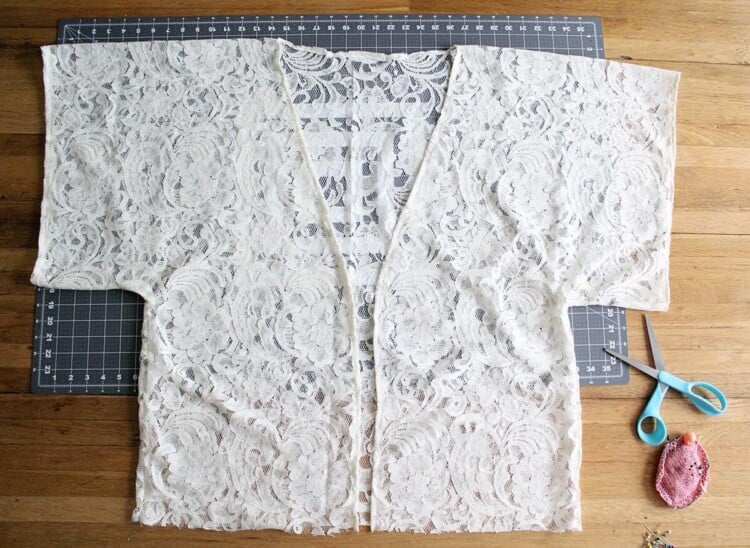
Laying Out and Cutting Your Lace Pattern Pieces
Accurate layout and cutting are critical for a successful kimono. Because lace can be somewhat transparent, careful attention to grainlines is less about hiding them and more about ensuring the fabric drapes correctly and that any decorative edges are positioned as intended. Lay your lace flat on a large, clean surface, ensuring it’s free of wrinkles. If your lace has a directional pattern or motifs that you want to align, this is where the detailed layout comes into play. Many kimono patterns utilize the full width of the fabric, minimizing seams. If your lace has decorative edges (e.g., scalloped or fringed borders), carefully consider how these will be incorporated into your design, such as along the hem or sleeve openings. Pin your pattern pieces securely to the lace. For slippery lace, consider using pattern weights instead of pins, or use fine, sharp pins that won’t leave noticeable holes. If your lace has a selvage edge that you wish to incorporate as a finished edge on your kimono (e.g., for the hem or sleeve openings), adjust your pattern pieces accordingly. Use a very sharp pair of fabric shears or a rotary cutter and mat. Take your time with each cut, following the pattern lines precisely. If you are using a lace with a delicate edge that you want to preserve, consider cutting slightly outside the intended seam allowance to avoid disturbing the decorative border.
Sewing Construction Techniques for Lace
Sewing lace requires specific techniques to achieve a neat and durable finish. Because lace can fray easily and its open weave can be tricky to handle, using the right needle, thread, and stitch is important.
- Needles: Use a fine, sharp needle, such as a universal needle size 60/8 or 70/10, or even a specialized microtex needle. For very delicate or stretchy laces, a ballpoint or stretch needle might be beneficial to prevent snagging.
- Thread: Opt for a good quality polyester thread that matches your lace or the underlying lining if you’re using one. Silk thread is also a luxurious option for silk laces.
- Stitch Settings: A narrow zigzag stitch is your best friend when sewing lace. This stitch helps to secure the edges and prevent fraying. Experiment with different stitch widths and lengths on a scrap piece of your lace to find what works best. A straight stitch can be used for seams that will be enclosed within a facing or lining, but a zigzag is generally preferred for exposed seams.
- Seam Finishes:
- French Seams: This is an elegant and durable way to finish lace seams, especially for unlined kimonos. It encloses the raw edges of the fabric within the seam. To create a French seam, sew the pieces together with the wrong sides facing, with a small seam allowance. Trim the seam allowance, turn the fabric so the right sides are together, and then sew again with a larger seam allowance, enclosing the first seam.
- Lapped Seams: This method involves overlapping one fabric edge over another and stitching them down. It’s often used for decorative purposes and can be quite effective with lace.
- Serger/Overlocker: If you have a serger, it can be an excellent tool for sewing lace. Use a narrow, three-thread overlock stitch with a differential feed setting to prevent stretching or puckering. The serger will trim and finish the raw edges simultaneously. Be sure to test your settings on a scrap of lace first.
- Lining and Facing: If you are lining your kimono or using facings for the front edges and collar, treat these as separate construction steps. Sew the lace and lining pieces together at the edges as you would a regular garment, then proceed with the main kimono construction.
Constructing the Kimono Body and Sleeves
Begin by sewing the main body panels together according to your pattern instructions. If you are using French seams, this will involve sewing the pieces with wrong sides together first, then turning and re-sewing. If your pattern has back or side seams, construct these similarly.
Attaching the sleeves is typically a straightforward process for kimonos. The wide, rectangular sleeves are often attached to the main body along a shoulder seam and down the side of the sleeve. Again, use your chosen seam finishing technique. Pay attention to how the lace pattern aligns if you are pattern matching. For very sheer lace, you may want to reinforce the underarm seam with a few hand stitches for added security.
Adding the Collar and Front Facings
The collar and front facings add structure and a finished look to the kimono’s opening. If your pattern has a separate collar piece, attach it to the neckline according to the pattern instructions. This often involves sewing it to the right side of the kimono neckline, then folding it over and stitching it in place.
Front facings are typically attached to the raw edges of the kimono’s opening, extending from the hem up to the neckline. These can be cut from the same lace, from a coordinating fabric, or from your lining fabric. Sew the facing to the kimono’s right side, then turn the facing to the inside and stitch it down along the edge. For a very clean finish, you can understitch the facing to prevent it from rolling out.
Hemming and Finishing Touches
The hem of your lace kimono is a prime opportunity to showcase the beauty of your lace.
- Decorative Edges: If your lace has a pre-existing decorative edge (e.g., scallops, fringe), you’ll want to preserve this. Carefully trim away any excess fabric beyond the decorative edge, ensuring you don’t cut into the motif. You may need to hand-stitch the decorative edge to the body of the kimono to keep it from unraveling.
- Rolled Hem: For lace without a decorative edge, a narrow rolled hem is a classic and elegant finish. This can be done with a sewing machine’s rolled hem foot or by carefully hand-rolling and stitching the edge.
- Lace Overlay Hem: You can also add a contrasting or coordinating lace to create a layered hem effect. This involves sewing a separate piece of lace to the hem of the kimono.
- Sleeve Hems: Finish the sleeve hems in the same manner as the main hem.
Optional Embellishments and Linings
For added modesty or a different aesthetic, consider lining your lace kimono. Lightweight silk, rayon, or even a fine cotton voile can work well. The lining can be constructed as a separate garment that is attached at the neckline, front edges, and hem, or it can be sewn directly to the lace pieces before construction.
Embellishments can further enhance the elegance of your kimono. Consider:
- Beading: Delicate beadwork along the neckline, sleeves, or hem can add a touch of glamour.
- Appliqué: Small lace motifs cut from scrap lace can be appliquéd onto the kimono for added visual interest.
- Ribbons or Ties: A simple satin ribbon or a coordinating fabric tie can be used as a belt to cinch the waist.
Care and Maintenance of Your Lace Kimono
To ensure your handmade lace kimono remains a treasured piece, proper care is essential. Always follow the care instructions for the specific lace you used. Generally, hand-washing in cool water with a mild detergent is recommended. Avoid wringing or twisting the delicate fabric. Lay the kimono flat on a clean towel to air dry, away from direct sunlight and heat. If ironing is necessary, use a very low heat setting and a pressing cloth, ironing from the wrong side. Store your kimono carefully to prevent snags. Hanging it on a padded hanger or folding it with tissue paper between the layers will help maintain its shape and prevent damage.
By following these detailed steps, you can successfully sew a beautiful and elegant lace kimono that reflects your personal style and craftsmanship. The key is patience, precision, and a willingness to experiment with techniques suited to the delicate nature of lace.
