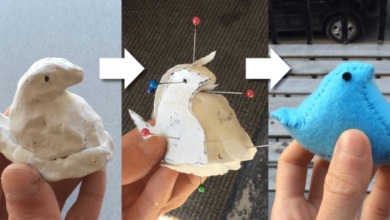
Decorative clay bell DIY is a delightful way to unleash your creativity and craft beautiful, personalized ornaments. These charming bells, with their rich history and cultural significance, add a touch of warmth and whimsy to any space. From traditional to modern designs, clay offers a versatile medium for crafting these delightful objects, allowing you to express your unique style.
This guide will walk you through the entire process, from gathering materials and tools to shaping, decorating, and firing your clay bells. Whether you’re a seasoned crafter or a curious beginner, this step-by-step journey will equip you with the knowledge and inspiration to create stunning decorative clay bells.
Materials and Tools
Before embarking on your clay bell creation journey, it’s essential to gather the necessary materials and tools. Having the right supplies ensures a smooth and enjoyable crafting experience. Let’s delve into the specifics of each item and their roles in bringing your clay bells to life.
Clay
Clay is the heart of your bell-making endeavor. It’s the malleable material that takes shape under your hands and transforms into beautiful, sonorous bells.
- Polymer Clay:This type of clay is oven-bake and comes in a wide range of colors. It’s ideal for intricate designs and detailed work, as it retains its shape well. Polymer clay is lightweight and durable, making it suitable for delicate bell structures.
- Air-Dry Clay:This clay hardens when exposed to air, eliminating the need for an oven. It’s a good option for beginners as it’s forgiving and easy to work with. Air-dry clay is also available in various colors and textures, allowing for creative exploration.
- Ceramic Clay:This clay requires firing in a kiln to achieve its final hardness. It’s known for its durability and ability to withstand high temperatures, making it suitable for creating bells that can be used outdoors.
Tools for Shaping and Cutting
The shaping and cutting tools are crucial for creating the desired form of your clay bells.
Making decorative clay bells is a fun and relaxing way to add a touch of whimsy to your home. The process is similar to sculpting, but with the added bonus of a delightful sound when the finished bell is hung.
As I was working on my latest batch of bells, I realized I needed a break from the clay and something sweet. That’s when I remembered the recipe for strawberry ravioli with balsamic and basil I’d bookmarked. The tartness of the strawberries paired with the sweetness of the balsamic was the perfect palate cleanser, giving me the energy to finish my clay project.
- Clay Sculpting Tools:These tools come in various shapes and sizes, allowing you to smooth, shape, and add details to your clay. They can be made from wood, metal, or plastic, and include tools like:
- Ribs:Used for smoothing and shaping clay surfaces.
They come in different shapes and sizes to create curves, angles, and textures.
- Loop Tools:These tools have a loop at the end, used for removing excess clay and creating holes.
- Wire Tools:These tools can be used for cutting, shaping, and adding details to clay.
- Ribs:Used for smoothing and shaping clay surfaces.
- Clay Rolling Pin:A rolling pin is used to create even thicknesses of clay, ensuring consistency in your bell’s structure.
- Clay Cutter:A clay cutter is used for cutting shapes and patterns in clay. It can be a simple knife or a specialized tool with various blade shapes.
- Scissors:Scissors are useful for cutting out small shapes and patterns from clay.
Tools for Decorating
Decorating tools add the finishing touches and enhance the beauty of your clay bells.
- Paintbrushes:Paintbrushes are used for applying paint, glaze, and other decorative elements to your clay bells.
- Paints:Acrylic paints are a popular choice for decorating clay bells, as they are easy to use and come in a wide range of colors.
- Glaze:Glaze is a glass-like coating that is applied to clay to create a smooth, shiny finish. It also helps to protect the clay from scratches and stains.
- Stamping Tools:These tools allow you to create intricate patterns and designs on your clay bells.
- Embellishments:Embellishments like beads, sequins, and ribbons can add a touch of sparkle and personality to your clay bells.
Other Essential Materials
- Work Surface:You’ll need a clean and flat surface to work on, such as a table or a piece of plywood.
- Water:Water is used to soften clay and to help smooth out any imperfections.
- Clay Slip:Clay slip is a mixture of clay and water that is used to join pieces of clay together.
- Wax Paper:Wax paper is used to prevent clay from sticking to your work surface.
- Oven or Kiln:Depending on the type of clay you’re using, you may need an oven or a kiln to bake or fire your clay bells.
Clay Bell Shaping Techniques
Creating the desired shape for your clay bells is an exciting step in the process. There are several techniques you can use, each offering unique advantages and creative possibilities. Let’s explore some of the most common methods and discover how to achieve the perfect bell shape for your project.
Hand-Building Techniques
Hand-building techniques are a great way to create unique and personalized clay bells. They involve shaping the clay by hand, without the use of molds. These techniques offer flexibility and allow for intricate designs.
- Pinch Pot:This classic technique involves pinching and shaping a ball of clay into a cup-like form. You can then use your fingers or tools to further refine the shape and create the desired bell form. This technique is perfect for small, delicate bells.
Creating decorative clay bells is a fun way to add a touch of whimsy to your home. I love using different textures and colors to make each bell unique. And just like a beautiful bell needs a delicate chime, a delicious dessert needs a perfect finishing touch, like the crunchy sugar topping on this flan with crunchy sugar tops.
The contrast between the smooth flan and the crispy sugar is just as satisfying as the contrast of colors and textures in my clay bells.
- Coil Building:This technique involves rolling out long, thin coils of clay and layering them on top of each other to create a bell shape. You can then smooth out the coils and refine the form using your fingers or tools. This technique is ideal for larger, more elaborate bells.
- Slab Building:In this technique, you roll out a flat sheet of clay and cut out the desired shape. You can then join the pieces together to create the bell form. This technique is great for creating bells with geometric shapes and intricate designs.
Mold-Making Techniques, Decorative clay bell diy
Mold-making allows you to create multiple identical bells with consistent shapes and sizes. This technique is especially helpful for mass production or when you need a large number of identical bells.
- One-Part Mold:This technique involves creating a single mold that encompasses the entire shape of the bell. You can use a variety of materials for your mold, such as plaster, silicone, or even a carved piece of wood. Once the mold is dry, you can press the clay into it to create the desired shape.
- Two-Part Mold:This technique involves creating two separate molds that fit together to form the complete bell shape. This allows for more intricate designs and details. You can use the same materials as for one-part molds, but you will need to create a separate mold for each half of the bell.
Tips for Shaping Clay Bells
Here are some tips to help you achieve the desired shape and size for your clay bells:
- Use the Right Clay:Choose a clay that is suitable for your project. Some clays are better for hand-building, while others are more appropriate for mold-making.
- Condition the Clay:Ensure the clay is properly conditioned before you start shaping it. This means kneading it until it is smooth and pliable. This will help to prevent cracking and ensure a more even texture.
- Use Tools:Don’t be afraid to use tools to help you shape your clay bells. Tools such as wooden tools, metal ribs, and sponges can help you achieve intricate details and smooth out imperfections.
- Be Patient:Shaping clay bells takes time and practice. Don’t be discouraged if your first attempts aren’t perfect. Just keep practicing, and you will gradually improve your skills.
Decorating Clay Bells
Once your clay bells are dry and ready, it’s time to unleash your creativity and add some personality! There are many ways to decorate clay bells, from simple to elaborate, and the possibilities are truly endless.
Painting Clay Bells
Painting is a versatile way to add color and detail to your clay bells. Acrylic paints are a popular choice for clay because they dry quickly and come in a wide range of colors. You can use brushes to create intricate designs or sponges to apply a solid coat of color.Here are some tips for painting clay bells:* Prepare the surface:Before painting, make sure your clay bells are clean and dust-free.
Use thin coats
Apply thin coats of paint to avoid cracking or chipping. Let each coat dry completely before applying the next.
Experiment with techniques
Try different brushstrokes, stencils, or sponges to create unique patterns and textures.
Glazing Clay Bells
Glazing is a great way to add a glossy, protective finish to your clay bells. Glazes are made from powdered glass that is mixed with water and applied to the clay. Once the glaze is fired in a kiln, it melts and fuses with the clay, creating a durable, waterproof surface.Here are some things to consider when choosing a glaze:* Type of glaze:There are many different types of glazes, including matte, glossy, and crackle glazes.
Choose a glaze that complements the style of your bells.
Color
Glazes come in a wide range of colors, from clear to vibrant hues.
Firing temperature
Make sure the glaze you choose is compatible with the clay you used and the firing temperature of your kiln.
Stamping Clay Bells
Stamping is a fun and easy way to add patterns and textures to your clay bells. You can use rubber stamps, cookie cutters, or even natural objects like leaves and twigs to create unique impressions.Here’s how to stamp clay bells:* Choose your stamps:Select stamps that complement the style of your bells.
Apply even pressure
Press the stamp firmly and evenly onto the clay to create a clear impression.
Experiment with depth
I love the idea of adding a touch of handmade charm to a space, and decorative clay bells are the perfect way to do that! I recently found inspiration in Laura’s guest bathroom before-after makeover, where she used a simple clay bell as a focal point on her vanity.
The possibilities are endless with clay bells – you can paint them, glaze them, or even add textures and embellishments. They’re a fun and affordable way to add a personal touch to any room.
You can create different effects by varying the depth of the impression.
Other Decorative Techniques
In addition to painting, glazing, and stamping, there are many other ways to decorate clay bells:* Adding embellishments:Attach beads, buttons, or other decorative elements to your clay bells using glue or wire.
Incorporating textures
Create textures by using tools like a toothpick, a fork, or a textured roller.
Using mixed media
Combine different materials like fabric, yarn, or paper to create unique and interesting designs.
Color Palettes and Design Patterns
The color palette and design patterns you choose will depend on your personal style and the occasion for which you are making your clay bells. Here are some ideas:* For a rustic look:Use earthy tones like brown, green, and beige.
For a modern look
Choose bold colors and geometric patterns.
For a whimsical look
Use bright colors and playful designs.Here are some design patterns that work well for clay bells:* Geometric patterns:Triangles, squares, and circles can be used to create simple yet elegant designs.
Floral patterns
Use stamps or freehand painting to create delicate flower motifs.
Abstract patterns
Let your creativity flow and create unique and unpredictable designs.Remember, the most important thing is to have fun and experiment! There are no rules when it comes to decorating clay bells. Let your imagination run wild and create beautiful and unique pieces.
Firing and Finishing

The final step in creating your clay bells is firing and finishing them. Firing transforms the clay into a durable, water-resistant material, and finishing adds the finishing touches to your creations.
Firing Clay Bells
Firing clay bells in a kiln is a crucial step that transforms the soft clay into a hard, durable piece. Kilns are specialized ovens designed to reach high temperatures, typically between 1000°C and 1300°C (1832°F and 2372°F). This heat causes the clay to undergo a chemical transformation called sintering, where the clay particles fuse together, forming a solid, ceramic structure.
- Preparing for Firing:Before firing, ensure your clay bells are completely dry. This is important to prevent steam from building up inside the clay during firing, which can cause cracking or explosions. Allow your clay bells to air dry for several days or use a kiln dryer for faster drying.
- Kiln Placement:When placing your clay bells in the kiln, ensure they have adequate space around them for heat circulation. Avoid stacking them directly on top of each other. Use kiln shelves or stilts to provide support and prevent them from sticking to the kiln floor.
- Firing Schedule:The firing schedule is a crucial aspect of the process. It involves gradually increasing the temperature over time to prevent thermal shock and ensure even heating. A typical firing schedule involves a slow ramp-up to the desired temperature, followed by a holding period at the peak temperature, and a controlled cool-down.
The duration of each stage depends on the type of clay used and the desired outcome.
- Firing Types:There are two main types of firing: bisque firing and glaze firing. Bisque firing is the first firing, where the clay is fired to a lower temperature, typically around 1000°C (1832°F), to harden it. Glaze firing is the second firing, where the bisque-fired clay is coated with glaze and fired again to melt the glaze and create a smooth, decorative finish.
Glazing Clay Bells
Glazing is an essential step in finishing clay bells, adding a protective layer and enhancing their aesthetic appeal. Glazes are liquid suspensions of finely ground glass-like materials that melt and fuse to the clay surface during firing.
- Types of Glazes:There are various types of glazes, each with unique properties and effects.
| Glaze Type | Description | Effects |
|---|---|---|
| Matte Glaze | Non-reflective, dull finish. | Creates a subtle, understated look. |
| Glossy Glaze | Shiny, reflective finish. | Enhances the vibrancy of colors and adds a touch of elegance. |
| Crackle Glaze | Forms a network of fine cracks on the surface. | Adds a unique texture and visual interest. |
| Crystal Glaze | Contains crystals that grow during firing. | Creates a shimmering, iridescent effect. |
- Applying Glaze:Glazes can be applied using various methods, including dipping, brushing, spraying, or pouring. The chosen method depends on the desired effect and the complexity of the design.
- Glaze Firing:Once the glaze is applied, the clay bells are fired again at a higher temperature, typically around 1200°C (2192°F), to melt the glaze and fuse it to the clay. The firing temperature and duration depend on the specific glaze recipe.
Finishing Clay Bells
After firing and glazing, your clay bells are ready for the final finishing touches. This includes cleaning, sealing, and adding hanging elements.
- Cleaning:After the glaze firing, your clay bells may have some glaze residue or dust. Use a soft brush or damp cloth to gently clean the surface.
- Sealing:To protect the glaze and prevent it from chipping or scratching, you can apply a sealant. Sealants are available in various finishes, including matte, gloss, and satin.
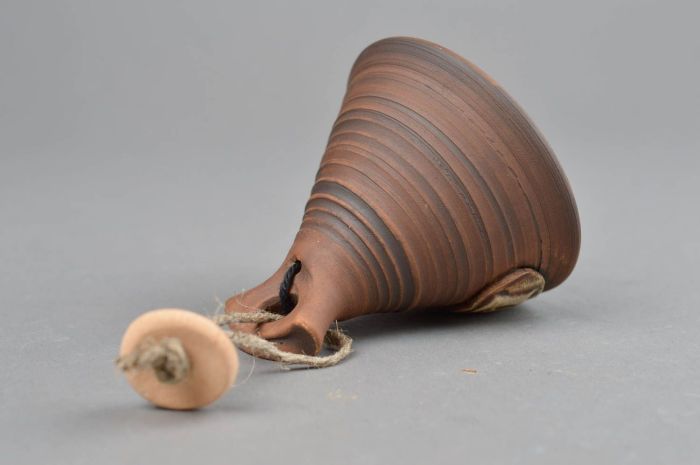
- Adding Hanging Elements:To hang your clay bells, you can attach a ribbon, twine, or a small loop of wire. Use a strong adhesive or a small hole drilled through the top of the bell for secure attachment.
Inspiration and Ideas
The beauty of crafting clay bells lies in the endless possibilities for creativity. From simple and elegant designs to intricate and whimsical creations, the only limit is your imagination. Let’s explore some inspiring examples and delve into how you can infuse your personal touch into your decorative clay bell creations.
Examples of Decorative Clay Bells
Here are some captivating examples of decorative clay bells that showcase the diverse range of styles and techniques:
| Design | Description | Materials | Techniques |
|---|---|---|---|
| Geometric Bell | A modern and minimalist design featuring clean lines and geometric shapes. | White stoneware clay, black underglaze | Hand-building techniques, using a combination of slabs and coils. |
| Floral Bell | A delicate and feminine design adorned with intricate floral patterns. | Terracotta clay, white glaze, gold leaf | Pinch pot technique, with detailed floral embellishments added using a slip or glaze. |
| Textured Bell | A rustic and organic design featuring textured surfaces created with various tools and techniques. | Red earthenware clay, brown slip, clear glaze | Impressing textures using stamps, sponges, or natural materials. |
| Animal Bell | A whimsical design featuring animal motifs, such as birds, butterflies, or animals. | White porcelain clay, colored glazes, metallic accents | Sculpting techniques, using clay to create three-dimensional animal figures. |
Incorporating Personal Touches and Themes
Infuse your decorative clay bells with your unique personality and style by incorporating personal touches and themes. Here are some ideas:
- Personalized Messages:Add meaningful quotes, initials, or dates to create a sentimental piece.
- Nature-Inspired Designs:Draw inspiration from your surroundings, incorporating elements like leaves, flowers, or animal prints.
- Seasonal Themes:Craft bells for specific seasons, using colors, patterns, and motifs associated with the time of year.
- Cultural Influences:Explore traditional patterns and motifs from different cultures to add a unique and authentic touch.
- Color Palettes:Experiment with different color combinations and glazes to create a visually stunning effect.
Troubleshooting and Tips: Decorative Clay Bell Diy

Creating clay bells can be a rewarding experience, but it can also present some challenges. Don’t worry, with a little knowledge and the right techniques, you can overcome these hurdles and create beautiful, durable bells. Here are some common issues and tips to help you avoid them:
Clay Cracks During Drying
Clay cracking during drying is a common problem that can be caused by several factors. Here are some tips to prevent cracking:
- Use the Right Clay:Choose a clay body that is designed for the type of project you are making. Earthenware clay is generally more prone to cracking than stoneware clay.
- Avoid Overworking the Clay:Overworking the clay can introduce air bubbles, which can cause cracking during drying.
- Slow Drying:Drying the clay too quickly can cause it to crack. Allow the clay to dry slowly in a cool, dry place, out of direct sunlight. Wrap the clay piece in a plastic bag to slow down the drying process if needed.
- Avoid Drafts:Placing the clay in a drafty area can cause it to dry unevenly and crack.
Clay Bell Doesn’t Ring
If your clay bell doesn’t ring, it could be due to the thickness of the clay or the shape of the bell.
- Thickness:The thickness of the clay wall of the bell affects its sound. Thicker walls produce a duller sound, while thinner walls produce a clearer, more resonant sound. Experiment with different thicknesses to find what works best for your bell.
- Shape:The shape of the bell also affects its sound. Bells with a wider opening tend to produce a lower, deeper sound, while bells with a narrower opening tend to produce a higher, brighter sound.
Clay Bell Is Not Smooth
Uneven clay surfaces can occur due to various factors.
- Uneven Application:When applying clay, make sure it is evenly distributed and smooth.
- Smoothing Techniques:Use tools like a rib or a damp sponge to smooth out any bumps or uneven areas.
- Clay Drying:As clay dries, it can shrink and become uneven. You can use a damp sponge to smooth out any minor imperfections that appear as the clay dries.