
DIY Delicate Sunburst Mirror: Crafting Ethereal Radiance for Your Walls
The sunburst mirror, a classic design motif, evokes warmth, optimism, and a touch of vintage glamour. While readily available in retail stores, crafting your own delicate sunburst mirror offers unparalleled customization, cost savings, and the immense satisfaction of creating a unique statement piece. This comprehensive guide will walk you through the entire DIY process, from selecting materials and design considerations to assembly and finishing touches, ensuring an SEO-friendly resource for anyone seeking to infuse their home decor with a touch of handmade radiance. We’ll delve into techniques for achieving a truly delicate aesthetic, moving beyond the bulky, heavy versions often found, and empower you with the knowledge to create a sophisticated and airy sunburst mirror that complements any interior style.
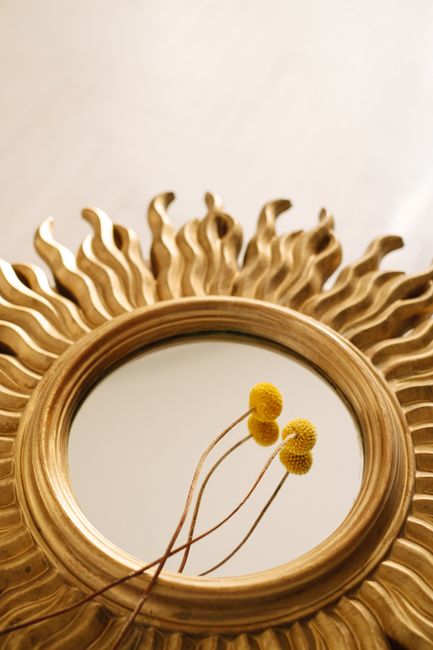
The foundation of any successful DIY project lies in careful material selection. For a delicate sunburst mirror, the core component is a central mirror. Opt for a small to medium-sized circular mirror, typically ranging from 6 to 12 inches in diameter. Mirrors with bevelled edges can add an extra layer of sophistication, reflecting light beautifully. Consider antique or salvaged mirrors for a truly unique and character-filled piece. Alternatively, craft stores and online retailers offer a wide array of plain mirrors that can be easily adapted. The backing of the mirror is crucial for attachment. Ensure it has a flat, smooth surface. If it has existing hanging hardware, consider its strength and how it will integrate with your chosen sunburst rays. If the mirror has a distressed or uneven backing, you may need to add a thin layer of sturdy cardboard or wood to create a stable base for attaching the rays.
The true artistry of the delicate sunburst mirror lies in its radiating elements, the "rays." To achieve a delicate look, avoid thick, heavy materials. Thin, pliable, and lightweight options are paramount. Wooden dowels are a popular and versatile choice. Look for dowels with smaller diameters, such as 1/8 inch, 3/16 inch, or 1/4 inch. You can purchase these in various lengths and cut them to size. Their natural wood grain offers warmth and can be easily painted or stained. Thin metal rods or wires like brass wire, copper wire, or even floral wire can create an elegant and modern aesthetic. Their inherent malleability allows for intricate shaping and bending. Craft sticks or popsicle sticks, particularly the slimmer varieties, can be cut and layered to create a softer, more organic ray effect. Feathers, especially ostrich or peacock feathers, are an excellent choice for a truly ethereal and bohemian sunburst mirror. Their lightweight nature and natural texture add unparalleled delicacy. Seed beads, small rhinestones, or glass beads strung onto thin wire or thread can create shimmering, crystalline rays. The key is to select components that are individually light and when clustered together, still maintain an airy and unburdened appearance.
Beyond the primary ray materials, consider supplementary elements that enhance the delicate aesthetic. Thin metallic spray paints in gold, brass, rose gold, or even a soft silver can elevate the look. Rub ‘n Buff is another fantastic option for achieving a realistic metallic patina without the weight of solid metal. Acrylic paints in muted tones, pastels, or even a pearlescent finish can also be used to achieve a softer, more painterly effect. For an organic touch, consider natural twine, hemp cord, or thin jute. These can be wrapped around dowels or metal rods to add texture and a rustic charm. Small embellishments like tiny pearls, seed beads, or miniature charms can be strategically glued to the tips of the rays for added sparkle and detail.
Design conceptualization is where your personal style truly shines. Before you begin cutting and gluing, sketch out your ideas. Consider the overall shape and proportion of your sunburst. Will the rays be uniform in length and thickness, or will you incorporate variations for a more dynamic and asymmetrical design? The number of rays is also a critical decision. Too few can look sparse, while too many might feel cluttered. Aim for a balance that creates visual interest without overwhelming the central mirror. Think about the density of the rays. A delicate sunburst often features more numerous, thinner rays spaced slightly apart rather than a few thick, densely packed ones. This spacing allows light to pass through and creates a sense of openness.
The angle at which the rays radiate from the center is another important design element. A slight upward or outward curve can add a sense of movement and dynamism. Experiment with bending metal rods or subtly angling wooden dowels to achieve the desired effect. The length of the rays relative to the mirror size is also crucial. Longer, thinner rays extending far from the mirror will create a more dramatic and expansive sunburst, while shorter, more densely packed rays will create a more concentrated and intimate feel. For a truly delicate look, consider a design where the rays are not perfectly straight but have a gentle, organic curvature. This mimicry of natural forms adds a touch of softness and sophistication.
Let’s move on to the practical construction process. You’ll need a few essential tools. A strong adhesive is paramount. Hot glue guns are excellent for quickly securing wooden dowels and craft sticks. For metal rods or more delicate embellishments, a super glue or a strong craft glue like E6000 will provide a more secure bond. A sharp craft knife or box cutter is essential for precise cutting of dowels, craft sticks, and any other materials. Wire cutters are a must if you’re working with metal wire. Sandpaper (fine-grit) will be useful for smoothing any rough edges on wooden components. A ruler or measuring tape will ensure uniformity if desired. A pencil for marking. If you plan on painting or staining your rays, you’ll also need paintbrushes and your chosen finishing products.
The first step in assembly is preparing your rays. If you’re using wooden dowels, cut them to your desired lengths and quantities. Sand down any rough edges to ensure a smooth finish. If you’re using metal rods, cut them to size and gently bend them to your desired angles. If you’re using feathers, ensure they are clean and ready for attachment. For bead-strung rays, pre-string your beads onto the chosen wire or thread, leaving a sufficient length for attachment.
Now, let’s tackle the attachment of the rays to the mirror. This is where the adhesive choice is critical. For a clean, professional finish, it’s often best to attach the rays to a backing board that is slightly larger than the mirror itself. You can use a sturdy piece of cardboard, thin plywood, or even a pre-made mirror backing board. This provides a more robust surface for gluing and also makes it easier to attach hanging hardware later.
Begin by arranging your prepared rays around the central mirror, experimenting with different layouts and spacing until you achieve your desired design. Once you’re satisfied with the arrangement, start adhering them. For wooden dowels or craft sticks, apply a generous bead of hot glue to the end that will attach to the backing board. Press firmly into place and hold until the glue sets. Work your way around the mirror, ensuring consistent spacing and angle.
If you’re using metal rods, a strong craft glue like E6000 is recommended. Apply a thin, even layer to the rod and press it onto the backing board. For bead-strung rays, secure the end of the wire or thread to the backing board with a dab of glue, ensuring it’s firmly attached.
When attaching feathers, you can glue the quill directly to the backing board. For a more secure and layered look, you might consider adding a small dab of glue to the backing board and then pressing the feather into it, ensuring the quill is firmly embedded.
If your design incorporates variations in ray length or thickness, work from the inner rays outwards or vice-versa to ensure a cohesive and aesthetically pleasing structure. Pay close attention to the symmetry (or intentional asymmetry) of your design as you progress.
Once all the rays are securely attached to the backing board, it’s time for finishing touches. If you’ve used wooden dowels or craft sticks and want to paint them, now is the time. Apply thin, even coats of your chosen paint. Metallic spray paints are ideal for a glamorous look. For a softer, more natural feel, consider muted acrylics or stains. Allow each coat to dry completely before applying the next. If you’re using Rub ‘n Buff, apply it sparingly with a soft cloth or gloved finger and buff to a subtle shine. For metal rods, you can also spray paint them or leave them in their natural metallic state for a modern appeal.
Embellishments can be added at this stage. Carefully glue tiny pearls or rhinestones to the tips of the rays for a touch of sparkle. If you’re using twine or cord, wrap it around sections of your rays for added texture.
The final step is attaching the mirror to the ray-covered backing board. Ensure the backing board is clean and dry. Apply a strong adhesive to the back of your mirror, ensuring even coverage. Carefully center the mirror onto the backing board and press firmly. Allow ample time for the adhesive to cure completely before attempting to hang the mirror.
Hanging hardware is crucial for a secure and safe installation. The weight of your mirror and its construction will dictate the type of hardware needed. For lighter mirrors made with dowels and craft sticks, a sturdy picture hanging wire and D-rings attached to the backing board should suffice. Ensure the D-rings are securely screwed into the backing material. For heavier mirrors, or those incorporating metal elements, consider heavier-duty hanging hardware like French cleats, which distribute weight more effectively. Always ensure your wall anchors are appropriate for the weight of your finished mirror and the type of wall you’re mounting it on.
When positioning your delicate sunburst mirror, consider how it will interact with natural and artificial light. The reflective quality of the mirror and the radiating rays will cast beautiful shadows and highlights, adding depth and dimension to your room. Place it strategically to catch sunlight or to reflect light from lamps, further enhancing its radiant effect. A delicate sunburst mirror can be a stunning focal point above a fireplace, a console table, or even in an entryway to create a welcoming and elegant first impression. Its versatility allows it to complement various decor styles, from bohemian and mid-century modern to more traditional and eclectic interiors. By following these steps, you can create a bespoke piece of art that not only adorns your walls but also tells a story of creativity and personal style.
