DIY faux stained glass bottles offer a captivating way to transform ordinary glass into stunning decorative pieces. This project, perfect for both beginners and experienced crafters, allows you to unleash your creativity and add a touch of artistic flair to your home decor.
The beauty of this technique lies in its versatility, enabling you to work with various bottle shapes, sizes, and styles, creating unique pieces that reflect your personal taste.
Imagine transforming a simple wine bottle into a vibrant centerpiece or a clear glass jar into a mesmerizing candle holder. With just a few materials and a bit of imagination, you can create beautiful faux stained glass masterpieces that add a touch of whimsy and elegance to any space.
Materials and Tools: Diy Faux Stained Glass Bottles
Creating faux stained glass bottles is a fun and rewarding project that allows you to transform ordinary bottles into stunning decorative pieces. This project requires a few essential materials and tools that are readily available.
Bottles
The foundation of your faux stained glass project is the bottles themselves. You can use any type of glass bottle, from wine bottles to liquor bottles to even jars.
- Clear Glass Bottles:These provide a blank canvas for your creativity and allow the colors and patterns to shine through.
- Colored Glass Bottles:Adding a touch of color to your project, colored bottles can create unique effects when layered with paints.
Paints
The heart of the project lies in the paints you choose, as they bring your designs to life.
- Acrylic Paints:Acrylic paints are a popular choice for this project due to their versatility and fast drying time. They come in a wide array of colors and can be easily mixed to create custom shades.
- Glass Paints:Specifically designed for glass surfaces, these paints offer excellent adhesion and durability. They are available in both opaque and translucent finishes, allowing you to create different effects.
- Metallic Paints:Adding a touch of sparkle and glamour, metallic paints can create stunning accents and highlights.
Adhesive
To secure your designs and prevent them from peeling or chipping, a strong adhesive is essential.
- Mod Podge:A versatile adhesive and sealant, Mod Podge is commonly used for decoupage and other craft projects. It provides a clear, glossy finish and can be applied in multiple layers for added durability.
- Epoxy Resin:For a more durable and waterproof finish, epoxy resin is a great option. It cures to a hard, clear finish that protects your designs from wear and tear.
Tools
The right tools will make your project easier and ensure a professional finish.
- Paintbrushes:Choose a variety of sizes and shapes to create different effects. For example, a fine-tipped brush is ideal for intricate details, while a wide brush is perfect for covering large areas.
- Scissors:Used for cutting out patterns from paper or fabric.
- Masking Tape:Helpful for creating clean lines and defining shapes.
- Gloves:Protect your hands from paint and adhesive.
- Protective Surface:A newspaper-covered table or workbench is a good choice to protect your work area from spills and drips.
Painting Techniques
The real magic of faux stained glass lies in the painting techniques. There are a variety of methods you can use to achieve the desired effect, each with its own unique look and feel. Let’s dive into some of the most popular techniques and explore how to apply paint to your bottles for a stunning result.
Creating DIY faux stained glass bottles is a fun way to add a touch of whimsy to your home decor. The process is surprisingly simple, using just a few materials and a bit of patience. While I’m working on my stained glass project, I can’t resist a snack break with some crispy brown sugar baked fries.
The sweet and salty combination is the perfect complement to the colorful glass, and the aroma of the baking fries fills the air with a cozy vibe. Once the fries are gone, it’s back to the stained glass, where I can create a unique piece of art that will brighten up my space for years to come.
Applying Paint to the Bottle
The key to a successful faux stained glass project is applying the paint evenly and smoothly. Here’s a step-by-step guide:
- Prepare the Bottle:Before you start painting, clean your bottle thoroughly with soap and water. Ensure it’s completely dry before moving on. This will help the paint adhere properly.
- Start with a Base Coat:Apply a thin, even layer of your chosen base color to the entire bottle. This layer will provide a solid foundation for the rest of your design. You can use acrylic paint or even a colored primer for this step.
I’m so excited about the DIY faux stained glass bottles I’m making for our wedding centerpieces! I’m trying to keep things simple and elegant, just like our wedding menu, which you can check out here. The bottles will be filled with colorful tissue paper and topped with a single, beautiful flower, creating a whimsical and festive atmosphere for our special day.
- Apply Paint to the Bottle:You can use various methods to apply paint to the bottle, including brushes, sponges, and even your fingers. For intricate designs, a thin brush is ideal. For larger areas, a sponge or your fingers can create a more textured effect.
Creating DIY faux stained glass bottles is a fun and rewarding project, especially when you want to add a touch of whimsy to your home decor. The process is surprisingly simple, and the results are stunning. While working on my latest stained glass bottle project, I realized I was craving a hearty and flavorful meal, so I whipped up a delicious meaty mushroom lasagna vegetarian friendly recipe.
The lasagna was the perfect complement to my creative endeavors, and it provided a much-needed energy boost for my next stained glass project!
- Layering and Blending:To achieve a truly beautiful stained glass look, you can layer different colors of paint on top of each other. Start with the lightest colors and gradually add darker shades. You can use a sponge or a brush to blend the colors together for a smooth transition.
You can also create sharp edges by using painter’s tape to mask off sections of the bottle.
- Experiment with Techniques:Don’t be afraid to experiment with different painting techniques. Try using a dry brush technique to create a more textured effect. You can also use a sponge to dab on paint for a more random, organic look.
Paint Color Combinations
The choice of paint colors is crucial for achieving the desired stained glass effect. Here are some examples of color combinations and their effects:
- Warm Colors:Using warm colors like reds, oranges, and yellows can create a vibrant and energetic feel. This combination is great for bottles that will be displayed in a sunny location.
- Cool Colors:Cool colors like blues, greens, and purples can create a calming and serene atmosphere. This combination is perfect for bottles that will be displayed in a quiet or relaxing space.
- Contrasting Colors:Using contrasting colors like black and white, or red and green, can create a dramatic and eye-catching effect. This combination is perfect for bottles that you want to make a statement with.
- Metallic Colors:Metallic colors like gold, silver, and copper can add a touch of elegance and sophistication to your faux stained glass bottles. These colors are perfect for creating a luxurious look.
Tips for Success
- Work in Thin Layers:Applying paint in thin layers will help to prevent it from cracking or peeling. This will also allow the colors to blend more seamlessly.
- Let Each Layer Dry Completely:Before applying a new layer of paint, allow the previous layer to dry completely. This will help to prevent the colors from muddying.
- Use a Clear Sealer:Once your faux stained glass design is complete, seal it with a clear acrylic sealer. This will protect the paint from scratches and chips and give it a glossy finish.
Adding Details and Finishes
The base of your faux stained glass bottles is now complete, but the details and finishes are what truly bring the project to life. Adding accents, embellishments, and protective coatings elevates the look of your bottles and adds a unique touch to your craft.
Adding Embellishments
Adding embellishments to your faux stained glass bottles adds a touch of sparkle and texture. You can use a variety of materials like glitter, beads, or metallic accents to enhance the look of your project.
- Glitter:Apply a thin layer of glue to the areas you want to embellish with glitter. Sprinkle glitter over the glue and let it dry completely. You can use different colors of glitter to create interesting patterns or designs.
- Beads:Use glue to attach beads to the surface of the bottle. Choose beads in various sizes, shapes, and colors to complement the stained glass design. You can even use beads with different textures for added dimension.
- Metallic Accents:Apply metallic paint to create highlights or accents on the bottle. Use a fine brush to create intricate designs or simply apply a thin coat of paint for a subtle shimmer.
Sealing and Protecting
After adding embellishments, it’s crucial to seal the bottle to protect the faux stained glass design and the embellishments. This step ensures the project lasts longer and retains its vibrant colors.
- Mod Podge:Apply a thin layer of Mod Podge over the entire surface of the bottle. This will seal the paint and protect it from scratches and fading. Allow it to dry completely before handling.
- Acrylic Varnish:Use a brush to apply a layer of acrylic varnish over the bottle. Acrylic varnish is a durable sealant that protects the paint and embellishments. It also adds a glossy finish.
- Polyurethane:For added durability, consider using a polyurethane sealant. Polyurethane is a strong sealant that protects the surface from water and other elements.
Creative Variations

The beauty of faux stained glass lies in its endless possibilities for personalization. You can transform ordinary bottles into unique works of art by incorporating different themes, colors, and textures. Let your creativity flow and explore the diverse ways to make your faux stained glass bottles truly stand out.
Themes and Color Palettes
Choosing a theme can provide a starting point for your design. You can create a cohesive look by selecting colors that complement the theme. For example, a nautical theme could use blues, greens, and whites, while a garden theme might incorporate vibrant greens, yellows, and purples.
- Seasonal themes: Create bottles for each season, incorporating colors and motifs associated with the time of year. For example, a winter bottle could use silver, white, and blue, while a spring bottle could feature pastel pinks, yellows, and greens.
- Holiday themes: Celebrate holidays with themed bottles. A Christmas bottle could feature red, green, and gold, while a Halloween bottle could use orange, black, and purple.
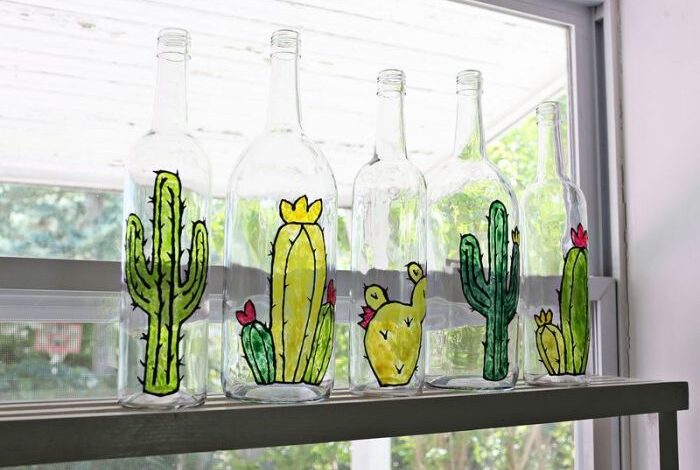
- Nature themes: Draw inspiration from nature with bottles depicting landscapes, flowers, or animals. You can use earthy tones for landscapes or bright colors for flowers and animals.
- Abstract designs: For a more modern look, create abstract patterns using various colors and textures.
Incorporating Textures, Diy faux stained glass bottles
Adding textures to your faux stained glass bottles can add depth and visual interest. You can create textured effects by using different types of paint, such as crackle paint, glitter paint, or textured acrylic paint.
- Crackle paint: Creates a vintage look with a network of fine cracks.
- Glitter paint: Adds sparkle and shine, perfect for festive occasions.
- Textured acrylic paint: Provides a rough or bumpy surface, creating a tactile element.
- Sand: Mix sand with glue and apply it to the bottle to create a textured surface.
- Collage: Add pieces of fabric, paper, or other materials to the bottle for a unique texture.
Creative Uses for Faux Stained Glass Bottles
The finished bottles can be used for various purposes, adding a touch of handmade charm to your home decor.
- Vases: Fill them with fresh or dried flowers for a vibrant centerpiece.
- Candle holders: Place a tea light or votive candle inside for a warm and inviting glow.
- Decorative accents: Display them on shelves, tables, or windowsills for a splash of color and personality.
- Gift ideas: They make thoughtful and unique gifts for friends and family.