DIY pocket embroidery shirts take center stage, inviting you to unleash your creativity and transform plain garments into unique expressions of your personality. This craft is a delightful fusion of needlework and fashion, offering a chance to personalize your wardrobe with intricate designs that reflect your individual style.
Embroidered pockets add a touch of whimsy and sophistication to any shirt, whether it’s a casual tee or a dressy button-down. From delicate floral motifs to playful animal patterns, the possibilities are endless. This guide will walk you through the steps, from selecting the right materials to mastering basic embroidery techniques, so you can create your own personalized pocket masterpieces.
Introduction to DIY Pocket Embroidery Shirts
There’s a certain charm to wearing a shirt that reflects your unique personality, and DIY pocket embroidery offers a fantastic way to achieve this. Whether you’re a seasoned crafter or a beginner, adding a touch of personalized embroidery to your wardrobe is a rewarding and creative experience.
Embroidering your own shirts allows you to express your individual style and create pieces that are truly one-of-a-kind. It’s a fantastic way to add a personal touch to your wardrobe, showcasing your creativity and artistic flair.
Different Styles of Embroidery
Embroidery comes in a variety of styles, each with its own unique aesthetic. Here are some examples:
- Freehand Embroidery:This style involves using a needle and thread to create free-flowing designs without the aid of a pattern. It’s a great option for those who enjoy a more organic and spontaneous approach to embroidery.
- Cross-Stitch:This classic style involves creating a grid of “x” stitches to form patterns and images. Cross-stitch is known for its intricate designs and geometric precision.
- Machine Embroidery:This style uses a specialized embroidery machine to create intricate and detailed designs. Machine embroidery is ideal for large-scale projects and intricate patterns.
Choosing the Right Shirt and Embroidery Supplies
Embroidering on a shirt can be a fun and rewarding project. Choosing the right shirt and embroidery supplies will make the process easier and ensure a beautiful result. Here’s what you need to know.
Choosing the Right Shirt
The best fabric for embroidery is one that is tightly woven and has a smooth surface. This will allow the needle to move easily through the fabric and create clean stitches. Cotton and linen are both excellent choices for embroidery shirts.
I’ve been loving adding personal touches to my wardrobe lately, like with my DIY pocket embroidery shirt. It’s so satisfying to see my designs come to life! And speaking of crafting, I recently discovered this awesome easy rope coaster DIY that I’m definitely going to try.
Maybe I’ll even embroider a little design on them to match my shirt!
Cotton is a popular choice because it is affordable, easy to work with, and comes in a wide variety of colors. Linen is a more luxurious fabric that is known for its durability and breathability. Linen shirts are typically more expensive than cotton shirts, but they will last longer and look more elegant.
Here are some tips for choosing the right shirt:
- Consider the weight of the fabric.A lightweight fabric will be easier to embroider on, but it may not be as durable. A heavier fabric will be more difficult to embroider on, but it will last longer.
- Look for a shirt with a smooth surface.This will make it easier to create clean stitches.
- Choose a shirt that is the right size for you.This will ensure that the embroidery fits well on the shirt.
Essential Embroidery Supplies
Here is a list of essential embroidery supplies:
- Embroidery needles:These needles are specifically designed for embroidery and have a sharp point and a large eye. They come in different sizes, so choose the right size for your project.
- Embroidery floss:This is a type of thread that is specifically designed for embroidery. It comes in a wide variety of colors and can be used to create different effects.
- Embroidery hoop:This is a circular frame that holds the fabric taut while you are embroidering. This helps to prevent the fabric from puckering and makes it easier to create even stitches.
- Scissors:You will need a pair of sharp scissors to cut the fabric and floss.
Choosing Embroidery Floss Colors
When choosing embroidery floss colors, consider the color of the shirt and the design you want to create. You can use contrasting colors to make your design stand out or use similar colors to create a subtle effect.
I’m totally digging the DIY pocket embroidery shirt trend right now. It’s such a fun way to personalize your wardrobe and add a touch of handmade charm. Speaking of charm, you have to check out elsies main bedroom tour , it’s seriously inspiring! The way she’s styled her space with cozy textures and vintage finds is amazing.
And then, I can totally picture a cute embroidered shirt hanging on her vintage clothes rack! Back to the embroidery, I’m thinking of adding a floral design to my denim jacket next.
- Consider the color of the shirt.If you are using a light-colored shirt, you can use any color floss. If you are using a dark-colored shirt, you may want to choose a lighter color floss so that it will stand out.
- Think about the design you want to create.If you are creating a simple design, you can use one or two colors of floss. If you are creating a more complex design, you may want to use multiple colors of floss.
- Experiment with different colors.There is no right or wrong way to choose embroidery floss colors. Experiment with different colors until you find a combination that you like.
Designing Your Embroidery Pattern
Embroidery patterns are the heart of your DIY pocket design. They add personality and visual appeal to your shirt. Taking the time to sketch your design is crucial for creating a unique and satisfying project.
Sketching Your Design
Before you start stitching, it’s important to have a clear idea of what you want to create. This is where sketching comes in. Grab a pencil and paper, and start brainstorming. Consider the shape and size of your pocket, the overall style of your shirt, and the message you want to convey.
You can even try tracing a simple object like a flower or a heart to use as inspiration.
Examples of Simple Embroidery Patterns
There are endless possibilities when it comes to embroidery patterns, but for beginners, it’s best to start with something simple.
- Basic Geometric Shapes:Squares, circles, triangles, and stars are easy to stitch and create a modern look. You can combine them to form more complex patterns.
- Simple Floral Motifs:Tiny flowers with a few petals are a classic choice for embroidery. You can use different colors and stitches to create a variety of looks.
- Lettering:A single word or phrase can add a personal touch to your pocket. Use a simple font for easy stitching.
Transferring Your Design
Once you’ve finalized your sketch, you need to transfer it onto your fabric. There are a few methods you can use:
- Tracing Paper:Trace your design onto tracing paper and then use a pencil to transfer it to your fabric. Make sure to use a light touch so that the lines aren’t too dark.
- Water-Soluble Pen:Draw your design directly onto the fabric using a water-soluble pen. This method is convenient, but be sure to use a pen that washes away completely.
- Embroidery Hoop:Secure your fabric in an embroidery hoop. Use a pencil or a water-soluble pen to draw your design directly onto the fabric within the hoop.
Creating a Visually Appealing Pocket Design
A visually appealing pocket design is all about balance and harmony. Here are a few tips to keep in mind:
- Consider the Scale:Make sure your design is proportional to the size of your pocket. A large, intricate pattern on a small pocket can look overwhelming.
- Use Color Strategically:Choose colors that complement the color of your shirt and your overall style. For example, a vibrant floral design on a neutral-colored shirt can add a pop of color.
- Play with Texture:Experiment with different embroidery stitches to create interesting textures. For example, a simple satin stitch can create a smooth surface, while a French knot can add a touch of dimension.
Embroidery Techniques for Beginners
Embroidery is a beautiful and versatile craft that can be enjoyed by people of all ages and skill levels. Whether you’re a complete beginner or have some experience, learning the basic embroidery stitches is essential for creating stunning designs.
I’m finally tackling that pile of old shirts, giving them a new life with some DIY pocket embroidery. It’s amazing how a little thread and a bit of creativity can transform a piece of clothing. And speaking of transformation, I’ve been thinking about data security lately, especially with all the sensitive information we handle these days.
I’m really interested in Netskope data loss prevention and how it can help keep our data safe. Back to my embroidery project, I’m thinking of adding a little pocket to each shirt, perfect for carrying a few essentials, and maybe even a small embroidery hoop for on-the-go crafting.
Back Stitch, Diy pocket embroidery shirt
The back stitch is a strong and versatile stitch that is perfect for outlining shapes and creating straight lines. It is also a good choice for lettering.
- Bring the needle up through the fabric at point 1.
- Insert the needle down at point 2, a small distance away from point 1.
- Bring the needle up at point 3, directly behind point 2.
- Insert the needle down at point 4, a small distance away from point 3.
- Continue stitching in this way, always bringing the needle up directly behind the previous stitch.
Satin Stitch
The satin stitch is a smooth and elegant stitch that is often used to fill in areas of embroidery. It is a good choice for creating leaves, petals, and other curved shapes.
- Bring the needle up through the fabric at point 1.
- Insert the needle down at point 2, a small distance away from point 1.
- Bring the needle up at point 3, directly behind point 2.
- Insert the needle down at point 4, a small distance away from point 3.
- Continue stitching in this way, keeping the stitches close together and parallel to each other.
French Knot
The French knot is a decorative stitch that is often used to add texture and dimension to embroidery. It is a good choice for creating flowers, stars, and other small details.
- Bring the needle up through the fabric at point 1.
- Wrap the thread around the needle 2-3 times, holding the thread against the fabric with your thumb.
- Insert the needle down through the fabric at point 1, close to the initial stitch.
- Pull the thread through, tightening the knot against the fabric.
Creating Different Textures and Effects
Embroidery stitches can be used to create a wide variety of textures and effects. For example, you can use the back stitch to create a crisp, clean line, or you can use the satin stitch to create a smooth, flowing shape.
By experimenting with different stitches and techniques, you can create unique and beautiful embroidery designs.
Tips for Creating Clean and Even Stitches
- Use a hoop to keep your fabric taut while you stitch. This will help you to create even stitches and prevent your fabric from puckering.
- Keep your stitches close together and parallel to each other. This will create a smooth and consistent look.
- Use a sharp needle and a good quality embroidery thread. This will help you to create clean and even stitches.
- Practice, practice, practice! The more you practice, the better you will become at embroidery.
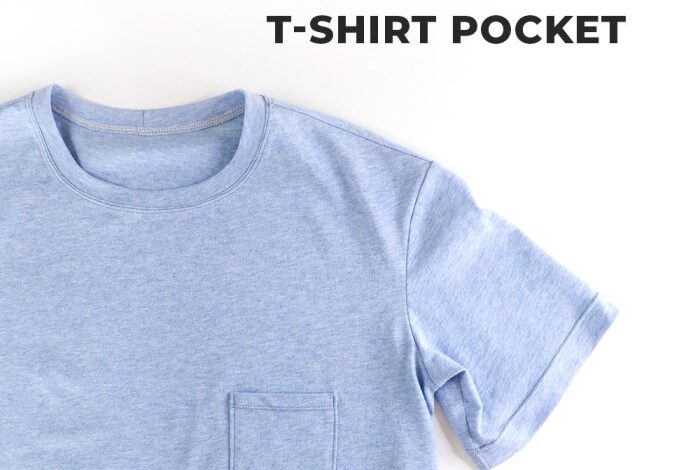
Adding a Pocket to Your Shirt

Now that you’ve chosen your shirt and designed your embroidery pattern, it’s time to add a pocket to complete your DIY project. Adding a pocket not only provides a functional element for storing small items but also adds a stylish touch to your shirt.
Pocket Styles
Choosing the right pocket style depends on your design preference and the overall look you want to achieve. Here are two popular pocket styles:
- Patch Pocket: This is the simplest and most common type of pocket. It’s a rectangular piece of fabric that is sewn directly onto the shirt front. Patch pockets are versatile and can be customized with different shapes, sizes, and embellishments.
- Welt Pocket: A welt pocket is a more sophisticated option that involves a narrow flap sewn onto the shirt front, concealing the pocket opening. Welt pockets create a clean and tailored look.
Cutting and Sewing a Pocket
- Materials: You’ll need fabric for the pocket, thread matching the shirt and pocket fabric, scissors, pins, and a sewing machine.
- Cutting: For a patch pocket, cut two identical rectangular pieces of fabric for the front and back of the pocket. For a welt pocket, you’ll need additional pieces for the flap and welt.
- Sewing:
- Patch Pocket: Sew the two pocket pieces right sides together, leaving the top open for turning. Turn the pocket right side out and press. Pin the pocket to the shirt front, aligning the top edge with the desired position.
Sew the pocket to the shirt using a straight stitch, reinforcing the corners for durability.
- Welt Pocket: Sew the welt to the shirt front, creating a narrow opening for the pocket. Sew the flap to the welt, then attach the pocket to the back of the flap. Finish by sewing the pocket opening closed.
- Patch Pocket: Sew the two pocket pieces right sides together, leaving the top open for turning. Turn the pocket right side out and press. Pin the pocket to the shirt front, aligning the top edge with the desired position.
Attaching the Pocket to the Shirt
Once you’ve sewn the pocket, it’s time to attach it to your shirt.
- Position: Determine the placement of the pocket on your shirt. Consider the balance and overall design. For a standard patch pocket, the top edge is typically placed about 6-8 inches below the neckline, centered on the shirt front.
- Pinning: Carefully pin the pocket to the shirt, ensuring it’s straight and even. Use plenty of pins to hold the pocket in place while sewing.
- Sewing: Sew the pocket to the shirt using a straight stitch. Reinforce the corners by backstitching at the beginning and end of each seam.
Finishing Touches
- Pressing: After sewing, press the seams flat to create a professional finish.
- Edges: For a clean look, finish the raw edges of the pocket with a serger or zig-zag stitch to prevent fraying.
- Embellishments: Add decorative touches to your pocket, such as buttons, ribbons, or appliqués, to enhance the design.
Finishing Touches
Your embroidery is complete, and your pocket is sewn on! Now it’s time to give your DIY shirt the finishing touches that will make it look professional and polished. These final steps are crucial for ensuring your hard work shines.
Pressing Your Embroidery
Pressing your embroidery is essential for achieving a crisp, clean finish. Heat helps to set the stitches and flatten the fabric, making your embroidery look its best. Use a pressing cloth to protect your embroidery from direct heat and to prevent shine.
For delicate fabrics, use a low heat setting.
Pressing helps to set the stitches and flatten the fabric, making your embroidery look its best.
Washing and Caring for Your Embroidered Shirt
To keep your embroidered shirt looking its best, follow these washing and care instructions:
- Turn your shirt inside out before washing.
- Wash your shirt in cold water on a gentle cycle.
- Use a mild detergent and avoid bleach.
- Line dry your shirt or tumble dry on low heat.
- Iron your shirt inside out on a low heat setting, avoiding the embroidery area.
Following these instructions will help preserve the vibrancy of your embroidery and prevent damage to the fabric.
Showcasing Your DIY Creations
Your embroidered shirt is a unique piece of art that deserves to be shown off! Here are some tips for showcasing your creations:
- Wear your shirt with pride!
- Share photos of your shirt on social media, using relevant hashtags like #DIYfashion, #embroideryart, and #handmadewithlove.
- Consider entering your shirt in a local craft fair or competition.
- Gift your shirt to a friend or family member, adding a personal touch to your present.
Embroidery Techniques and Effects
Here is a table that showcases different embroidery techniques and their effects: